
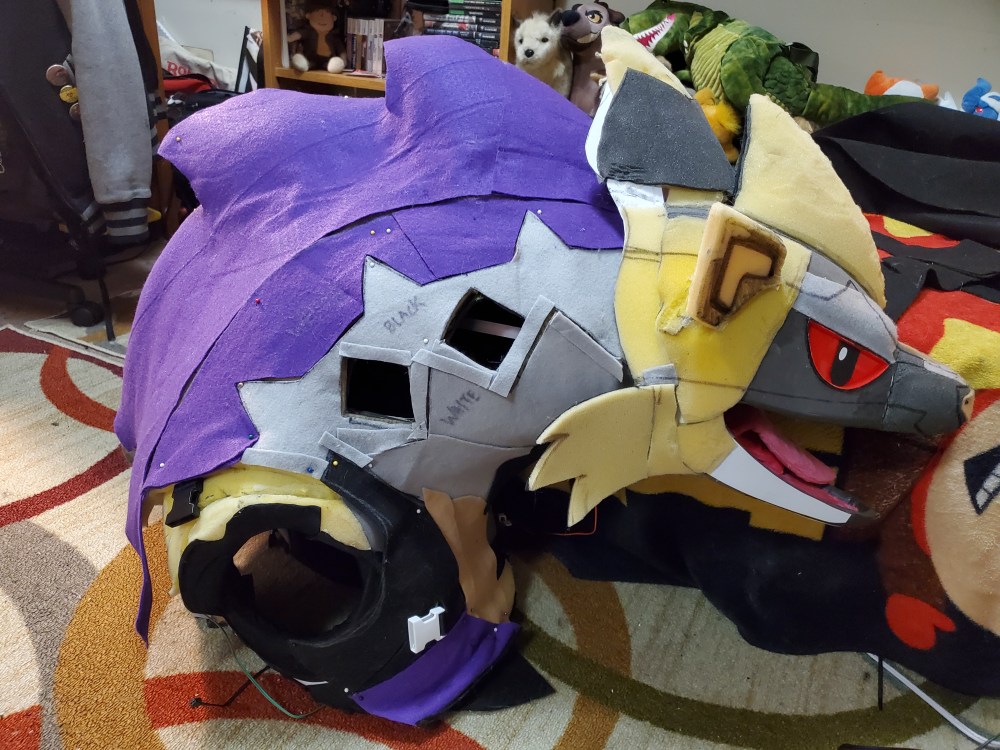
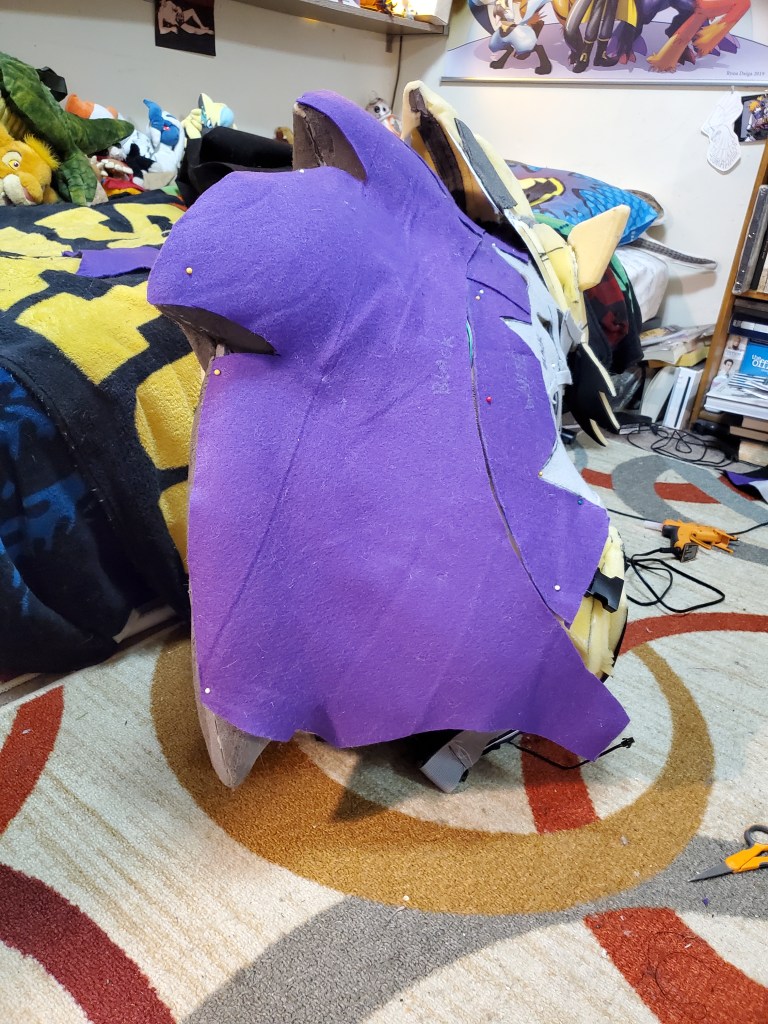
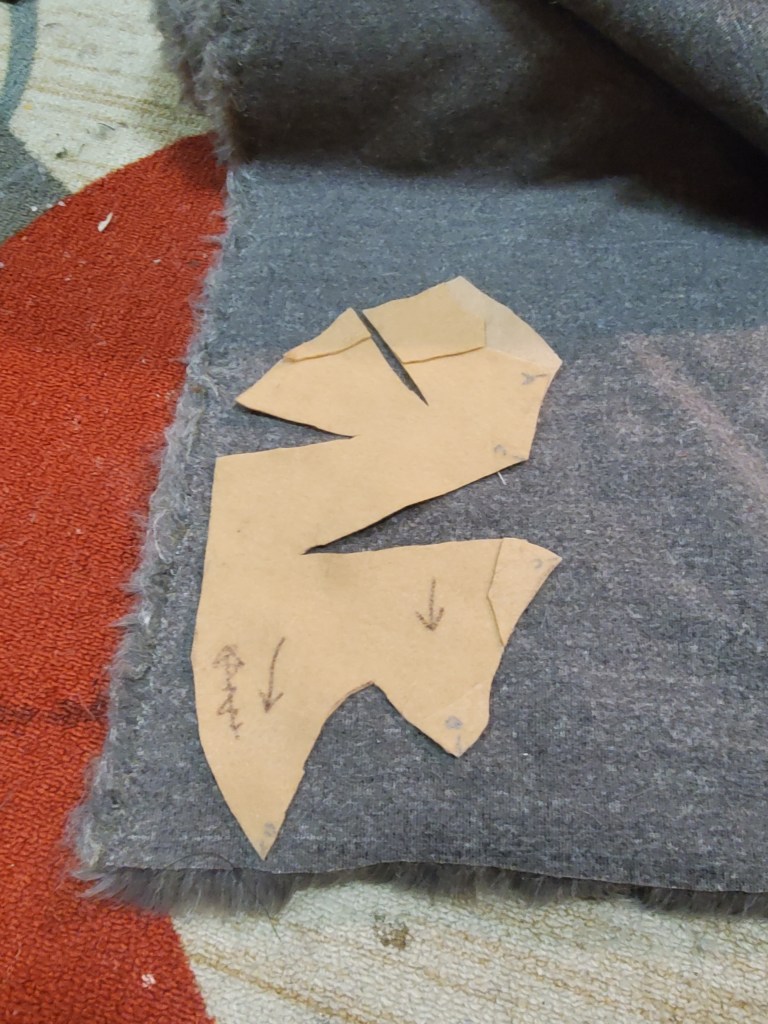
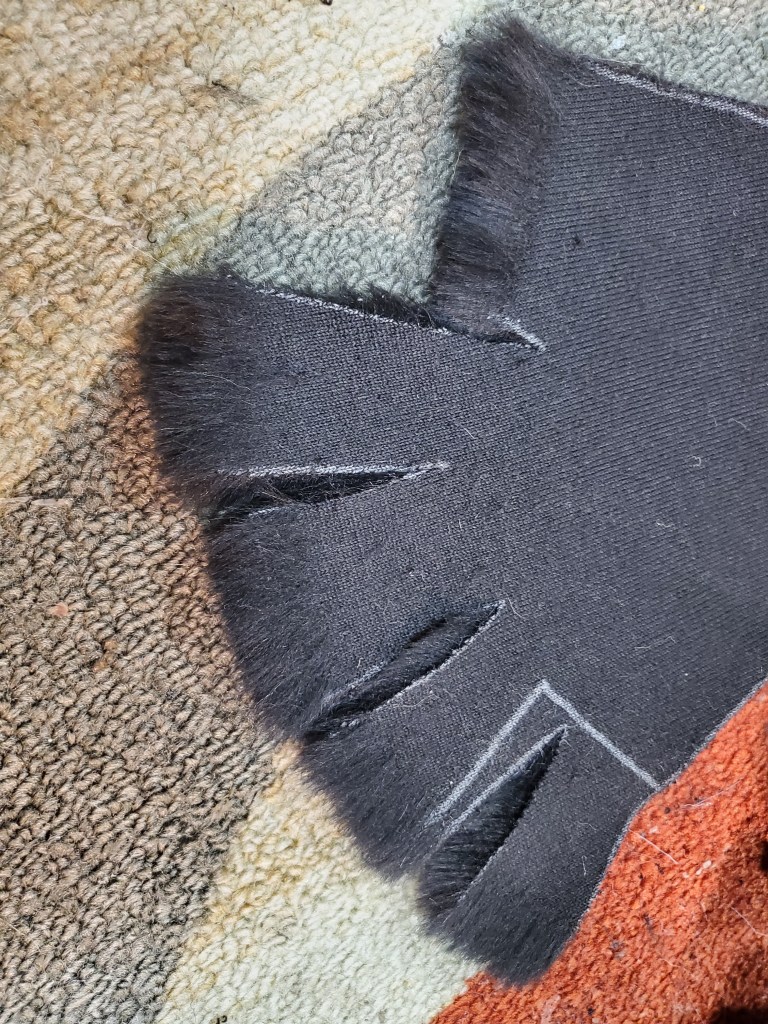
Patterning
The way I pattern costumes for adding fur or skin is quite different than most use (which is the duct tape method). I use felt to make a sort of cover for whatever piece I’m working on, cut as needed (for darts) and then trace that pattern onto the fur backing. This may make more sense with pictures:


Welcome back to another log post for Vandal! Here I’ll be going over first how I constructed his claws for both his feet and hands, and then how I made the feet and hands themselves using foam. I’ve also decided on a new format in which I will bold specified materials to help point out important notes, or skimming for materials ideas, and I added headers to help organize the post. Enjoy!
Note: I actually swapped between working on the feet and hands, and the vest (the next post), but for the sake of having an organized log, I’m writing these next two posts as if I just worked on them straight through to finish, when in reality, I got a little done on the hands, swapped to the vest for a while, then swapped to the feet, then back to the hands, etc. I just preferred these logs to be more of a work summary than an actual daily or weekly work log, which would get really tedious.
The Claws
The claws were a project in and of themselves. A lot of work, but a lot of nice payoff too. They were a massive undertaking because of what I expect them to need to hold up to, especially on the feet. I knew I didn’t want them to be resin, which isn’t really abrasion resistant, and that would be a pain to work with, as well as Sculpey, and not very durable, so EVA foam was what I went with.
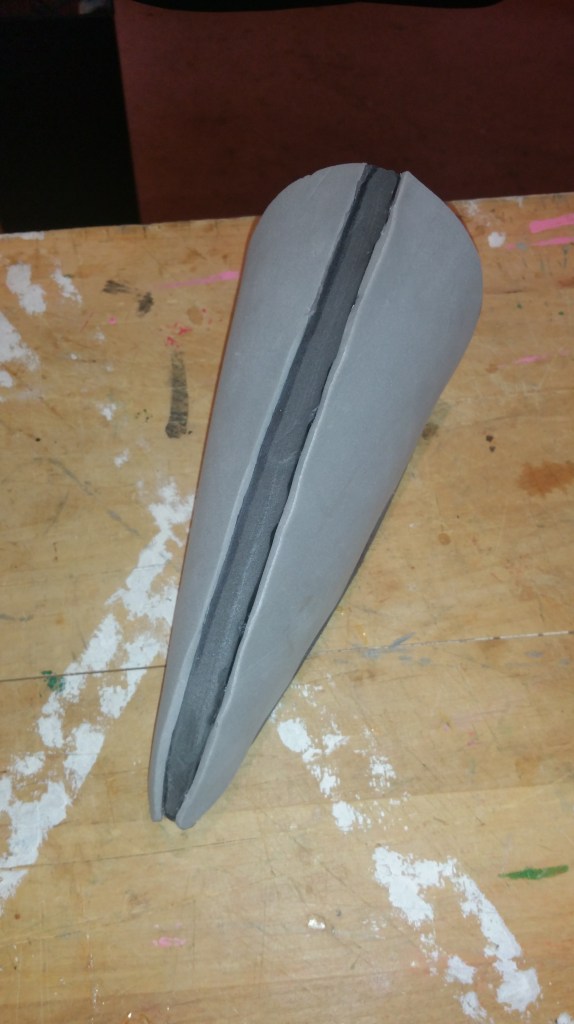
I made a prototype of the claws for basic sizing and shape using cardboard, then cut out the bottom shape and side (center) shape in EVA foam. EVA by itself is pretty resistant to scuffing and damage in general, especially after being Plasti-Dipped, and is actually made to be stepped on in (they use it for floor mats in most places). I also found Plaid’s FX Paint, made specifically for EVA foam, which is also scuff resistant and flexible/non-cracking unlike a lot of acrylic paints, so EVA + Plasti-Dip + FX paint would likely be pretty durable. But how I can I sculpt EVA into such a round looking claw without having it look like crap? That was my main issue. I didn’t really want to carve each one out of thick block of EVA, that’s never been something I’m good at, plus block EVA is very expensive. So instead, I decided to try this:


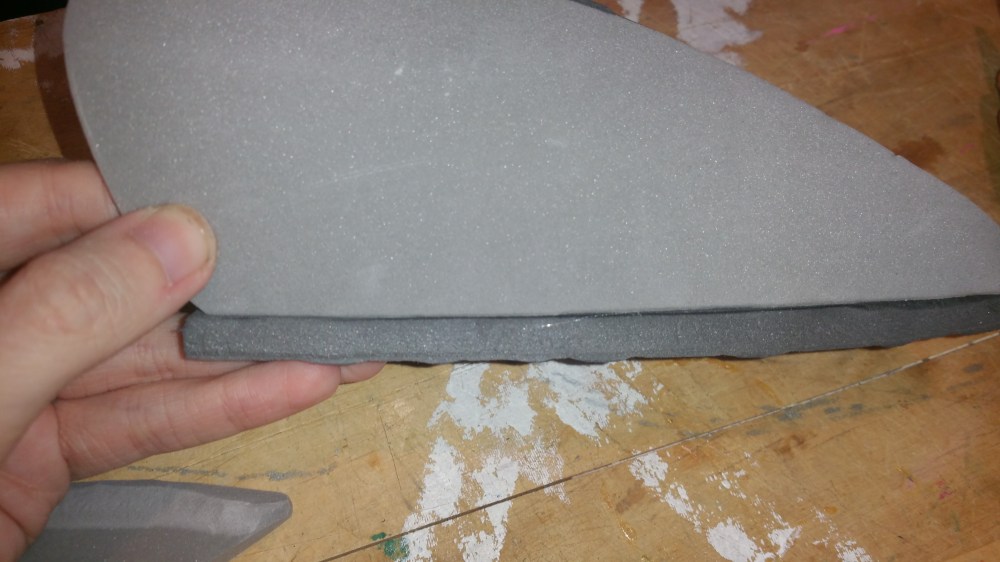
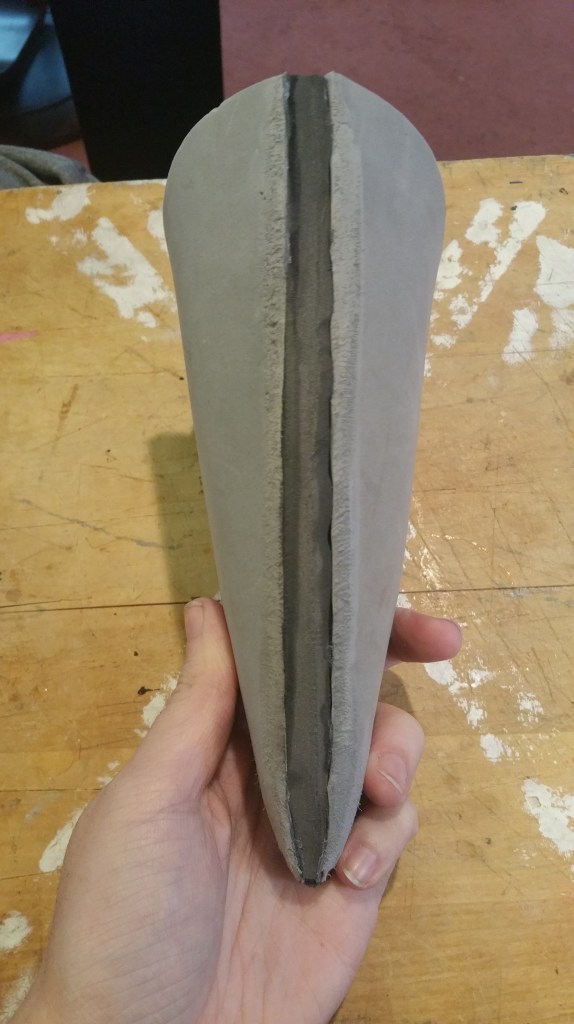
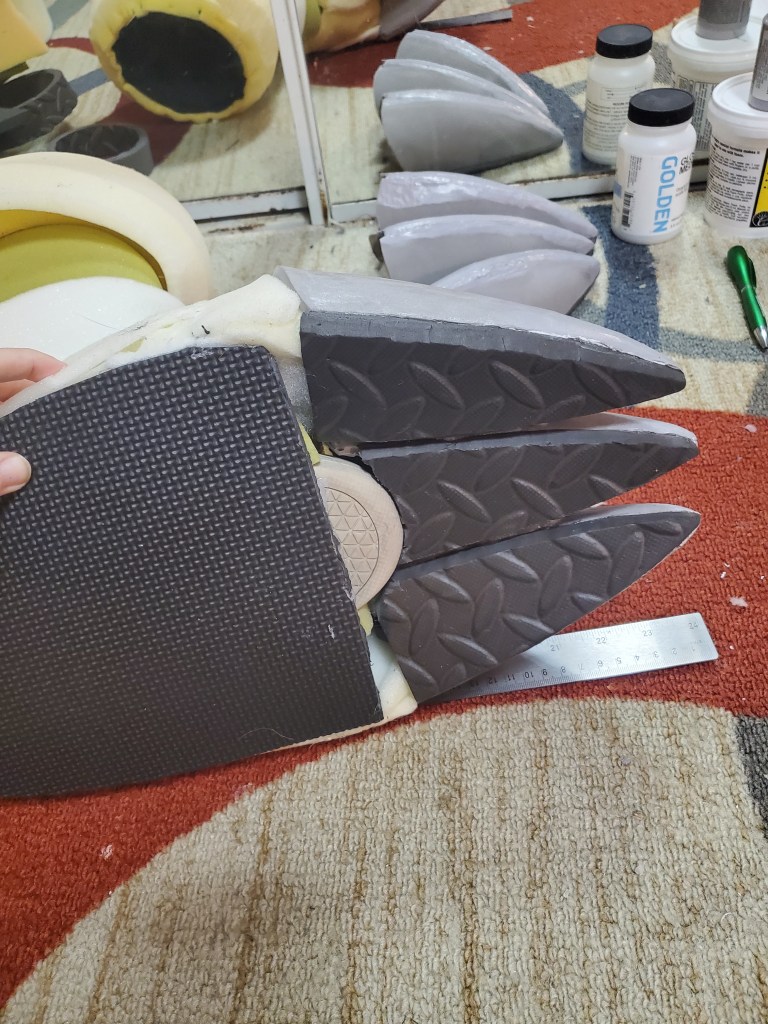
Using the side piece and bottom piece I cut out using the sizing from the prototype, I glued the side piece, which I’ll now call the core, as its the center of the claw, to the middle of the bottom piece, which will now serve as the bottom most part of the claw (not even part of the claw really but an extra buffer along the bottom that can scuff all it wants). From there, I took a piece of paper and cut out pieces similar to the side shape of the claw, which I then transferred over to thinner EVA foam (the light grey pieces), and glued along the top of the bottom piece, and the side of the core piece. I did this on both sides, and the result was this:


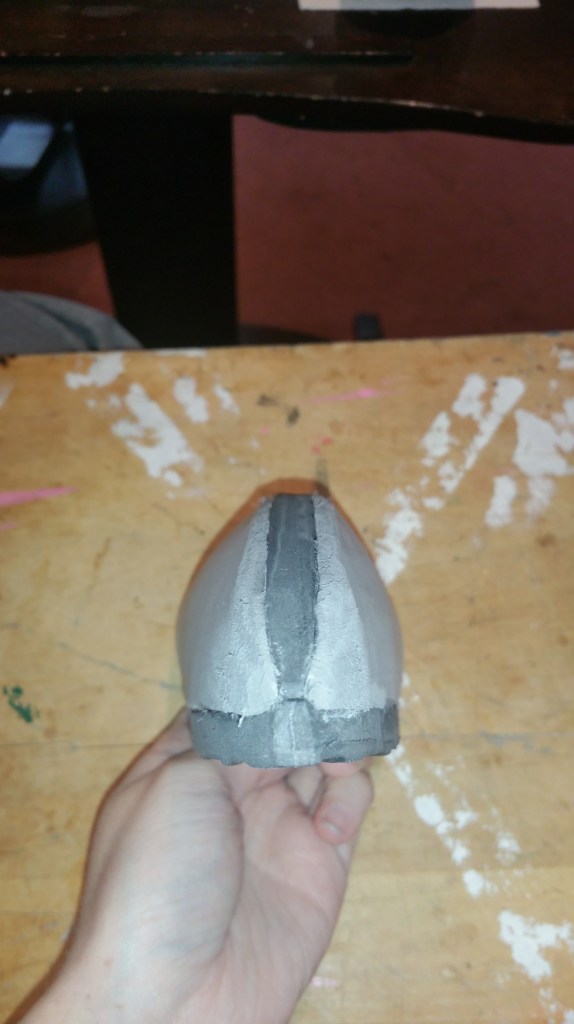
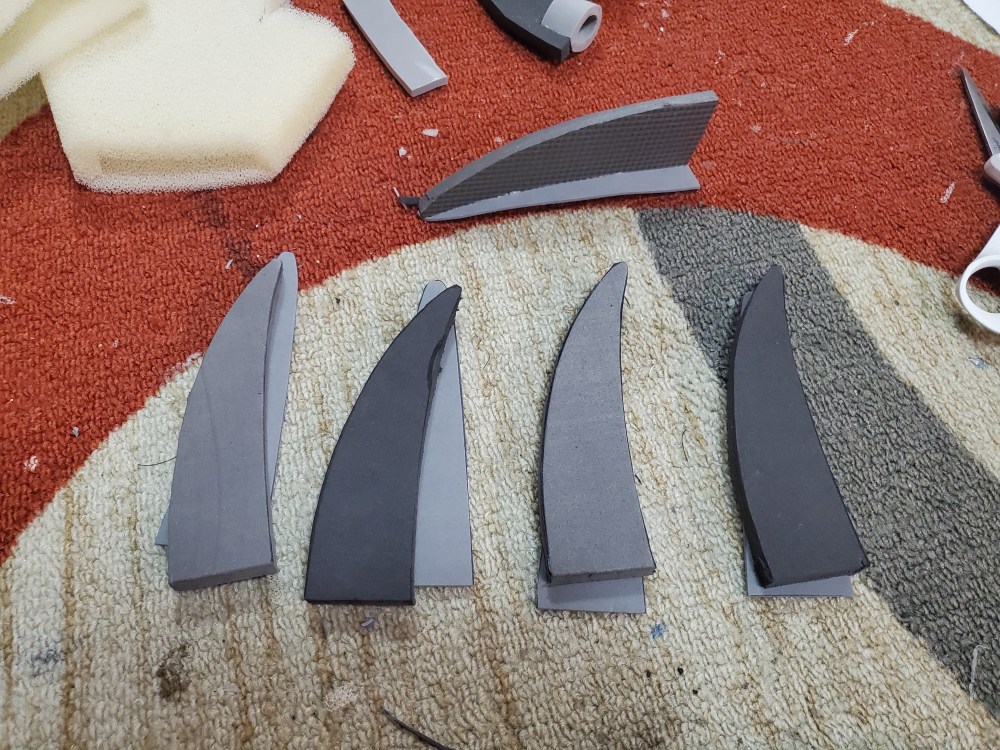
A pretty basic claw shape. Not great by itself though. The edges aren’t smooth enough where everything is attached, its ripple-y in places, and its not quite round enough to be accurate to the shape of his claws either. Fortunately the back of these claws are open, so I was able to stuff the inside with Poly-fil to round the shape out a lot more. Now just the edges need some help. And that’s another great thing about most EVA foam: it’s sandable! So I broke out my Dremel and a sanding wheel and went to town sanding down the edges of the EVA where I glued it. This works pretty good, as you can see, but it still leaves a lot of little sanding artifacts and leveling issues (pockmarks, and uneven areas).


For these issues, I tried 3 different products, only 1 of which worked the way I had hoped. 2 of them were “foam clay” products (the first one from TNT Cosplay and the second from Michaels), but I found them both difficult to adhere to EVA foam (the stuff from TNT impossible, actually, I believe it to be freeform sculpting only, and the Michaels stuff was difficult to blend into the EVA). I had a lot more issues with both of these products that I won’t discuss here, I’ll simply say they didn’t work for this usage. They’re likely fine and even good products for other things, just not what I needed for this project. What did work, however, was actually the cheapest of the 3 products: Foam Putty by Woodland Scenics. This stuff can be found in most hobby shops and is usually used when sculpting terrains for railroad models and similar things. It doesn’t shrink, it dries super quick, it’s sandable, and best of all, it likes to stick to EVA foam and can be easily blended into the EVA at the edges unlike the Michaels foam. The only unfortunate thing is that it’s not really flexible. It can bend a very slight amount, but it will crack eventually. I found a fix for this however, which I will go over in a moment.
But first, I added the foam putty to the EVA claws where I felt it was needed to help level all the craggy areas or divets in the foam. It was a lot smoother, but I wanted it more smooth. So I broke out some of my Golden (brand) Acrylic Gloss, which is very thick and helps a lot with leveling. It also helps adhere the Woodland Scenics’ foam putty to the EVA and seals it in place, so that it no longer cracks when moved because the acrylic (and eventually the Plasti-Dip too) locks it in place and creates a sort of skin over it. This is how to avoid cracking of the foam putty 🙂 Though I still wouldn’t suggest putting it in any areas that need to move regularly, it may still eventually wear out and begin to show canyons or other imperfections.
With the Golden Acrylic and Woodland Scenics Foam Putty applied to the claw, I finally was happy enough with the smoothness to start using Plastic-Dip to seal the whole thing. Plasti-Dip is very thin so it does not help with leveling really at all.
I sealed each claw with 4 layers of black Plasti-Dip (spray, btw, not the actual dip) and then 3 layers of white Plasti-Dip. This is just the way I tend to like to seal EVA foam so I know I got every bit of the original foam. (I should have taken a pic before painting, but I did not; apologies, oof).
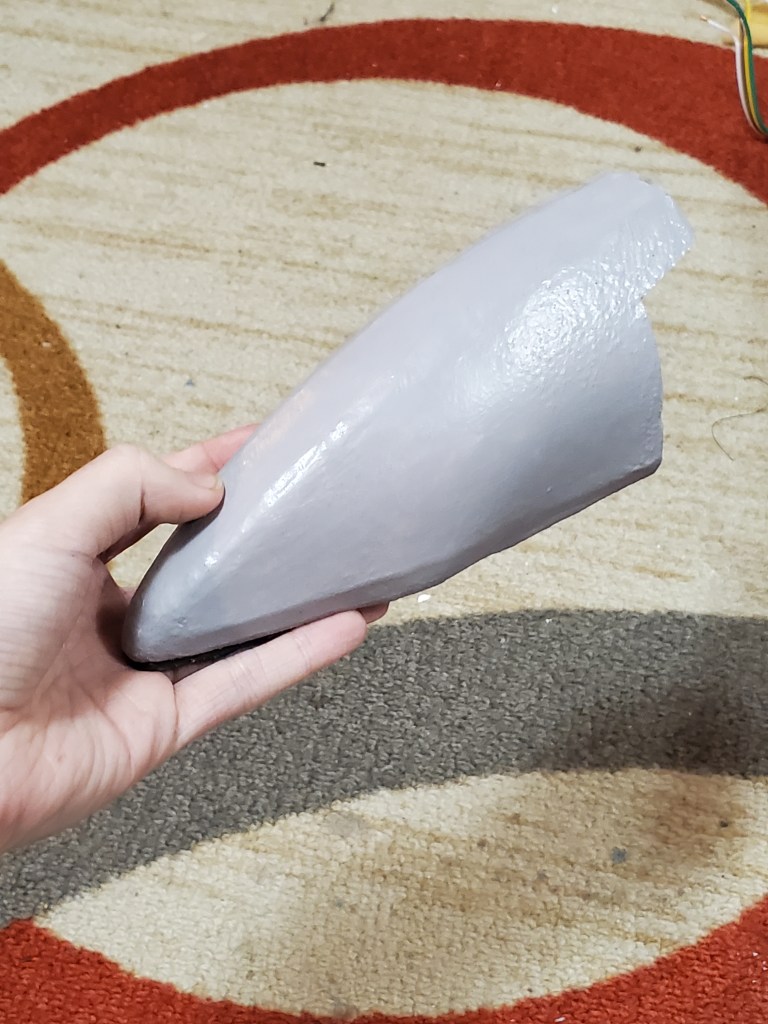
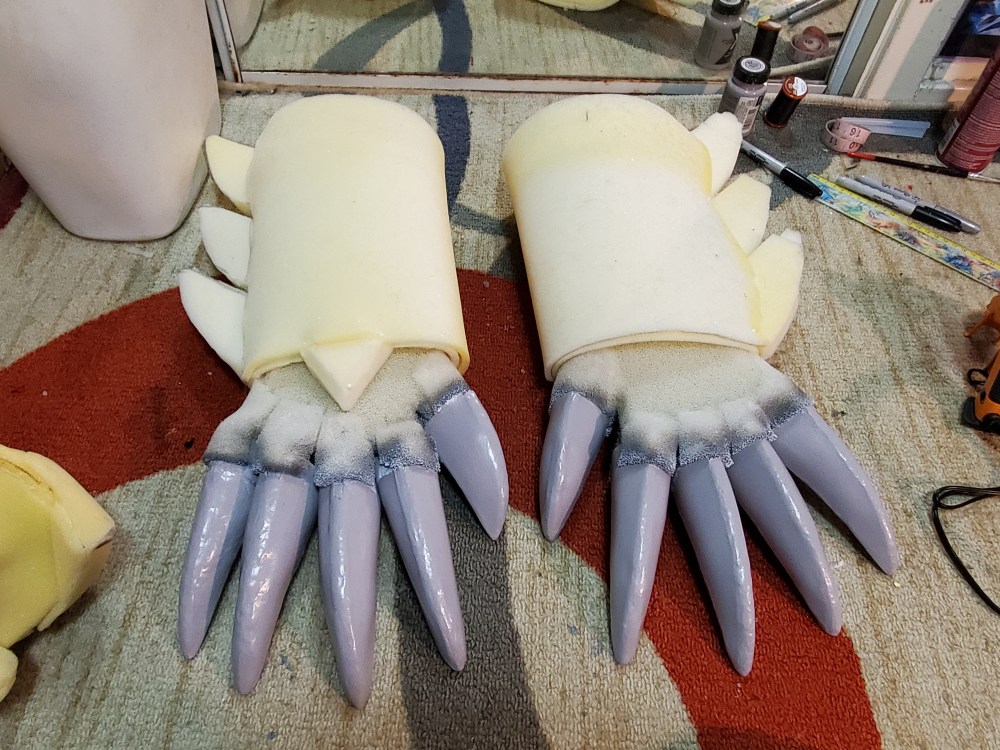
Finally I can paint the Plaid FX Paint directly onto the Plasti-Dip. Again, it is flexible, non-cracking and scuff-resistant paint, so leaving it as a final layer seems like an okay thing to do, especially since the actual claw should not come into contact too often with the pavement, the EVA along the bottom and partway up the side should take most of that abrasion. What the paint needs to resist is stuff like people kicking the claws, accidentally stepping on them, etc.
With a couple layers of Plaid FX Paint, here is the final result of a nice, smooth, damage resistant Obstagoon claw:

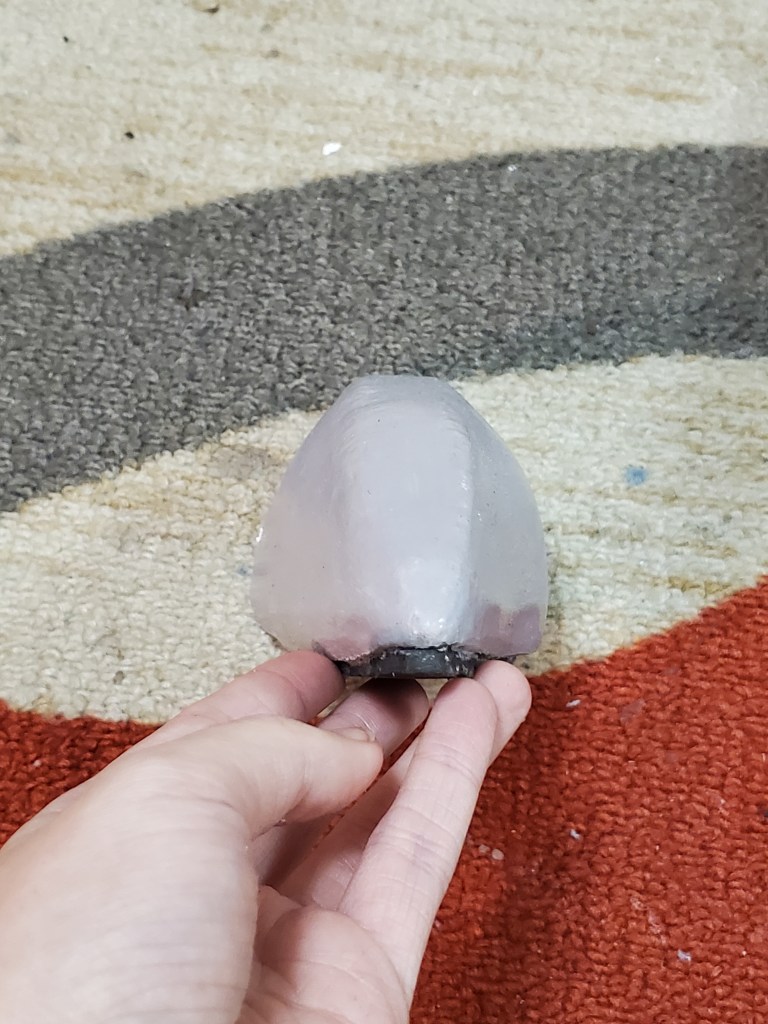

(The weird cutouts in the back was for me to attach it to shoe to test durability!) WHEW, that was a lot of work, and I had to make 6 of them. But they’re worth it I think in their durability and looks! But, lets get back to building the feet. Now that I’m done with the claws, time to move onto the actual feet, and build the real feet claws (I won’t be using this one because of the cutouts, plus it was just for testing).
As a durability test summary, I walked laps with these outside on pavement, as well as stepped on them a number of times with combat boots, and I was not gentle. The claws show no scuffing so far, and when crushed, they popped right back up and any wrinkles disappeared within a minute or two, not cracking or wrinkles staying on the surface. Obviously I’ll have to take these to a con to determine final durability but so far, so good!
The Feet/Shins

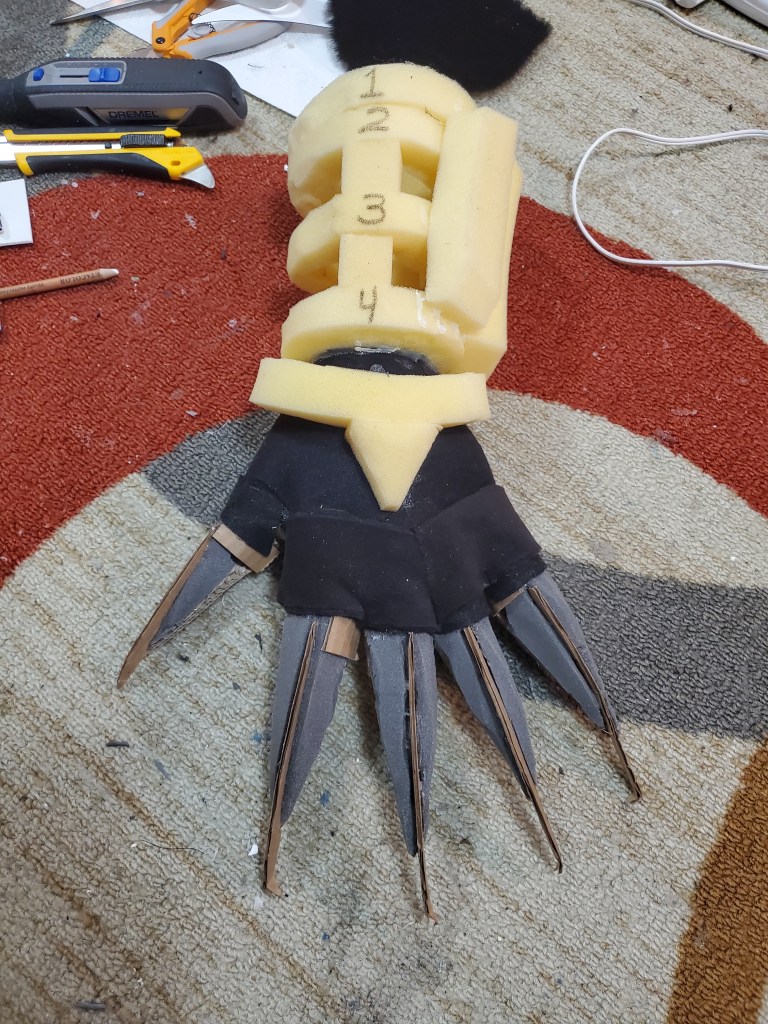
I decided to make the feet and grey leg warmer things one piece, to slip on like boots over a pair of what will basically be pants. Fortunately, I had perfectly sized (height) leg foam wraps from my old Peridot cosplay which was otherwise starting to fall apart, so I recycled other pieces just for stuff like this (I kept her hair and goggles though, very proud of those!) So I grabbed those out of storage, cut the toes off and add the newly made claws to them, along with a new pair of shoes and bam, there’s the start to Obstagoon feet! I also made a quick, basic liner out of spandex that I sewed into the bottom near the shoe, and will sew the top into the fur when I get there. I added foam and Polyfil under a layer of 1/4″ foam to create the curvy shape of the legs, and Plasti-Dipped when I was all done.

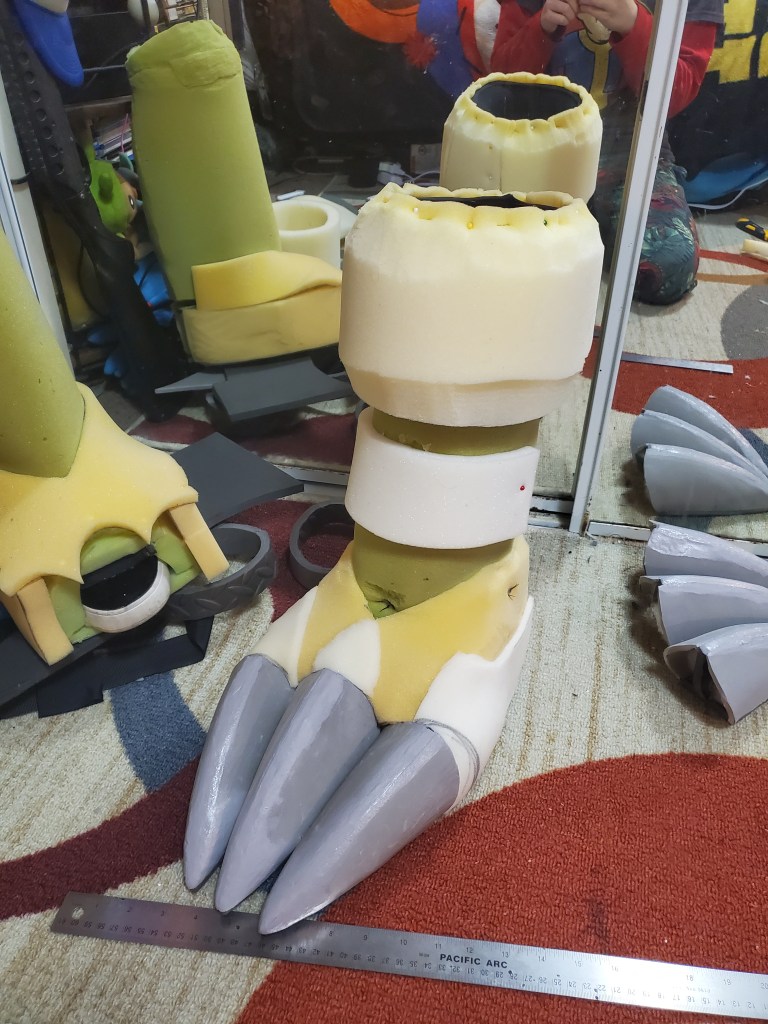


I added a little bit more foam to the foot to make it look a little more accurate to the shape of Vandal’s feet, and used foam to attach the toes to the base of the foot, leaving the EVA at the bottom of the claws detached from the bottom of the foot EVA. This was essential to helping the toes to not scuff the ground so much when walking. It allows them to pivot easier and not be forced back into the ground upon taking a step. It’s hard to describe in text, but it helps a lot with the potential scuffing issue just by having less resistance between the toes and the ground. You’ll also recall that there is a little bit of a buffer between the actual claw and the EVA foam on the bottom, so that layer of EVA should be getting the abrasions and not the actual claw itself in most cases.
After this foot was done, I took it for a stroll outside to test the resistances. No scuffing detected at all so far after making a few laps! I also put on a pair of boots and stepped directly on the claws a number of times. They bounced right back and any wrinkles disappeared within about a minute or two. Very sturdy, damage resistant feet! The hand claws won’t need as much attention as these got, because they won’t need to hold up to, for example, people stepping on them, but it’s good to know this method works for things that need to be damage resistant.
I’m not going to add the spikes at the top or bottom of the leg yet, instead I’m going to pattern them into the fur and stuff them while I fur it, because it would be really hard to get the sewn fur over foam spikes like that, so at this point…


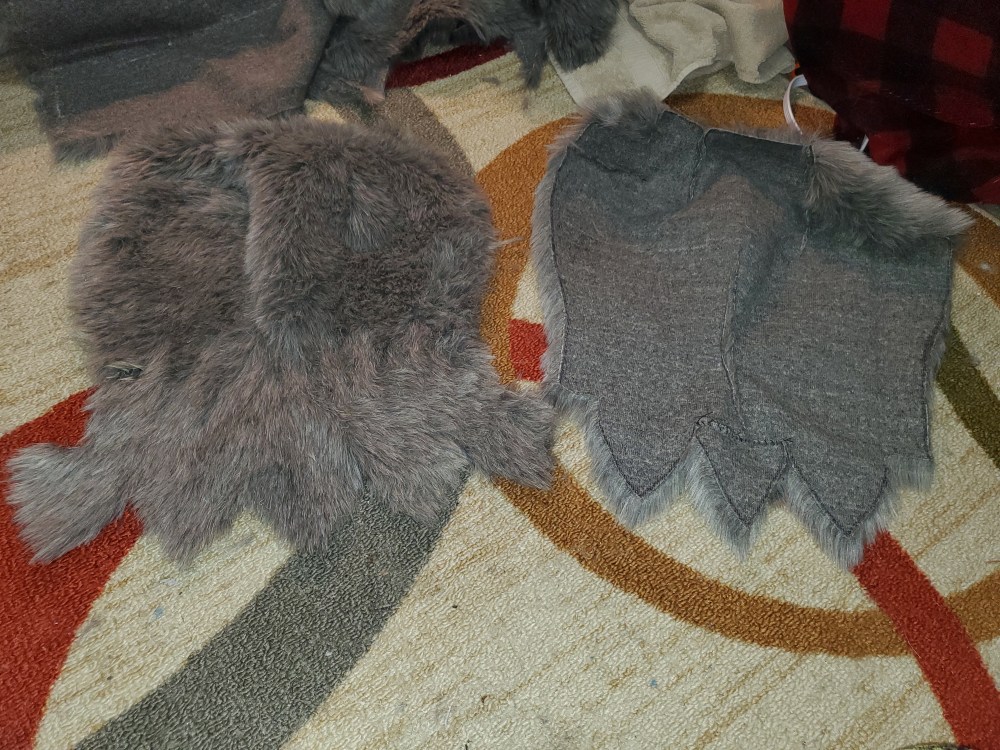
…I have ready-to-fur Obstagoon feet! Yay! I’m not super happy with the left one, I actually made a mistake; before taking the time to flip the top foam pattern over to do the other side, I glued and sewed it on, so I had to freehand the second side and it didn’t turn out too well. But the fur will likely cover up any issues, and if there are still visible problems I can fill it out a bit with some extra Poly-Fil, so I’m not too worried. The only real downside is that because of the Poly-Fil I’ve used thus far to make it match, it actually made the left leg tighter than the right, but that shouldn’t matter too much either, its not terribly noticeable when worn, just when putting it on.
But anyway, the feet are done and ready to fur, so let’s move onto the hands!
The Hands
First off, I made a prototype of the hands, because I wasn’t entirely sure about the claw situation and the placement of my fingers. Obviously his hands need to be a little on the large side, but the claws need to be straight (more or less), so I knew I needed to figure out a very specific way to have my fingers sit inside the claws to get the right placement. This might not make a lot of sense, but hopefully the below picture will clear some things up about my thoughts on finger and claw placement:


So basically I need to make the hand as wide as possible while keeping my fingers in at least somewhat of a normal, comfortable position, so I made sure to place my fingers very specifically within the claws. My index finger is all the way to the right (inside) of the index claw, and my pinky is all the way to the left (inside) of the pinky claw, and the fingers in the middle are fairly centered, but a little off to the inside of the claws respectively. This allowed for the hand to look much wider than it is within the glove.
The foam on the forearm can be ignored, I built his grey fur cuffs much differently in the end than I did with this prototype.
Once I was happy with the basic shape and movement of the prototype, I created a liner to which I’ll adhere everything,

Using the prototype as a template for sizing and shape, I cut out the palm in 1/4″ reticulated foam, and the upper part of the hand in 1/2″ reticulated foam. Reticulated foam is a very nice alternative to regular upholstery foam in places where you expect to sweat. Its anti-microbial and dries very quickly. This stuff combined with lining will keep the suit clean and dry on the inside, something that will be very nice for hands, if they end up getting sweaty (reticulated foam also breathes very well so the likelihood of it getting super wet is lowered as well). i glued these two pieces together with a thin piece along each side to raise it up slightly and make it a box-y shape so it wasn’t just two slabs of foam glued together.

With this, the base for the hand is done, and it was time to move onto the claws. I went through the same basic process as when I made the feet claws, making a bottom (this time out of very thin EVA foam) and the core, but had to pay a little extra attention to where exactly my fingers were sitting within these claws. for the middle and ring finger I had to cut out part of the core to make sure my finger would sit in there. I made little EVA foam “cages”, I guess you could say, for where my finger would sit, and glued the liner into them to ensure they wouldn’t move and that the liner will stay down in the hand when I take off the hands. From there, I added the sides of the claws , and stuffed where I could with Poly-fill to keep them a little round. Once that was done, I added a piece of foam to the tops and bottoms of each claw to attach it back to the hand as sort of “fingers” that likely will not show once furred which is fine. But it helps with keeping the claws in the correct position on the hand.


Now, I did all the same stuff as I did with the feet claws and smoothing them out. Acrylic fluid, foam putty, test painting, and eventually, Plasti-Dipping then painting to get the final result:

Pretty decent looking! You can still see the sanded areas up close, but I’m not super worried about that, and it’s still pretty subtle. To me, it just shows that they’re handmade and not 3D printed or otherwise cast as one piece.
The Forearm
Now to move onto that giant grey part of his forearm. This I did much more simply than what I had created for the prototype. I didn’t end up needing ribs like I did on the prototype originally because I decided to use reticulated foam instead of regular upholstery foam, which will air out much easier and doesn’t need the big gaps to be light and airy.
The first layer is a single piece of 1/2″ reticulated foam, sewn at the base near the hand to the inner lining to help keep it in place (I also tacked the edge of the hand to the liner here as well). This buffer layer will help the arm to be sweat resistant and cool, because the next few layers I’m just going to use regular foam to help build out the bulk. I have more regular foam than reticulated foam currently, so this is the general design I went with. Below are progression photos (I also added the spikes along the side between the second and third layer).


Before I glue the final layer of foam to the left side of the hand, though, I need to add the buttons and wiring like in my original outline, so here’s that (buttons and connectors from Adafruit):

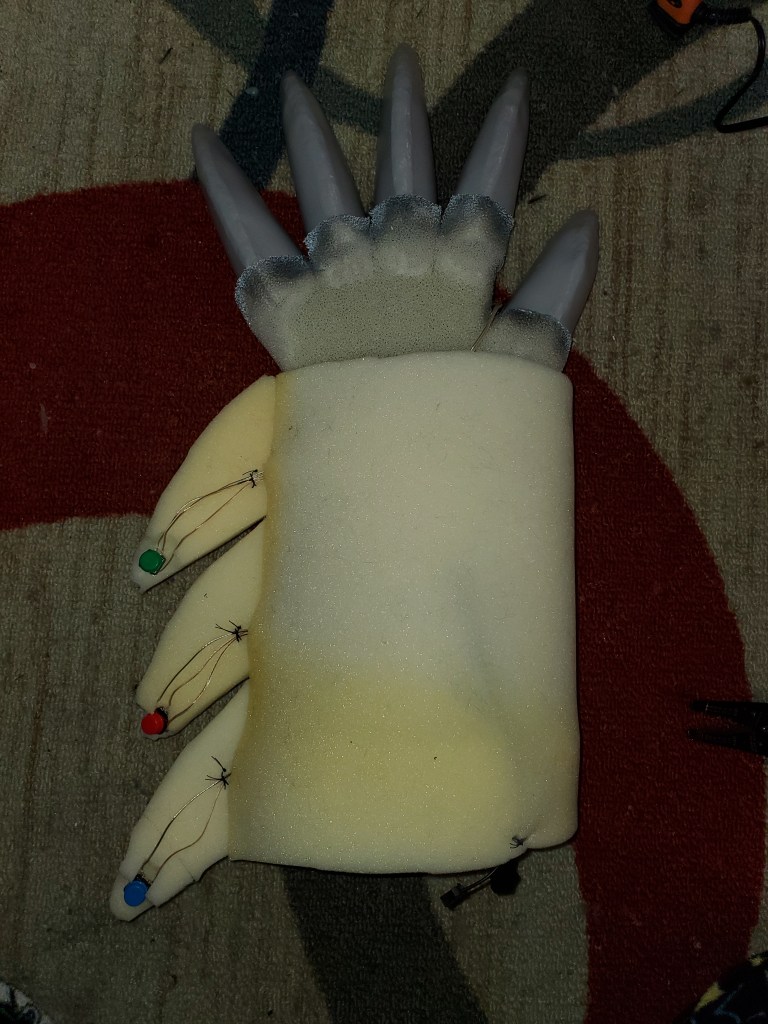

And with all of that, the hands are now ready to fur too! I know the inner edge of the foam going down toe liner probably looks really ugly and unfinished, but I’m going to have the fur fold over and go down inside the glove a bit so it won’t look that bad when completed.
I should also probably bring up the fact that I used 1 4-pin JST and 1 2-pin JST instead of just 1 5-pin. This was my bad in ordering, and I didn’t want to wait for another single connector so I just used two different ones.
Next post will be about my construction of the vest, upper arms, and adding the electronics! Stay tuned! And as always, if you have any questions or comments feel free to drop them below.
