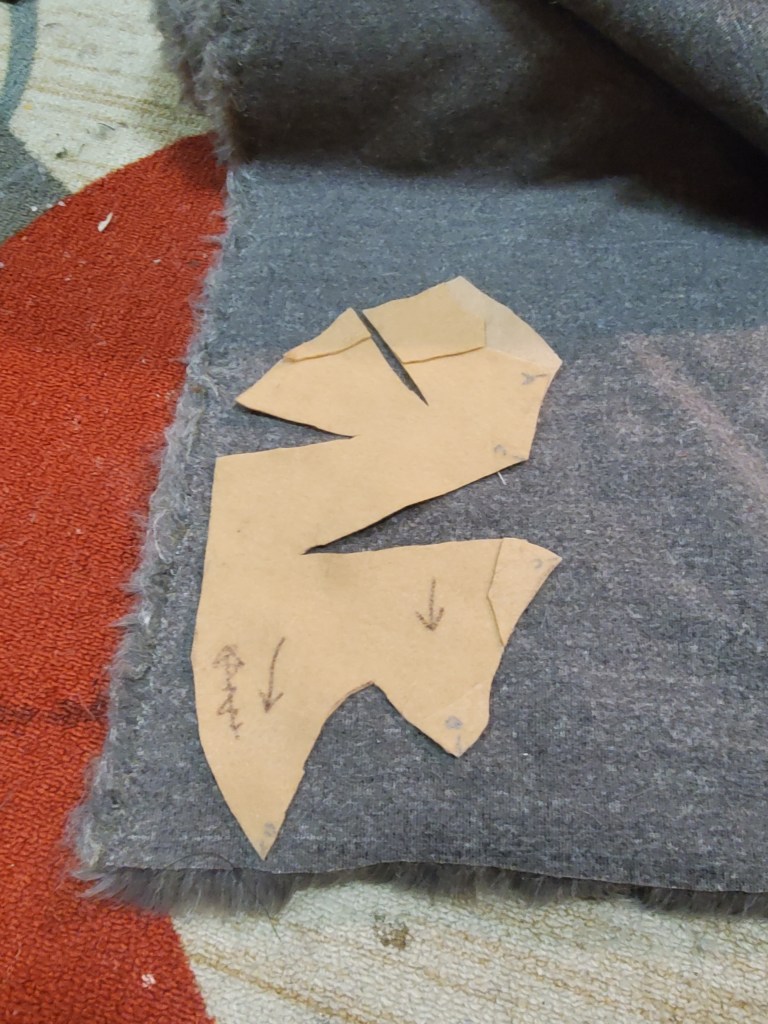
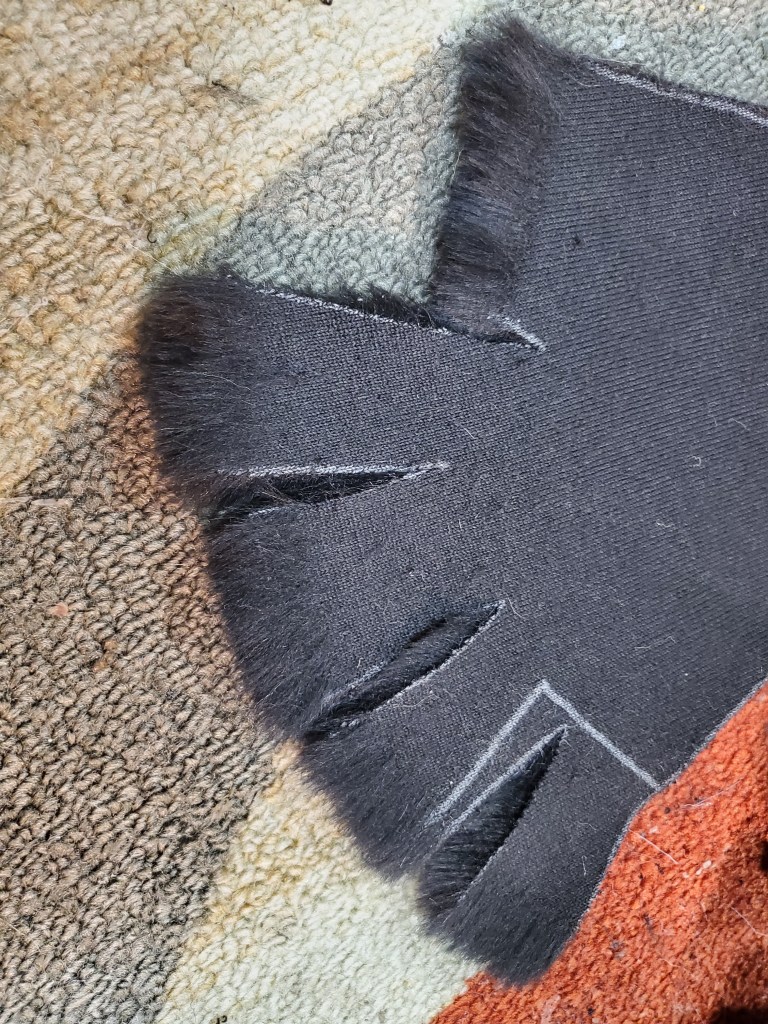
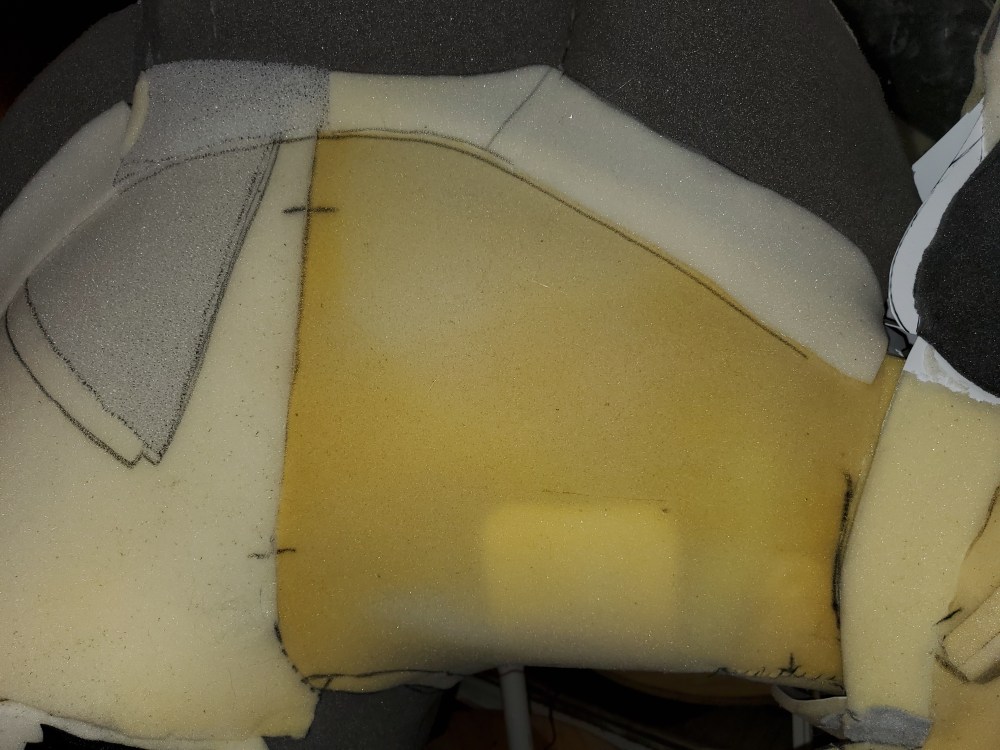
The way I pattern costumes for adding fur or skin is quite different than most use (which is the duct tape method). I use felt to make a sort of cover for whatever piece I’m working on, cut as needed (for darts) and then trace that pattern onto the fur backing. This may make more sense with pictures:
I use arrows to remember the direction of the nap required for the piece, and often I will mark points with A, B, C, etc, so when I’m sewing I know where to attach and match up each piece.
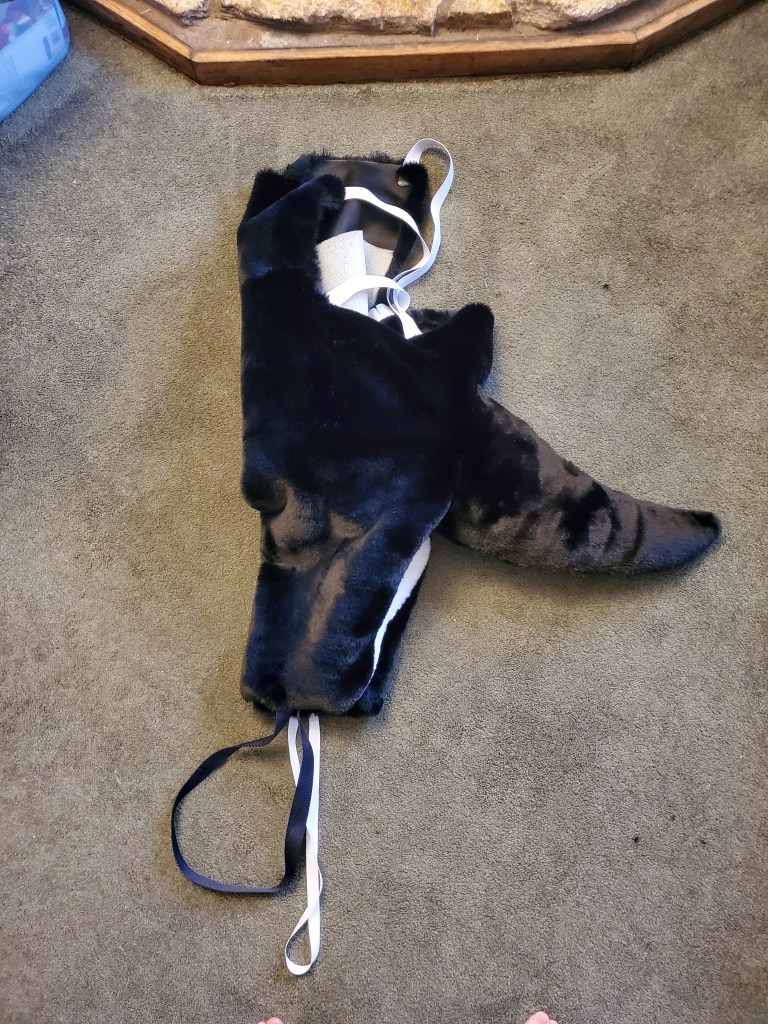
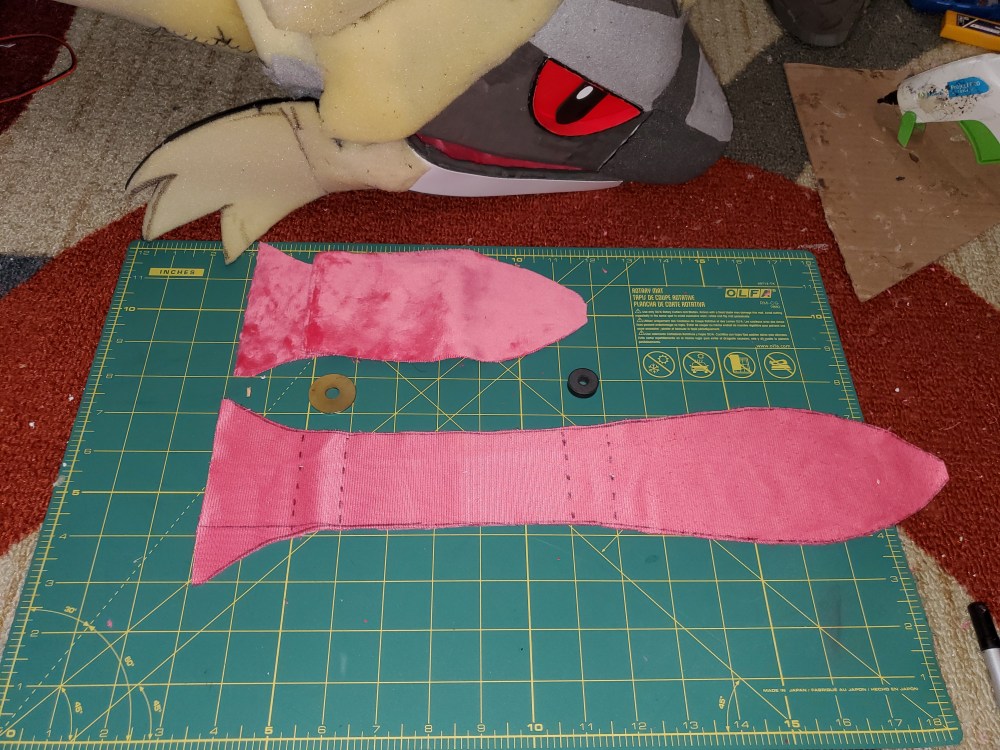
I used this method for the entirety of the costume except for the bodysuit, which I was able to just take measurements of myself (since there is no real major padding except a tiny bit in the crotch) and sew together as would be the process of a normal, unpadded bodysuit, seen below:
The elastic in the back and over the shoulders is just to help hold the suit on, as I didn’t want the entire back to be covered in fur when the vest is already going over it, for cooling reasons. The straps at the bottom act as stirrups to keep the legs down inside of the “boots” when I put them on. The tail is sewn directly onto the bodysuit, as no real partial-use can exist for this costume.
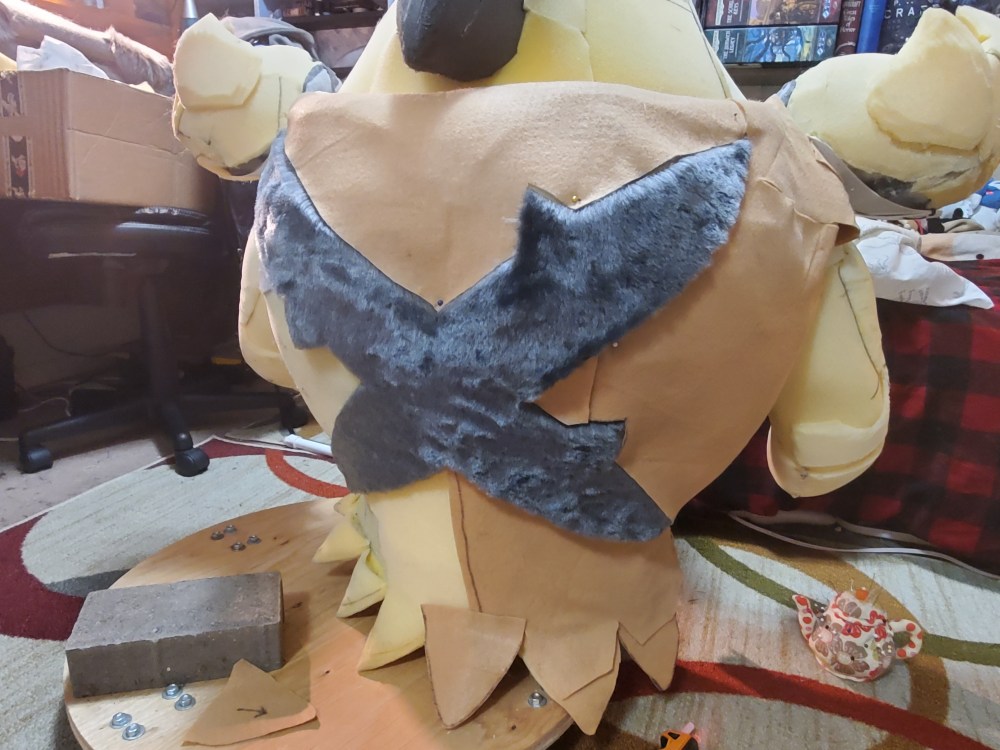
Once all was patterned, traced, and cut out, it was time to sew! (Just sharing the vest and neck here to save some space; all pieces were hand sewn with machine reinforcement in some places).
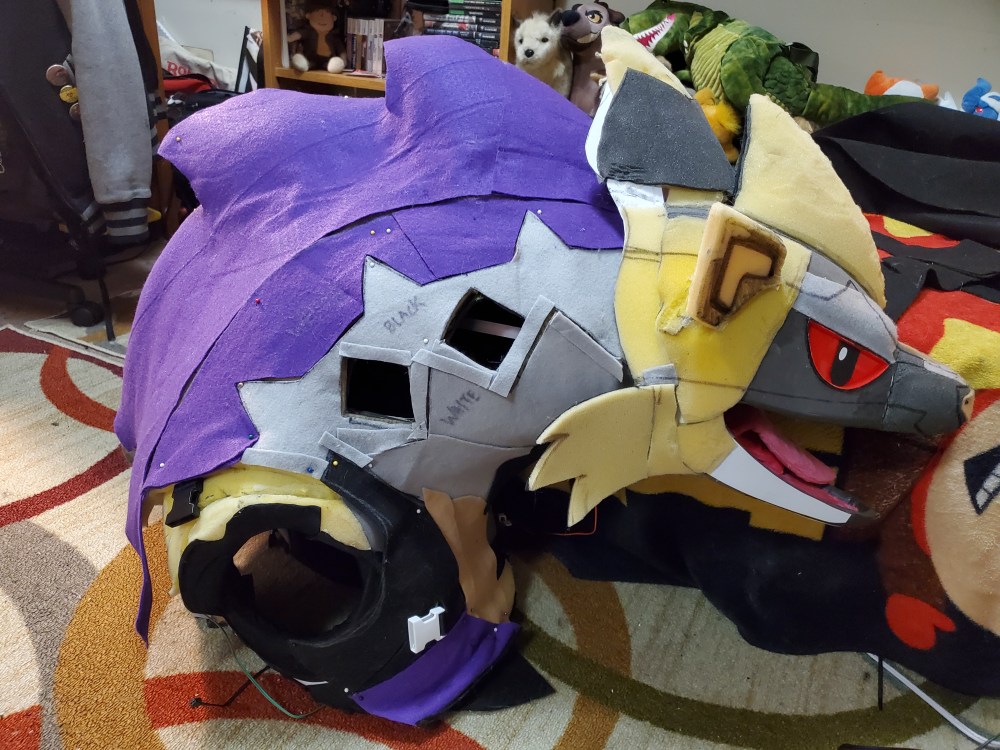
Now, before I place the fur onto the neck, I need to cover the diamond openings with white buckram, so I slapped a piece of it on there (after painting the back black for glare reduction; I painted the backing black first and then repainted the front white because there was bleed due to the openings).
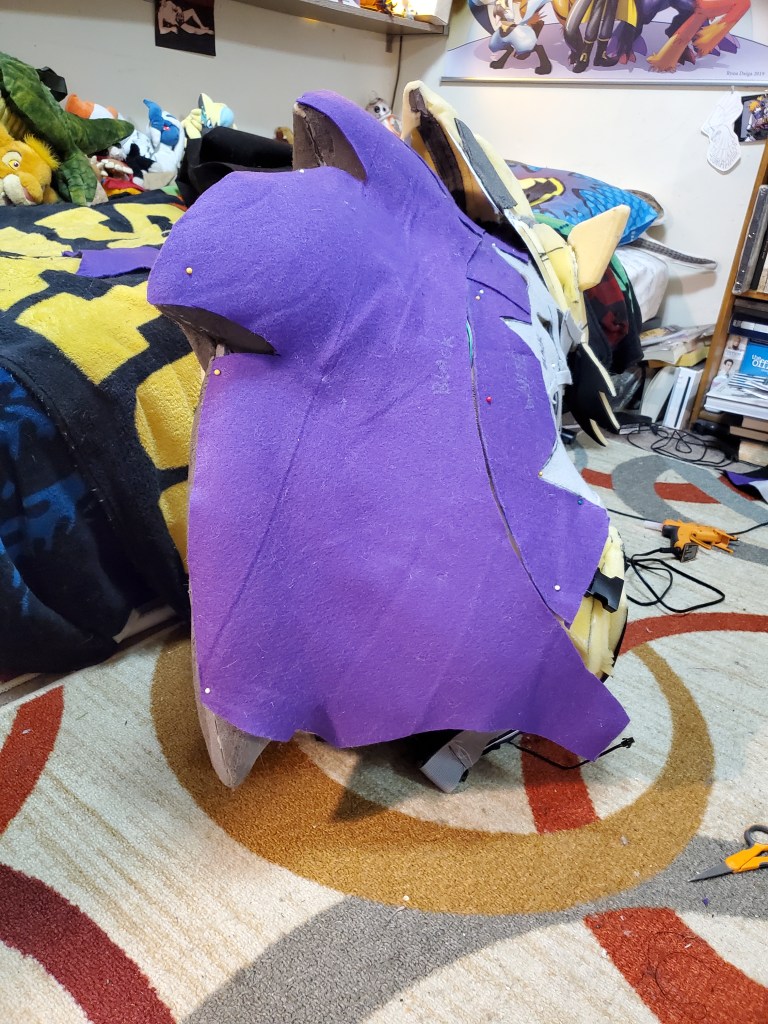
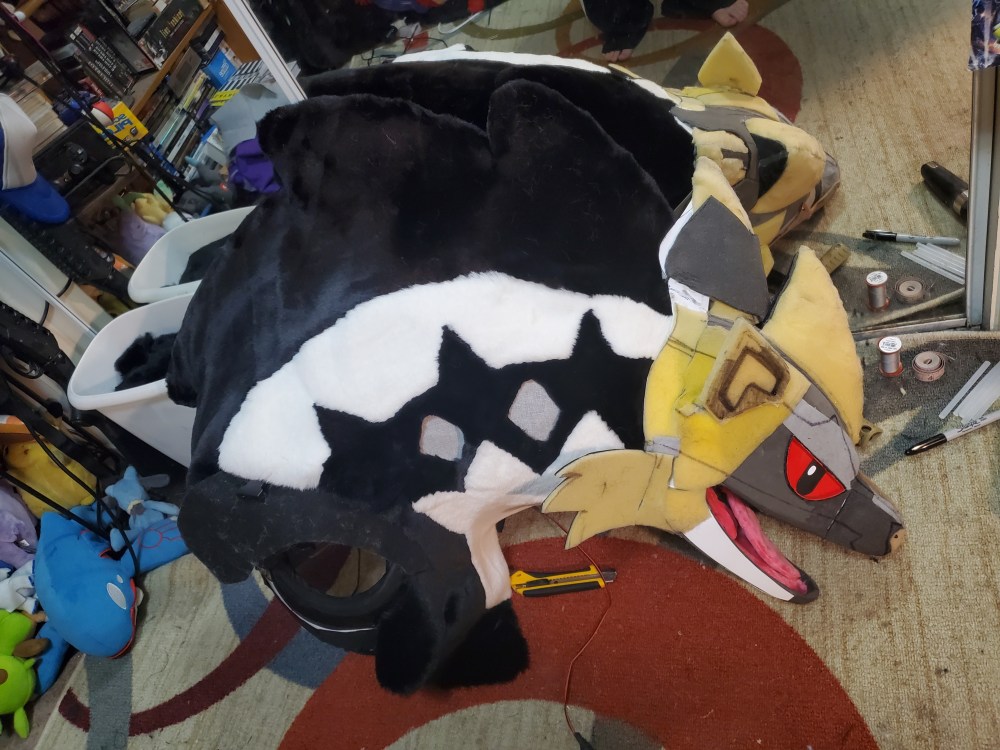
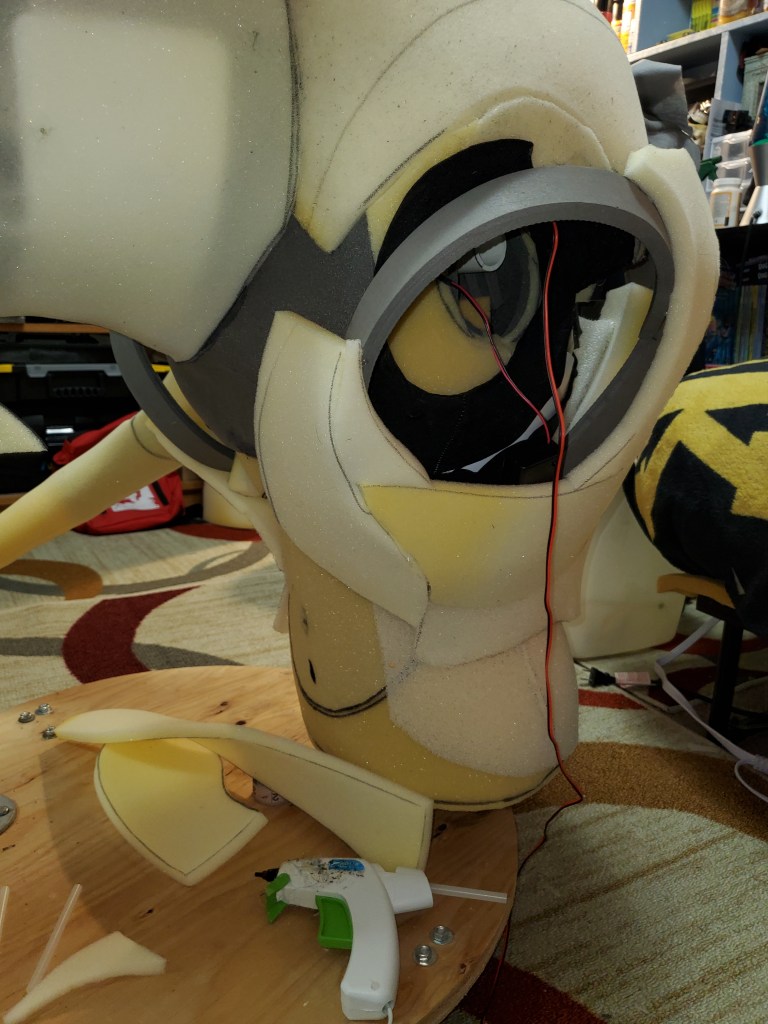
Here are some WIPs of me applying the fur skins to the neck and head!
I should also mention here that that seam between the black mane and white part of the neck does contain a zipper for accessing inside the neck (invisible zipper!). The nose will come later as a piece of EVA foam stuck to the front. For now, it’s time to start securing the fur to the foam in key places and refining some bits like around the mouth, etc. After that’s complete, I can add the teeth, which will be cut pieces of styrene, and add the scars around his left eye.
Deadline
I will say, at this point I reached the end of my deadline, and was forced to work on some of the final touches such as sewing some things down and adding the teeth/scars at the hotel room for our convention (SacAnime), so I don’t have pictures of these as I was quite rushed and didn’t think about it. So for the next post, I will be adding post-completion pictures, as well as sharing my con photos, where I’m considering his debut a test run due to him still requiring some tweaks (but it went very well!). So stay tuned for the final log post for this project! I will also be making an overview video of the suit for a more in-depth look at all the pieces.
As always, feel free to leave me question or comments!
The way I pattern costumes for adding fur or skin is quite different than most use (which is the duct tape method). I use felt to make a sort of cover for whatever piece I’m working on, cut as needed (for darts) and then trace that pattern onto the fur backing. This may make more sense with pictures:
Note: I actually swapped between working on the feet and hands (the last post), and the vest, but for the sake of having an organized log, I’m writing these next two posts as if I just worked on them straight through to finish, when in reality, I got a little done on the hands, swapped to the vest for a while, then swapped to the feet, then back to the hands, etc. I just preferred these logs to be more of a work summary than an actual daily or weekly work log, which would get really tedious.
So far I’ve gotten a lot done on this suit, but there’s still a lot more to go! This post is going to go over how I made the grey body vest and the bulky upper arms. I’m going to mix this post up a bit by adding a video to it to go over things instead of writing it all out, because at the moment I’m rather short on time and a little behind at logging stuff (as well as having forgotten to take some WIP of some things…) So a video works a bit better in this case 🙂
The Vest
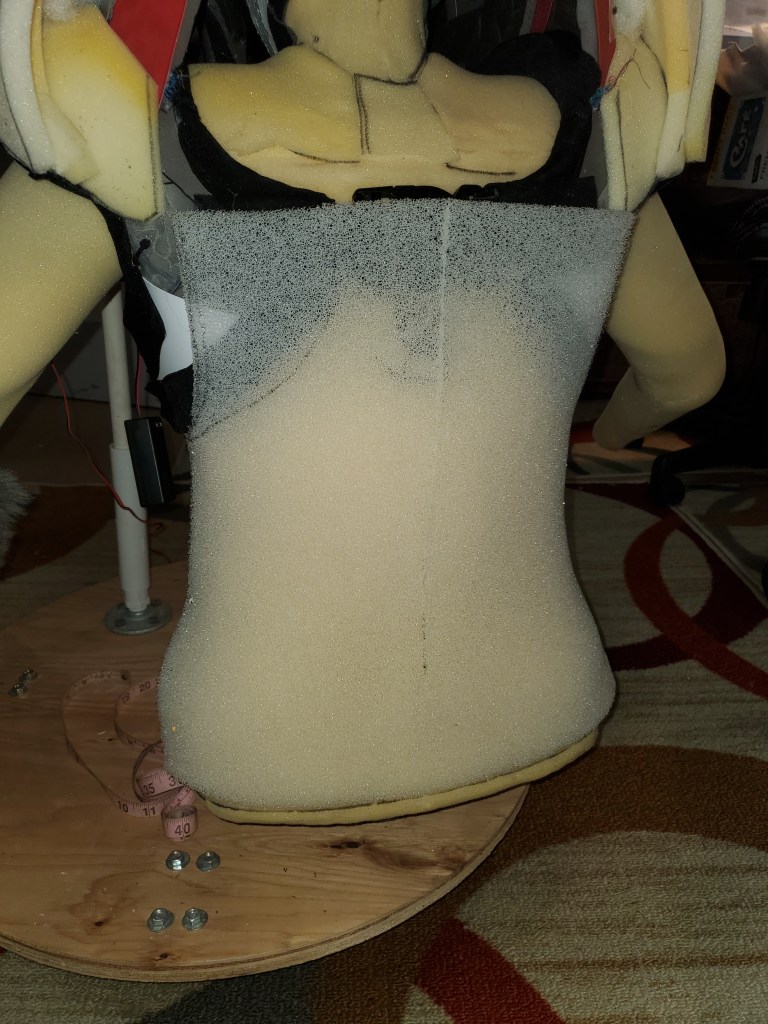
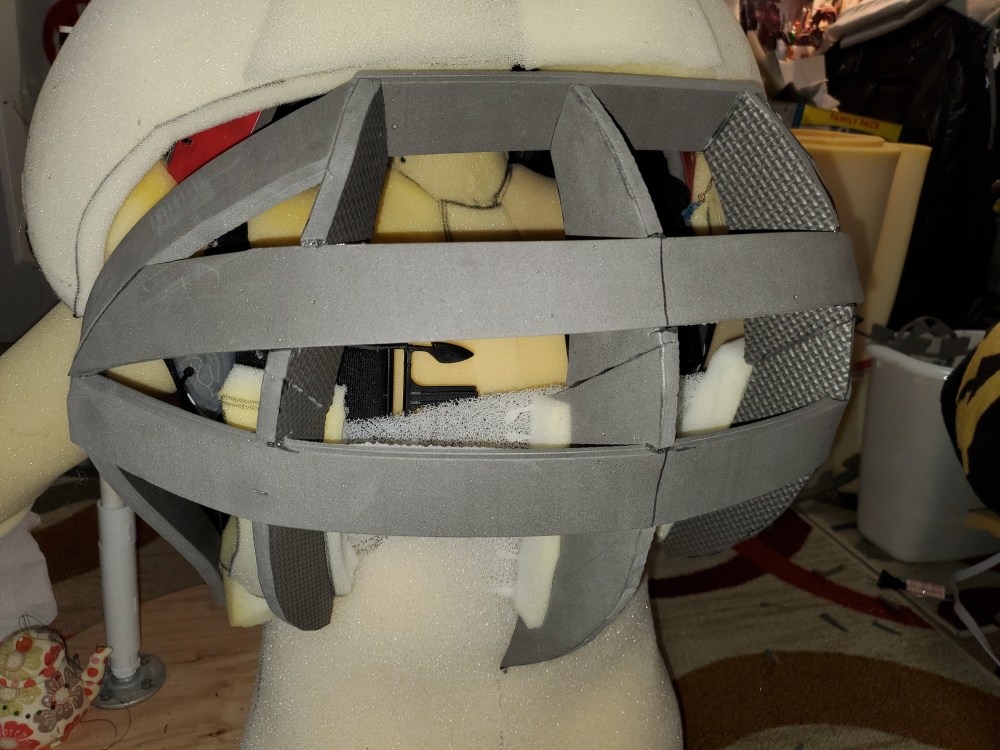
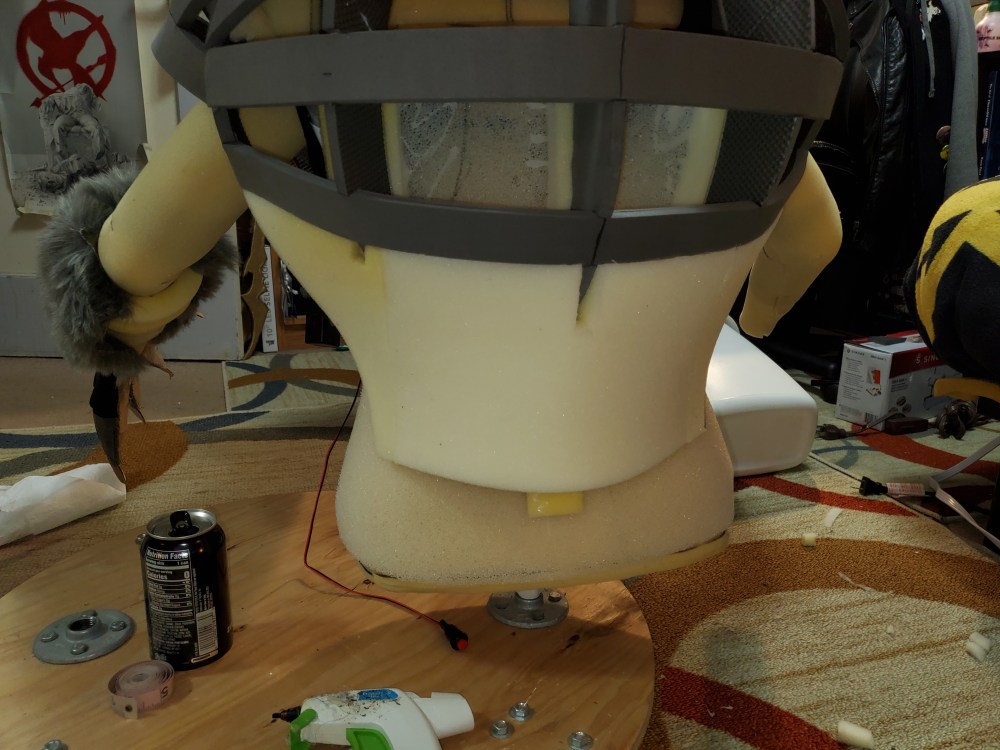
I knew the vest would be the biggest undertaking other than the head. I mean, the thing is huge. Initially I thought of having it be solid foam, and placing cooling packs in it, but as I thought about it more, I came up with a different idea. I ended up making significantly less pockets for cooling packs because I’m not sure they’ll be entirely necessary anymore. I ended up using more reticulated foam and a hollow cage for the vest structure. Here’s some progression photos of building out the vest:
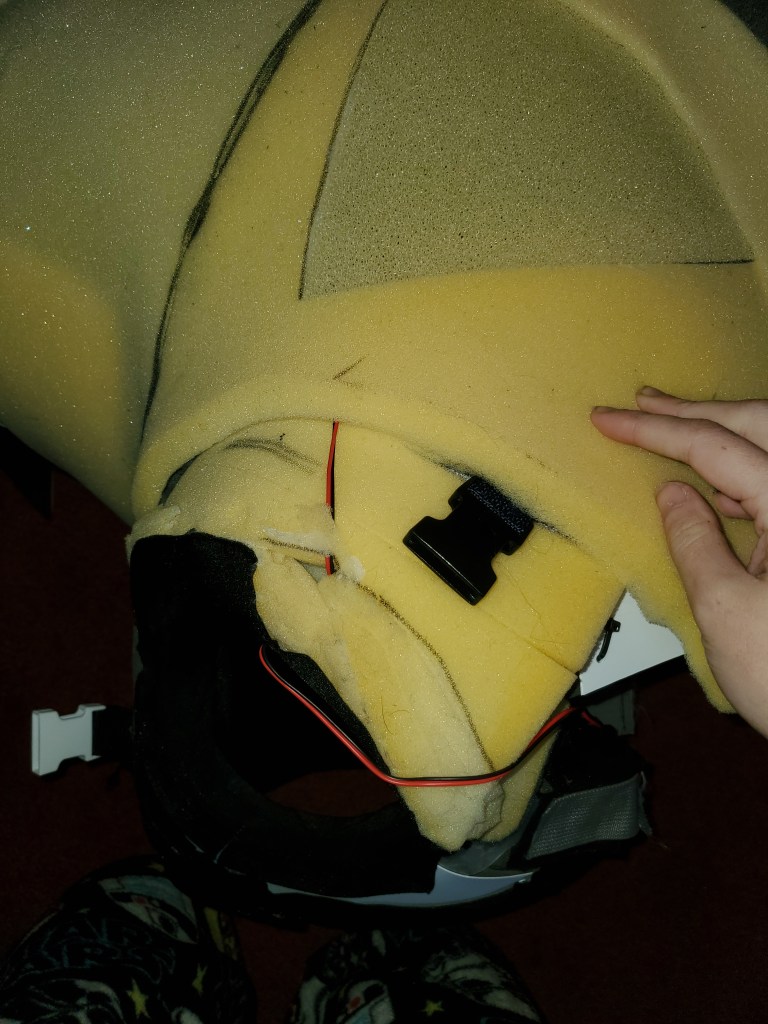
The last three pics are of parachute clips added to the chest of the head and the other side in front of the shoulders to connect to it. This keeps the vest together in front.
I had to work on the vest with the head on the mannequin, and discovered later it would actually work better if I cut down the shoulders down on the head and made a channel for the vest to sit down into, so I did that and added a parachute clip to each side to help hold the vest on (especially after I add the puffy things on his shoulders which will weigh the shoulders down a bit), where the other end of the parachute clip is inside the vest.
Once I had the base done, I went ahead and made a liner for it out of spandex (which I don’t have WIPs of), making sure not to glue the edges since I haven’t added the fur yet and I want to sew it in.
But anyway, back to the vest. Now I started constructing the puffy spiky things on his shoulder. The interior is EVA foam for a sturdy structure, with ribbing to keep them rounded instead of just using Poly-Fil, and then there’s a layer of thin foam over them. The spikes are plain foam carved into shape.
These things are where I wired up and placed the two speakers, with reticulated foam in front of them to unobstruct sound, but I do have a major change I will discuss coming up regarding that.
At this point, I started constructing the upper arms, which I also for some reason don’t have WIPs of even though I swear I remember taking them. They may have been on my old phone and didn’t transfer over…But anyway, I have the buildup of the upper arms and the muscle I used to help build it out, and I can at least mention the layering I did. The first layer was reticulated foam, to help with sweat and cooling. Over that I placed a layer of 1/2″ normal foam, and a piece of 1/4″ foam near the elbow (where I also folded the liner over), and then began constructing muscles over that to help build out his shoulders and make him wider. Note: The majority of the foam is on the outside of my arm only, for the sake of movement and comfort. This makes him appear wider without compromising too much movability or making it so I can’t put my arms down.
After I constructed the arms, they made the vest sit differently on the mannequin and the front no longer fit together very well, so I’m going to have to add more to the front of the vest to get it to look right again. This is actually good though, because it helps make him look even wider, and gives better proportions for the best, more accurate to the original design.
I attached the shoulder spikes to the shoulders by first gluing them on, then placing a Styrene brace attached to the shoulder EVA and running out to the end of the spikes to keep them from sagging down.
From here, I noticed that I could actually bring the area under the arms out a little more than just the foam did, so I added some Poly-Fil to that area to help make him even wider and, again, make the proportions a little more accurate.
You can also see that at this stage I started adding a little more to the front of the vest to help bring it out more and to have it nearly touching in front which is what it’s supposed to do.
From here, I’m going to direct you to a video I’ve done going over a few other major aspects of this build, including the electronics, and some other changes I’ve made, especially ones straying from my original plans. Enjoy!
The end cut off a bit thanks to my accidentally pressing stop on my phone but hopefully that video was helpful!
All in all, here’s a video of all the current pieces working together, ready to be furred!
Quick WIP video of Vandal the #Obstagoon with the foam work /nearly/ done and SFX installed! I've already started patterning his head and neck (the felt along the side) as well as his hands and feet. Boi will be done SOON. #rarsuit#cosplay#Pokemonpic.twitter.com/LMAzWdF682
— McKinley Massacre//Team Skull Rayne (@McK_Massacre) December 31, 2022
Next post will be about me patterning each piece in preparation for furring, as well as working on the pants, stay tuned!
The way I pattern costumes for adding fur or skin is quite different than most use (which is the duct tape method). I use felt to make a sort of cover for whatever piece I’m working on, cut as needed (for darts) and then trace that pattern onto the fur backing. This may make more sense with pictures:
Welcome back to another log post for Vandal! Here I’ll be going over first how I constructed his claws for both his feet and hands, and then how I made the feet and hands themselves using foam. I’ve also decided on a new format in which I will bold specified materials to help point out important notes, or skimming for materials ideas, and I added headers to help organize the post. Enjoy!
Note: I actually swapped between working on the feet and hands, and the vest (the next post), but for the sake of having an organized log, I’m writing these next two posts as if I just worked on them straight through to finish, when in reality, I got a little done on the hands, swapped to the vest for a while, then swapped to the feet, then back to the hands, etc. I just preferred these logs to be more of a work summary than an actual daily or weekly work log, which would get really tedious.
The Claws
The claws were a project in and of themselves. A lot of work, but a lot of nice payoff too. They were a massive undertaking because of what I expect them to need to hold up to, especially on the feet. I knew I didn’t want them to be resin, which isn’t really abrasion resistant, and that would be a pain to work with, as well as Sculpey, and not very durable, so EVA foam was what I went with.
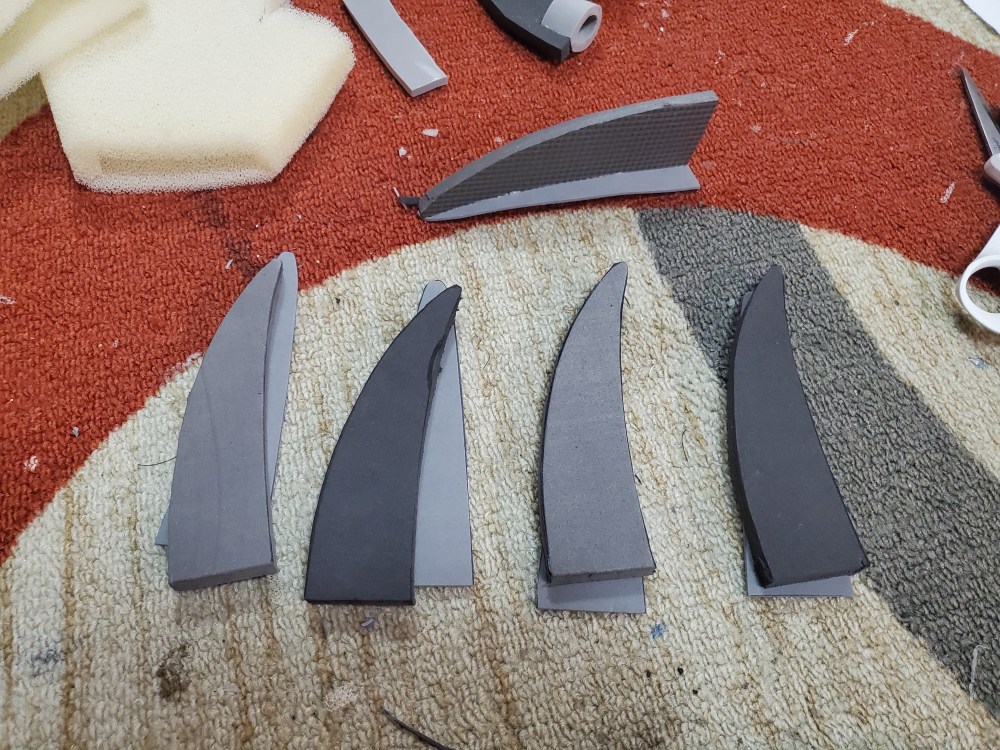
I made a prototype of the claws for basic sizing and shape using cardboard, then cut out the bottom shape and side (center) shape in EVA foam. EVA by itself is pretty resistant to scuffing and damage in general, especially after being Plasti-Dipped, and is actually made to be stepped on in (they use it for floor mats in most places). I also found Plaid’s FX Paint, made specifically for EVA foam, which is also scuff resistant and flexible/non-cracking unlike a lot of acrylic paints, so EVA + Plasti-Dip + FX paint would likely be pretty durable. But how I can I sculpt EVA into such a round looking claw without having it look like crap? That was my main issue. I didn’t really want to carve each one out of thick block of EVA, that’s never been something I’m good at, plus block EVA is very expensive. So instead, I decided to try this:
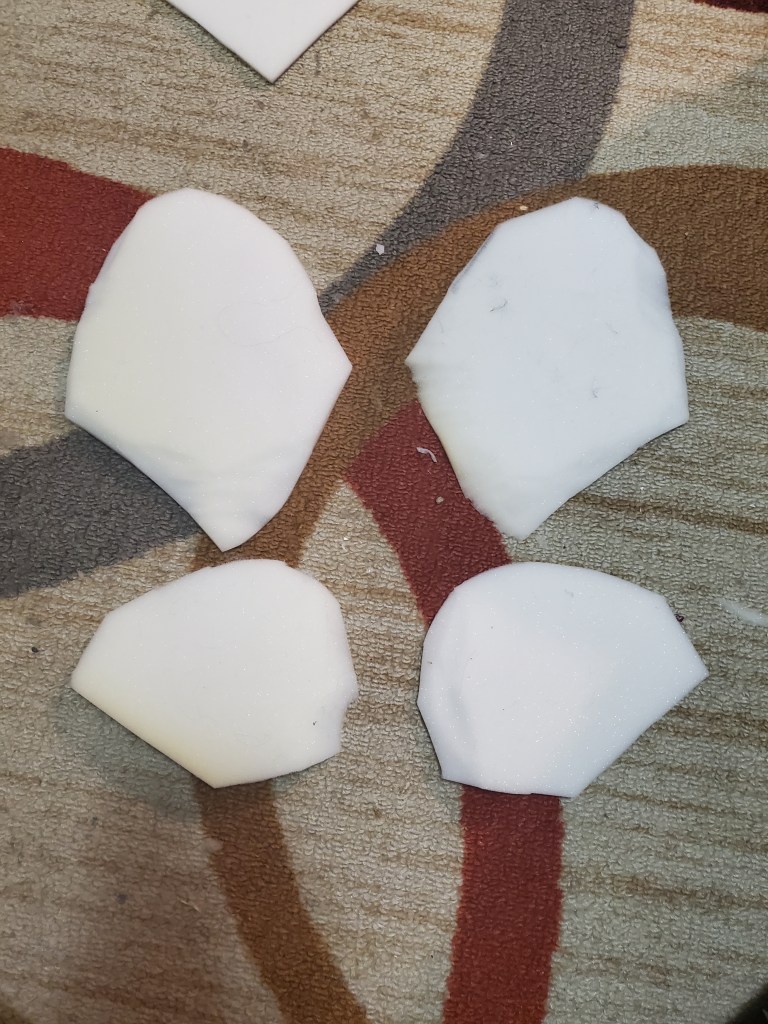
Using the side piece and bottom piece I cut out using the sizing from the prototype, I glued the side piece, which I’ll now call the core, as its the center of the claw, to the middle of the bottom piece, which will now serve as the bottom most part of the claw (not even part of the claw really but an extra buffer along the bottom that can scuff all it wants). From there, I took a piece of paper and cut out pieces similar to the side shape of the claw, which I then transferred over to thinner EVA foam (the light grey pieces), and glued along the top of the bottom piece, and the side of the core piece. I did this on both sides, and the result was this:
A pretty basic claw shape. Not great by itself though. The edges aren’t smooth enough where everything is attached, its ripple-y in places, and its not quite round enough to be accurate to the shape of his claws either. Fortunately the back of these claws are open, so I was able to stuff the inside with Poly-fil to round the shape out a lot more. Now just the edges need some help. And that’s another great thing about most EVA foam: it’s sandable! So I broke out my Dremel and a sanding wheel and went to town sanding down the edges of the EVA where I glued it. This works pretty good, as you can see, but it still leaves a lot of little sanding artifacts and leveling issues (pockmarks, and uneven areas).
For these issues, I tried 3 different products, only 1 of which worked the way I had hoped. 2 of them were “foam clay” products (the first one from TNT Cosplay and the second from Michaels), but I found them both difficult to adhere to EVA foam (the stuff from TNT impossible, actually, I believe it to be freeform sculpting only, and the Michaels stuff was difficult to blend into the EVA). I had a lot more issues with both of these products that I won’t discuss here, I’ll simply say they didn’t work for this usage. They’re likely fine and even good products for other things, just not what I needed for this project. What did work, however, was actually the cheapest of the 3 products: Foam Putty by Woodland Scenics. This stuff can be found in most hobby shops and is usually used when sculpting terrains for railroad models and similar things. It doesn’t shrink, it dries super quick, it’s sandable, and best of all, it likes to stick to EVA foam and can be easily blended into the EVA at the edges unlike the Michaels foam. The only unfortunate thing is that it’s not really flexible. It can bend a very slight amount, but it will crack eventually. I found a fix for this however, which I will go over in a moment. But first, I added the foam putty to the EVA claws where I felt it was needed to help level all the craggy areas or divets in the foam. It was a lot smoother, but I wanted it more smooth. So I broke out some of my Golden (brand) Acrylic Gloss, which is very thick and helps a lot with leveling. It also helps adhere the Woodland Scenics’ foam putty to the EVA and seals it in place, so that it no longer cracks when moved because the acrylic (and eventually the Plasti-Dip too) locks it in place and creates a sort of skin over it. This is how to avoid cracking of the foam putty 🙂 Though I still wouldn’t suggest putting it in any areas that need to move regularly, it may still eventually wear out and begin to show canyons or other imperfections. With the Golden Acrylic and Woodland Scenics Foam Putty applied to the claw, I finally was happy enough with the smoothness to start using Plastic-Dip to seal the whole thing. Plasti-Dip is very thin so it does not help with leveling really at all.
I sealed each claw with 4 layers of black Plasti-Dip (spray, btw, not the actual dip) and then 3 layers of white Plasti-Dip. This is just the way I tend to like to seal EVA foam so I know I got every bit of the original foam. (I should have taken a pic before painting, but I did not; apologies, oof). Finally I can paint the Plaid FX Paint directly onto the Plasti-Dip. Again, it is flexible, non-cracking and scuff-resistant paint, so leaving it as a final layer seems like an okay thing to do, especially since the actual claw should not come into contact too often with the pavement, the EVA along the bottom and partway up the side should take most of that abrasion. What the paint needs to resist is stuff like people kicking the claws, accidentally stepping on them, etc.
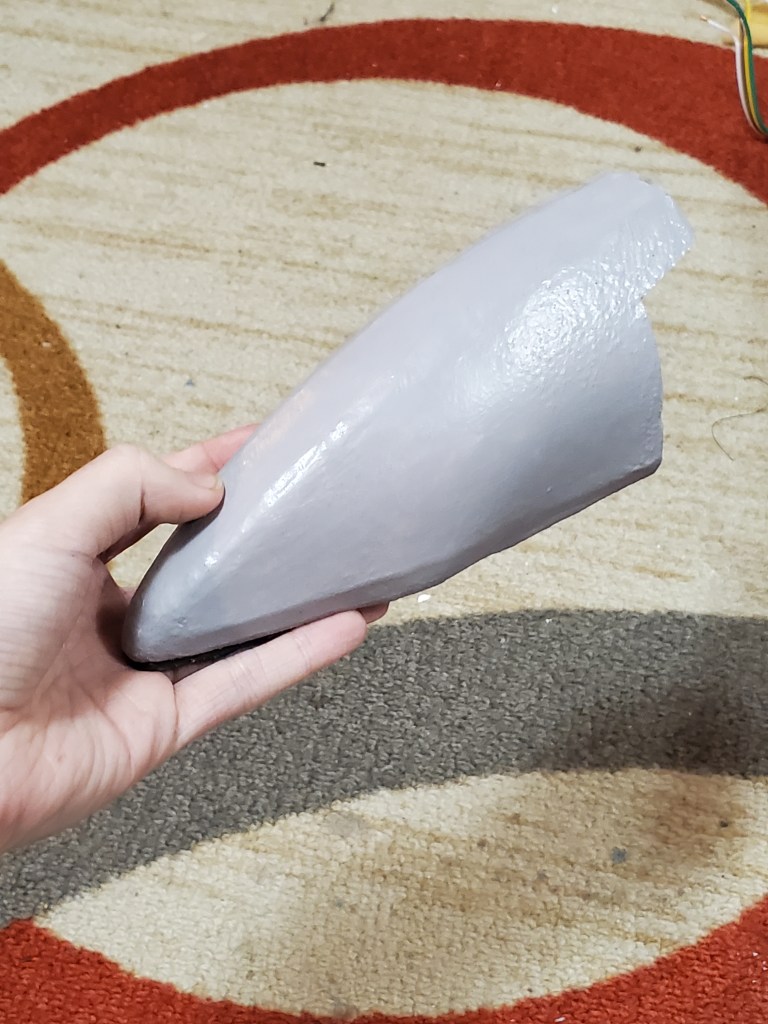
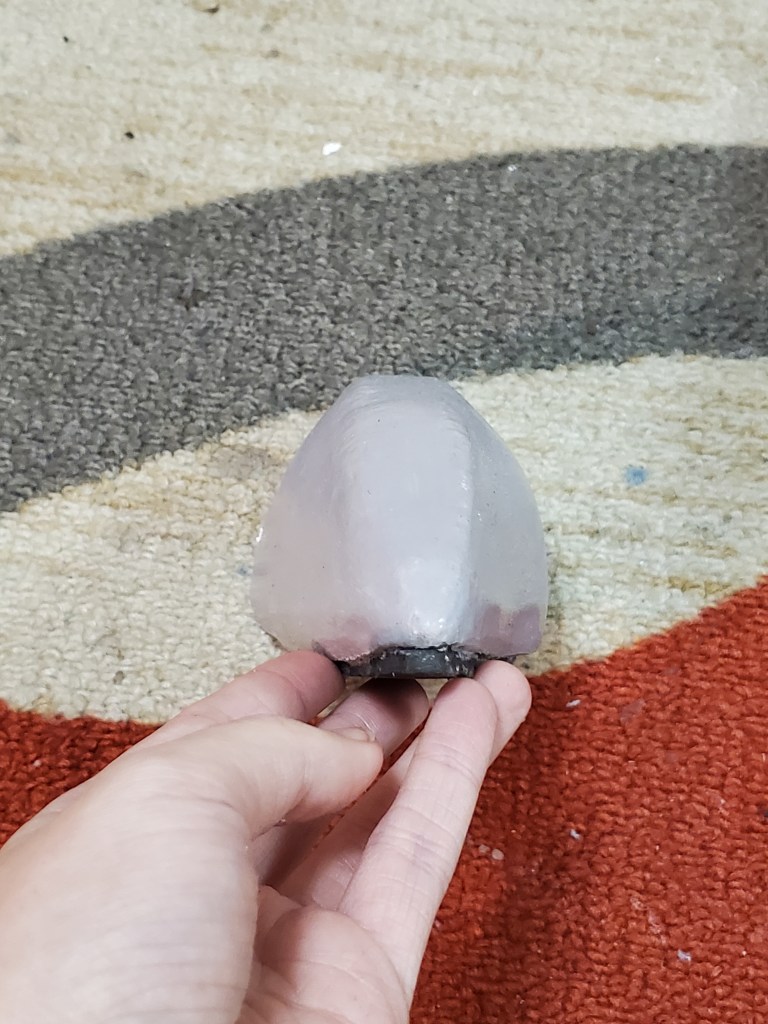
With a couple layers of Plaid FX Paint, here is the final result of a nice, smooth, damage resistant Obstagoon claw:
(The weird cutouts in the back was for me to attach it to shoe to test durability!) WHEW, that was a lot of work, and I had to make 6 of them. But they’re worth it I think in their durability and looks! But, lets get back to building the feet. Now that I’m done with the claws, time to move onto the actual feet, and build the real feet claws (I won’t be using this one because of the cutouts, plus it was just for testing).
As a durability test summary, I walked laps with these outside on pavement, as well as stepped on them a number of times with combat boots, and I was not gentle. The claws show no scuffing so far, and when crushed, they popped right back up and any wrinkles disappeared within a minute or two, not cracking or wrinkles staying on the surface. Obviously I’ll have to take these to a con to determine final durability but so far, so good!
The Feet/Shins
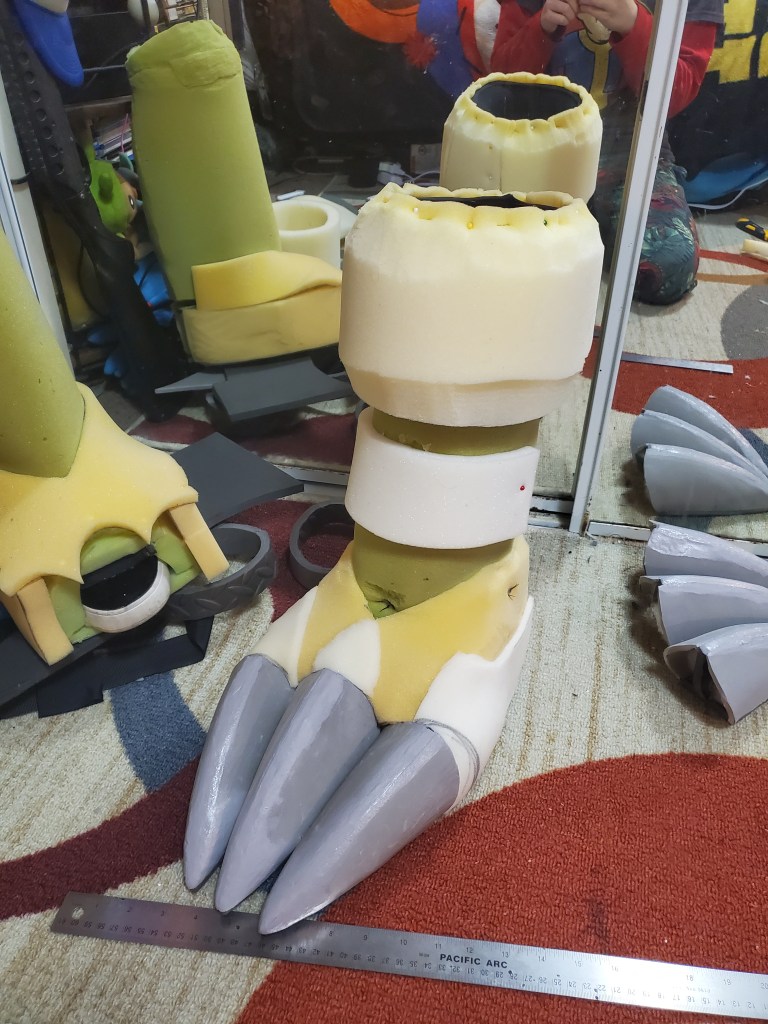
I decided to make the feet and grey leg warmer things one piece, to slip on like boots over a pair of what will basically be pants. Fortunately, I had perfectly sized (height) leg foam wraps from my old Peridot cosplay which was otherwise starting to fall apart, so I recycled other pieces just for stuff like this (I kept her hair and goggles though, very proud of those!) So I grabbed those out of storage, cut the toes off and add the newly made claws to them, along with a new pair of shoes and bam, there’s the start to Obstagoon feet! I also made a quick, basic liner out of spandex that I sewed into the bottom near the shoe, and will sew the top into the fur when I get there. I added foam and Polyfil under a layer of 1/4″ foam to create the curvy shape of the legs, and Plasti-Dipped when I was all done.
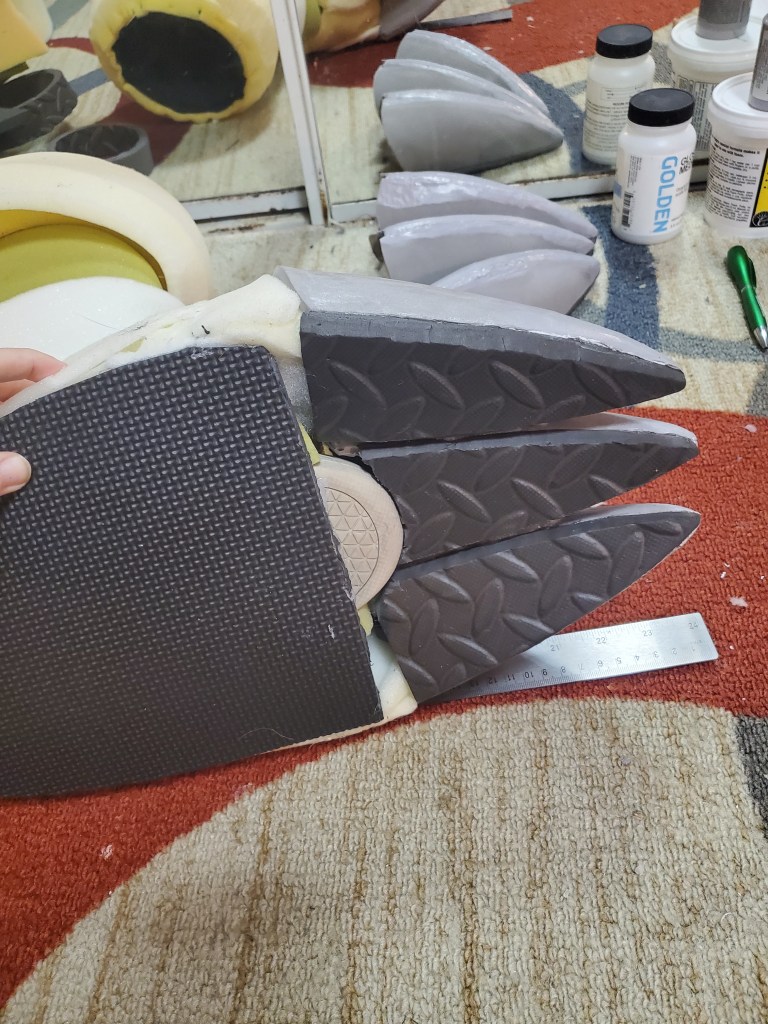
I added a little bit more foam to the foot to make it look a little more accurate to the shape of Vandal’s feet, and used foam to attach the toes to the base of the foot, leaving the EVA at the bottom of the claws detached from the bottom of the foot EVA. This was essential to helping the toes to not scuff the ground so much when walking. It allows them to pivot easier and not be forced back into the ground upon taking a step. It’s hard to describe in text, but it helps a lot with the potential scuffing issue just by having less resistance between the toes and the ground. You’ll also recall that there is a little bit of a buffer between the actual claw and the EVA foam on the bottom, so that layer of EVA should be getting the abrasions and not the actual claw itself in most cases.
After this foot was done, I took it for a stroll outside to test the resistances. No scuffing detected at all so far after making a few laps! I also put on a pair of boots and stepped directly on the claws a number of times. They bounced right back and any wrinkles disappeared within about a minute or two. Very sturdy, damage resistant feet! The hand claws won’t need as much attention as these got, because they won’t need to hold up to, for example, people stepping on them, but it’s good to know this method works for things that need to be damage resistant.
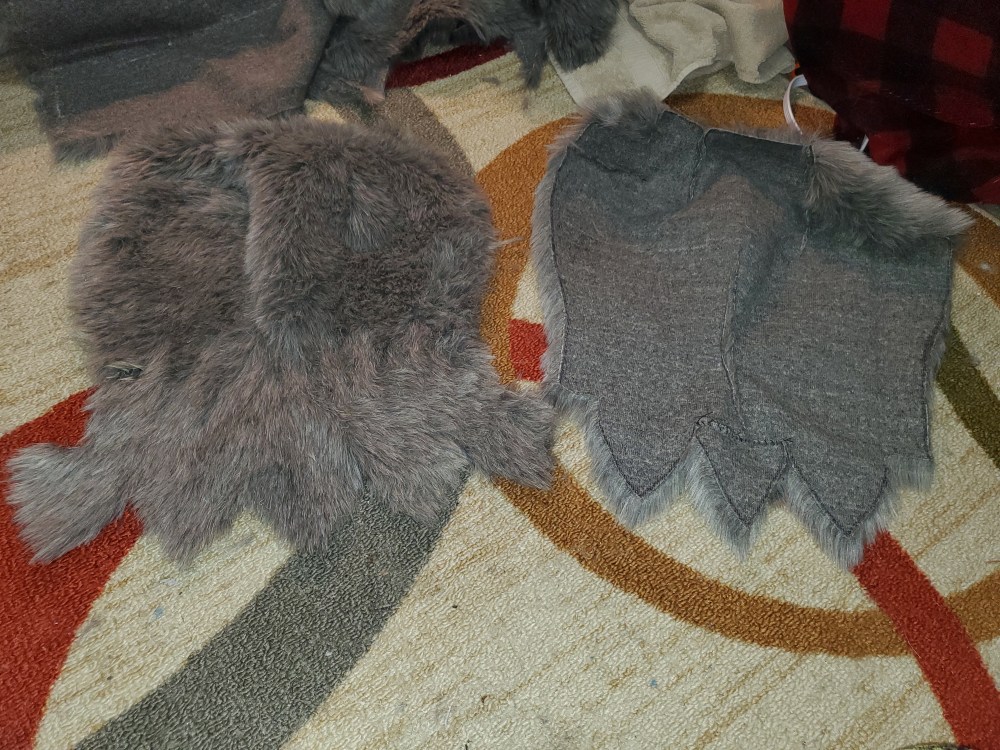
I’m not going to add the spikes at the top or bottom of the leg yet, instead I’m going to pattern them into the fur and stuff them while I fur it, because it would be really hard to get the sewn fur over foam spikes like that, so at this point…
…I have ready-to-fur Obstagoon feet! Yay! I’m not super happy with the left one, I actually made a mistake; before taking the time to flip the top foam pattern over to do the other side, I glued and sewed it on, so I had to freehand the second side and it didn’t turn out too well. But the fur will likely cover up any issues, and if there are still visible problems I can fill it out a bit with some extra Poly-Fil, so I’m not too worried. The only real downside is that because of the Poly-Fil I’ve used thus far to make it match, it actually made the left leg tighter than the right, but that shouldn’t matter too much either, its not terribly noticeable when worn, just when putting it on.
But anyway, the feet are done and ready to fur, so let’s move onto the hands!
The Hands
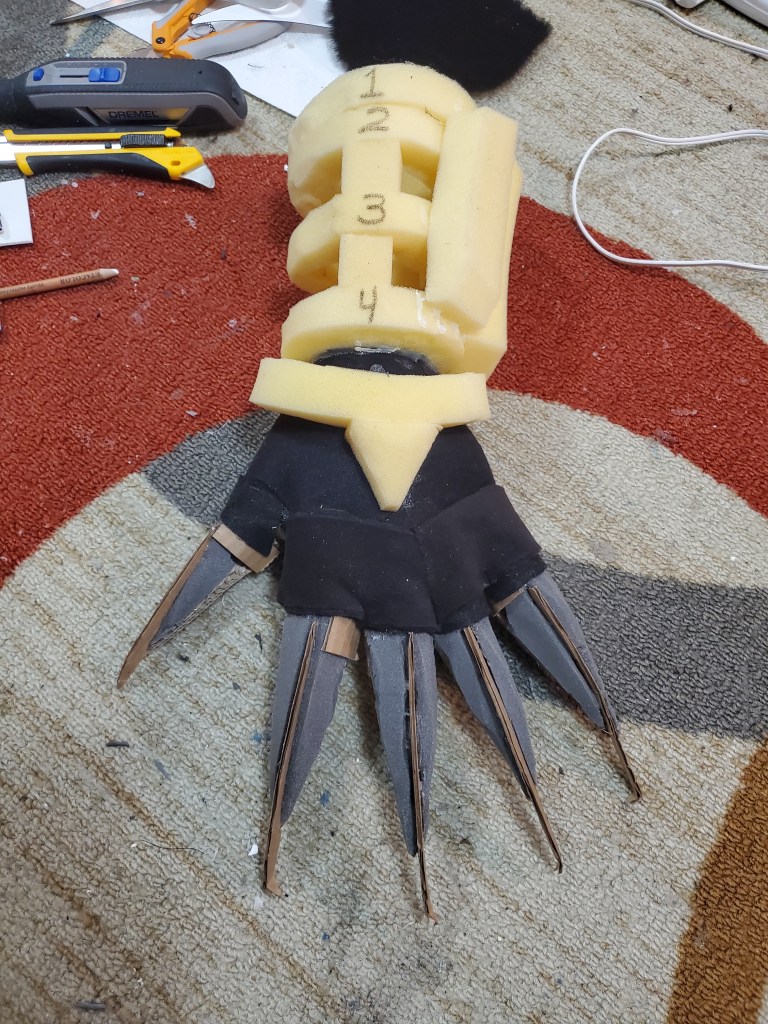
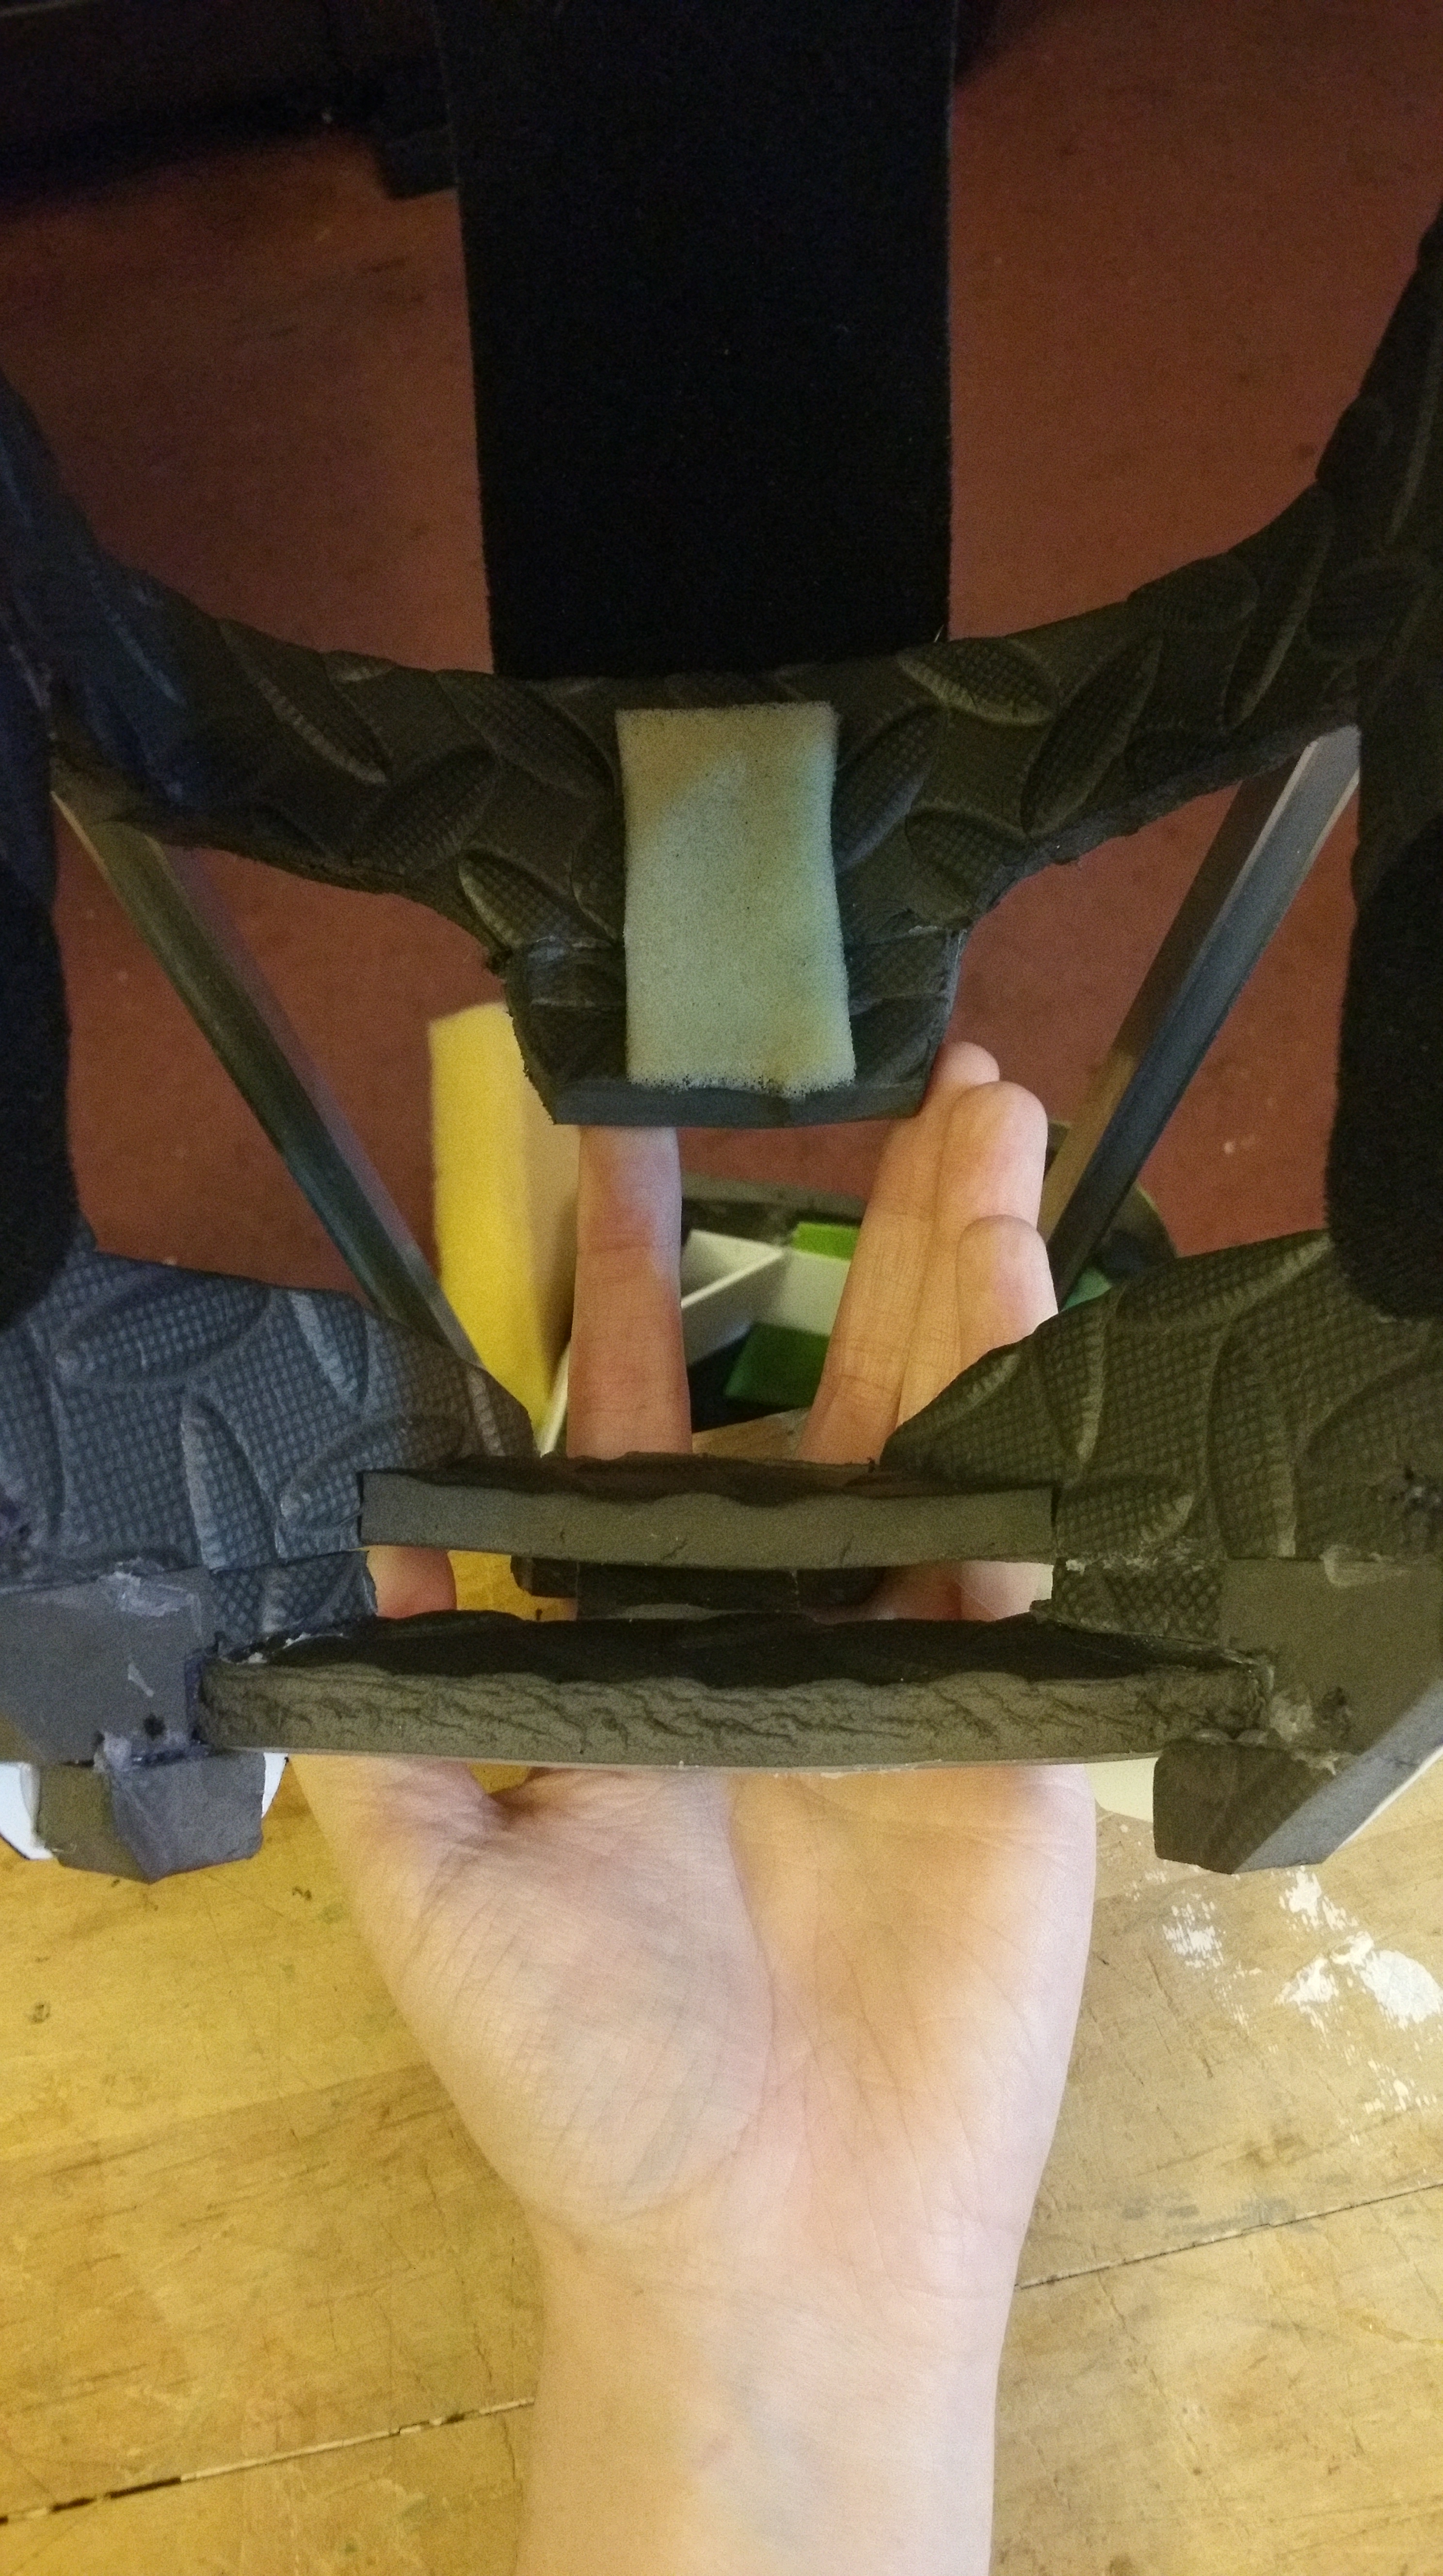
First off, I made a prototype of the hands, because I wasn’t entirely sure about the claw situation and the placement of my fingers. Obviously his hands need to be a little on the large side, but the claws need to be straight (more or less), so I knew I needed to figure out a very specific way to have my fingers sit inside the claws to get the right placement. This might not make a lot of sense, but hopefully the below picture will clear some things up about my thoughts on finger and claw placement:
So basically I need to make the hand as wide as possible while keeping my fingers in at least somewhat of a normal, comfortable position, so I made sure to place my fingers very specifically within the claws. My index finger is all the way to the right (inside) of the index claw, and my pinky is all the way to the left (inside) of the pinky claw, and the fingers in the middle are fairly centered, but a little off to the inside of the claws respectively. This allowed for the hand to look much wider than it is within the glove. The foam on the forearm can be ignored, I built his grey fur cuffs much differently in the end than I did with this prototype.
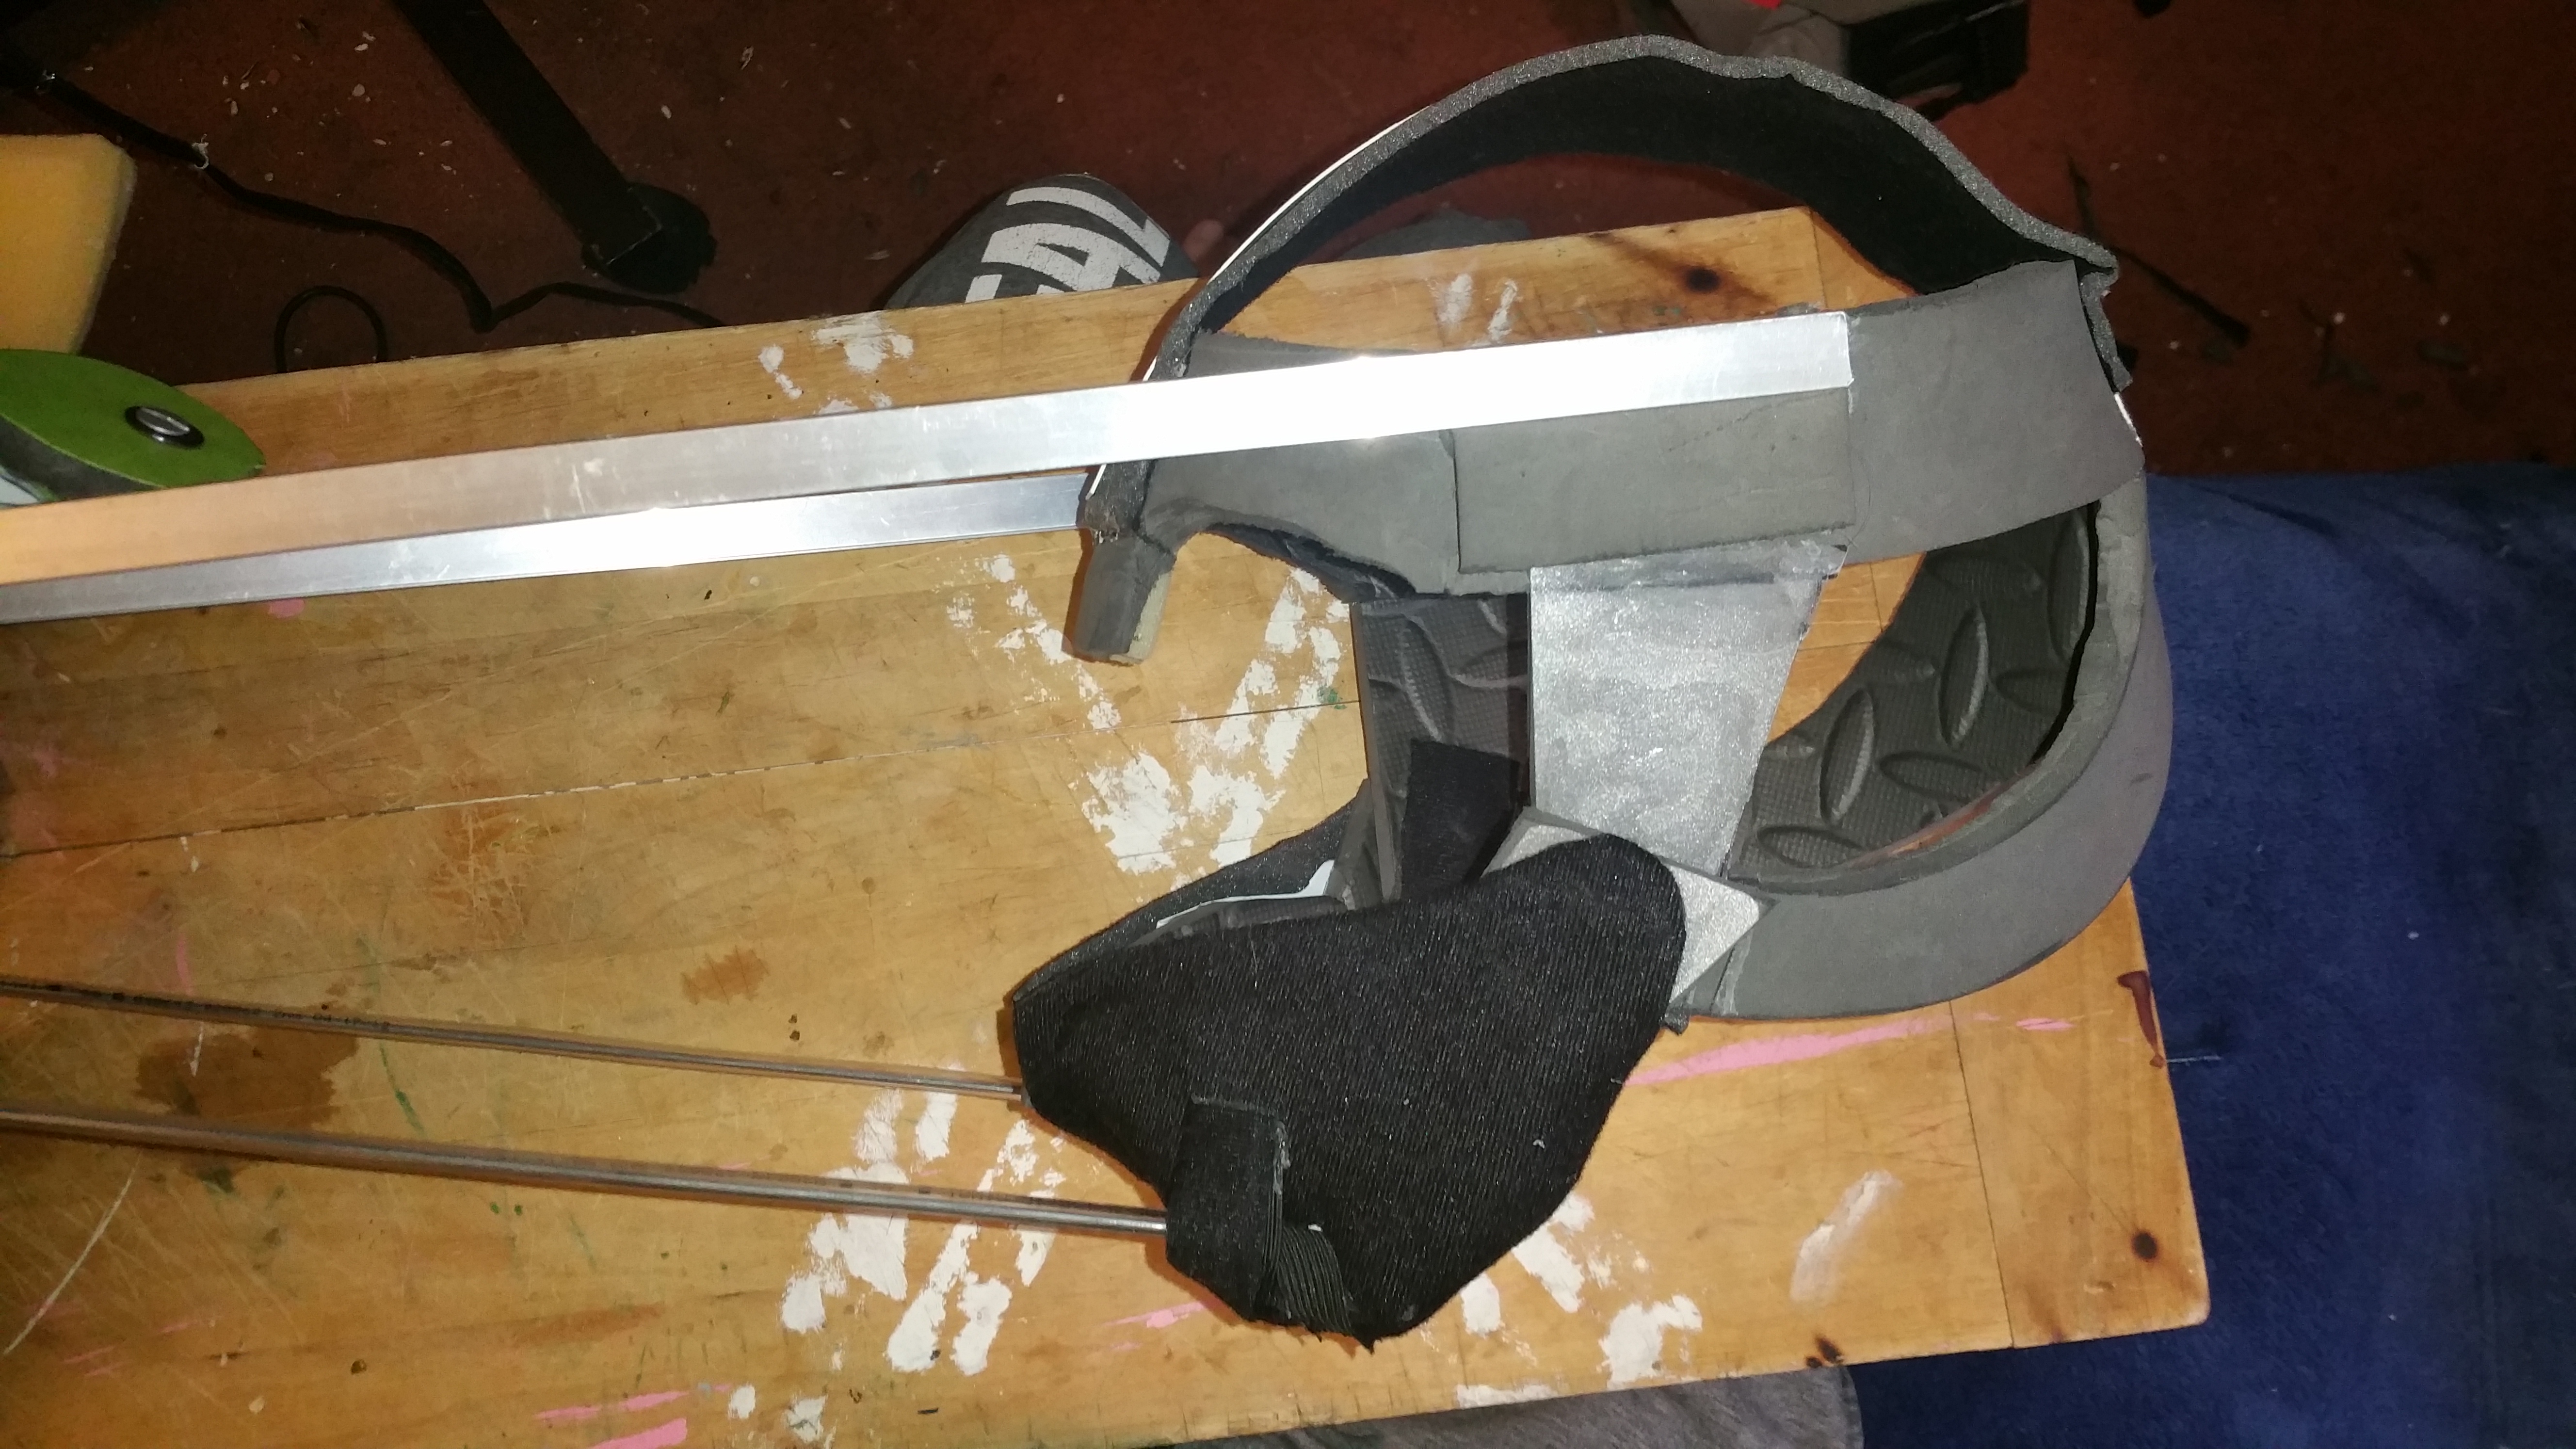
Once I was happy with the basic shape and movement of the prototype, I created a liner to which I’ll adhere everything,
Using the prototype as a template for sizing and shape, I cut out the palm in 1/4″ reticulated foam, and the upper part of the hand in 1/2″ reticulated foam. Reticulated foam is a very nice alternative to regular upholstery foam in places where you expect to sweat. Its anti-microbial and dries very quickly. This stuff combined with lining will keep the suit clean and dry on the inside, something that will be very nice for hands, if they end up getting sweaty (reticulated foam also breathes very well so the likelihood of it getting super wet is lowered as well). i glued these two pieces together with a thin piece along each side to raise it up slightly and make it a box-y shape so it wasn’t just two slabs of foam glued together.
With this, the base for the hand is done, and it was time to move onto the claws. I went through the same basic process as when I made the feet claws, making a bottom (this time out of very thin EVA foam) and the core, but had to pay a little extra attention to where exactly my fingers were sitting within these claws. for the middle and ring finger I had to cut out part of the core to make sure my finger would sit in there. I made little EVA foam “cages”, I guess you could say, for where my finger would sit, and glued the liner into them to ensure they wouldn’t move and that the liner will stay down in the hand when I take off the hands. From there, I added the sides of the claws , and stuffed where I could with Poly-fill to keep them a little round. Once that was done, I added a piece of foam to the tops and bottoms of each claw to attach it back to the hand as sort of “fingers” that likely will not show once furred which is fine. But it helps with keeping the claws in the correct position on the hand.
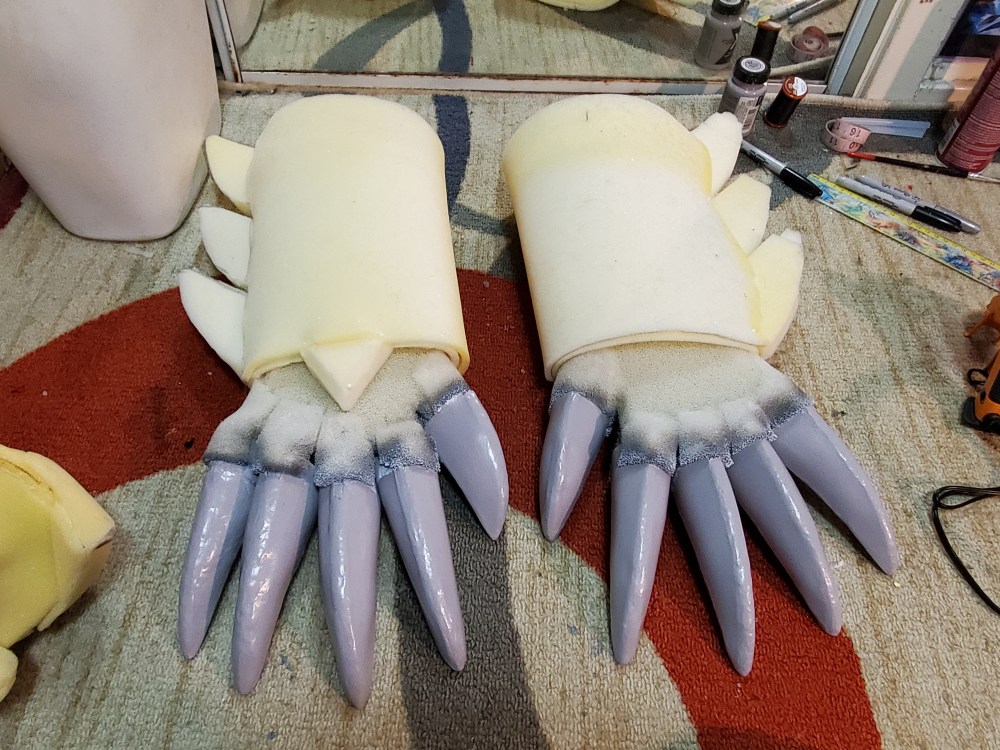
Now, I did all the same stuff as I did with the feet claws and smoothing them out. Acrylic fluid, foam putty, test painting, and eventually, Plasti-Dipping then painting to get the final result:
Pretty decent looking! You can still see the sanded areas up close, but I’m not super worried about that, and it’s still pretty subtle. To me, it just shows that they’re handmade and not 3D printed or otherwise cast as one piece.
The Forearm
Now to move onto that giant grey part of his forearm. This I did much more simply than what I had created for the prototype. I didn’t end up needing ribs like I did on the prototype originally because I decided to use reticulated foam instead of regular upholstery foam, which will air out much easier and doesn’t need the big gaps to be light and airy.
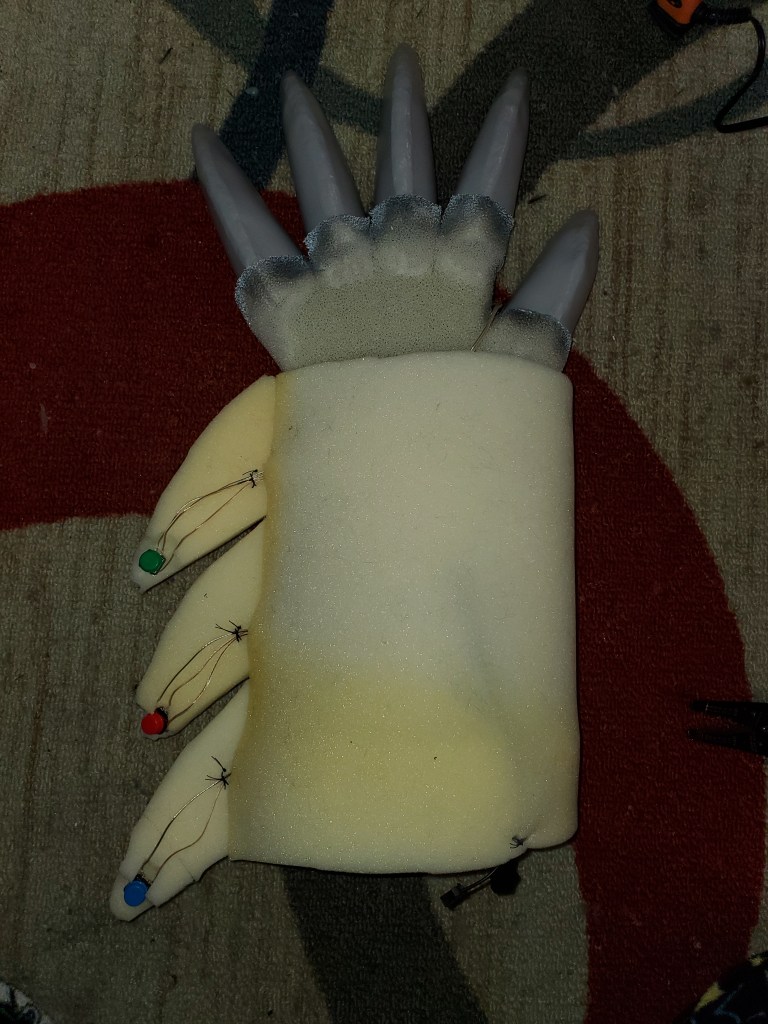
The first layer is a single piece of 1/2″ reticulated foam, sewn at the base near the hand to the inner lining to help keep it in place (I also tacked the edge of the hand to the liner here as well). This buffer layer will help the arm to be sweat resistant and cool, because the next few layers I’m just going to use regular foam to help build out the bulk. I have more regular foam than reticulated foam currently, so this is the general design I went with. Below are progression photos (I also added the spikes along the side between the second and third layer).
Before I glue the final layer of foam to the left side of the hand, though, I need to add the buttons and wiring like in my original outline, so here’s that (buttons and connectors from Adafruit):
And with all of that, the hands are now ready to fur too! I know the inner edge of the foam going down toe liner probably looks really ugly and unfinished, but I’m going to have the fur fold over and go down inside the glove a bit so it won’t look that bad when completed.
I should also probably bring up the fact that I used 1 4-pin JST and 1 2-pin JST instead of just 1 5-pin. This was my bad in ordering, and I didn’t want to wait for another single connector so I just used two different ones.
Next post will be about my construction of the vest, upper arms, and adding the electronics! Stay tuned! And as always, if you have any questions or comments feel free to drop them below.
The way I pattern costumes for adding fur or skin is quite different than most use (which is the duct tape method). I use felt to make a sort of cover for whatever piece I’m working on, cut as needed (for darts) and then trace that pattern onto the fur backing. This may make more sense with pictures:
I’ve finally made it to an exciting stage: foaming the skeleton! This process took me about 2 weeks of full days work, and I made a few more changes to the skeleton as well.
I started with his head, which required a lot of foam around the back to make it less square and blocky looking. I also started building it up toward the first hair spike. Looking at the 3D models from the Sword and Shield games, its apparent that his head is very smoothly arched up into the hair spikes, whereas my skeleton has a flat top. This is fine since the skeleton was just a base and I anticipated needing to add a lot of foam to it to achieve an accurate shape. I try to keep the skeletons minimal.
Note: I also played around with his ear placement at this point, so one side has an ear pinned on!
The foam was layered, with the upper layer (the grey foam) being sand-able for smoothing around the eyebrow. I also added a layer of thin 1/4″ foam on the side of his head to bring it out slightly, and shore up the area around the hinge where his lower jaw was slightly inset. I also added a layer of headliner around his nose to round it out some and smooth it, as well as the bridge of his nose. The grey felt is there for extra smoothing, and in the case of his nose, to cover the bolt attaching the inner head rods. You can ignore the yellow foam on his neck in the middle picture, this was just for testing smoothness and not official yet 🙂
Now, the first thing that happened in terms of changes was an extra reinforcement I felt the need to add, after noticing that the area was sagging a bit as I was foaming his head. The area in question was the topmost sliding area of the head (where his spine attaches to the back of his head). While the area itself, as well as each side, was reinforced with plastic, or in the case of the hinge itself, a thick piece of PVC, the EVA foam between these areas was not reinforced, and a crease was beginning to show. I took a piece of styrene and covered the entire area, locking it in place with both glue and zip ties. Below are before and after pictures (I had to remove the third hair spike to do this):
This area now still flexes slightly which is great, and the bolt still slides underneath the styrene, so all is now well with the sagging hinge!
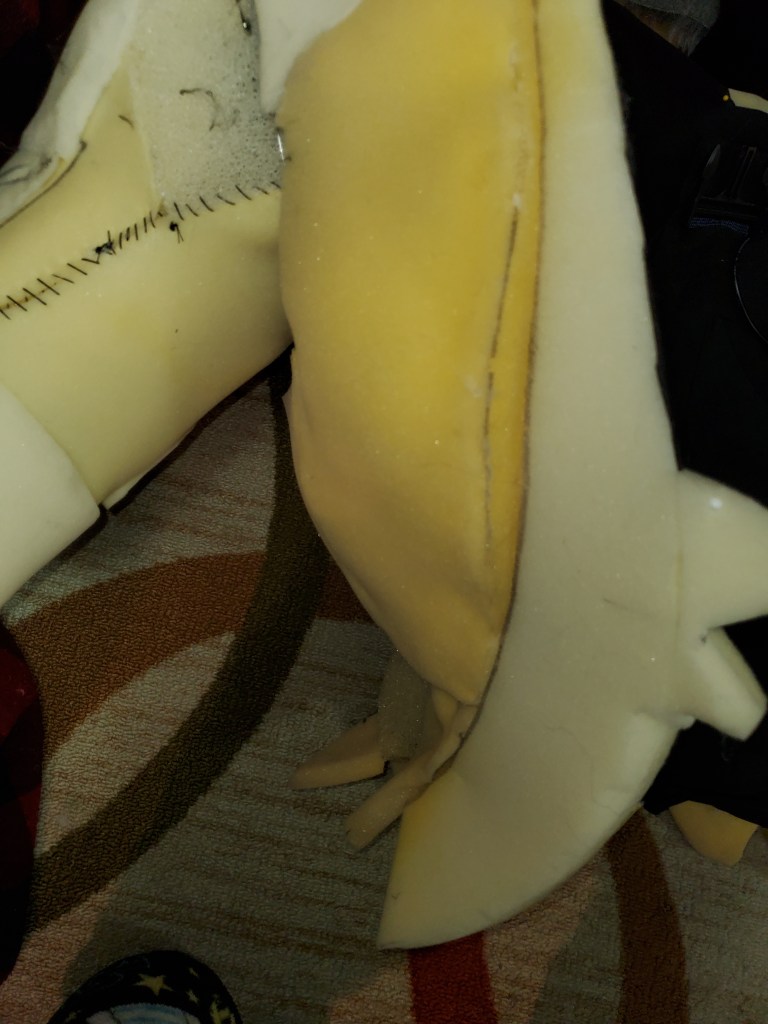
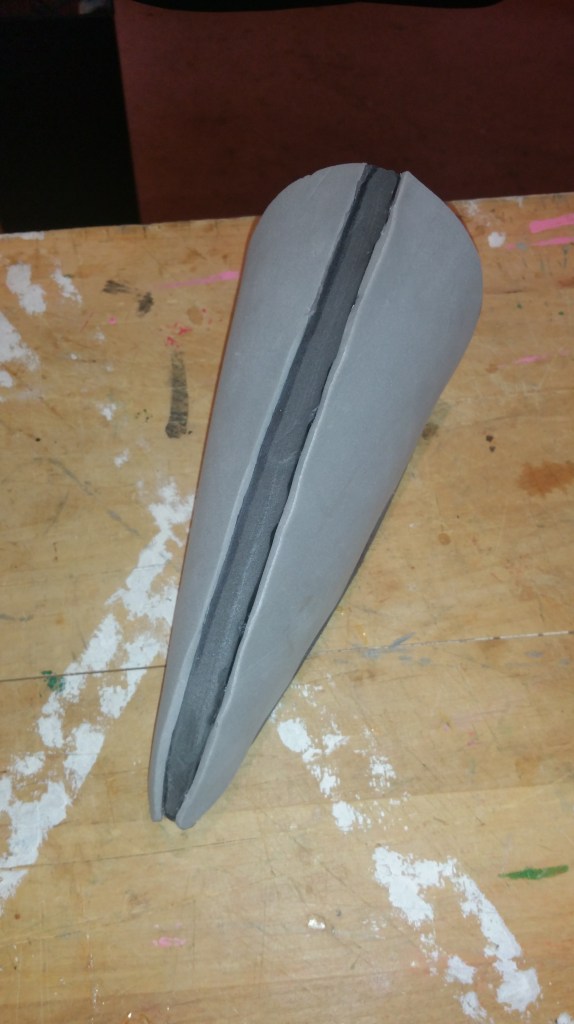
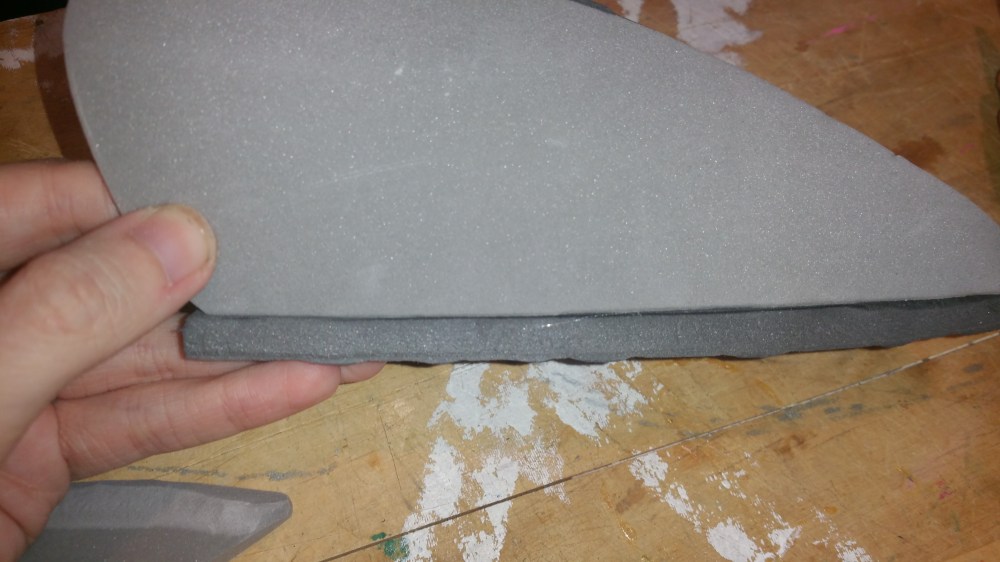
Next, I started fleshing out the hair spikes (#1 and #2 only so far, with the others only being center bases), and began filling out his shoulders with thick foam. I also had to shore up the area just after his shoulders because the skeleton curved inward pretty drastically, so I layered a couple pieces of foam into that area to bring it out slightly (the last two pictures show these pieces).
After this, I initially added some pieces of foam from my scrap bin to continue fleshing out the neck, but later decided I didn’t like this setup, for a couple of reasons: one, it was just messy looking, and that also leads into the second reason, which is that I will be adding a zipper into the seam between his hair and the sides of his neck on both sides so I can peel the foam back to do interior work if necessary, so this area will potentially be seen or felt and I decided I’d like to put it together nicer than that. So what I did was use the dark grey foam that is sand-able (it’s not EVA but its similar) and layered them sort of like muscles, sanding down the edges so they will look smoother when the neck is complete.
The first picture below shows what I had prior to the layered grey foam.
You’ll probably also notice the weird looking patch of foam on the shoulders, it almost looks like a patch of buckram. This is reticulated foam and acts as a vent! Or will hopefully, it really depend on how well the fur I’m using ends up breathing. But hopefully it will help with heat dispersion.
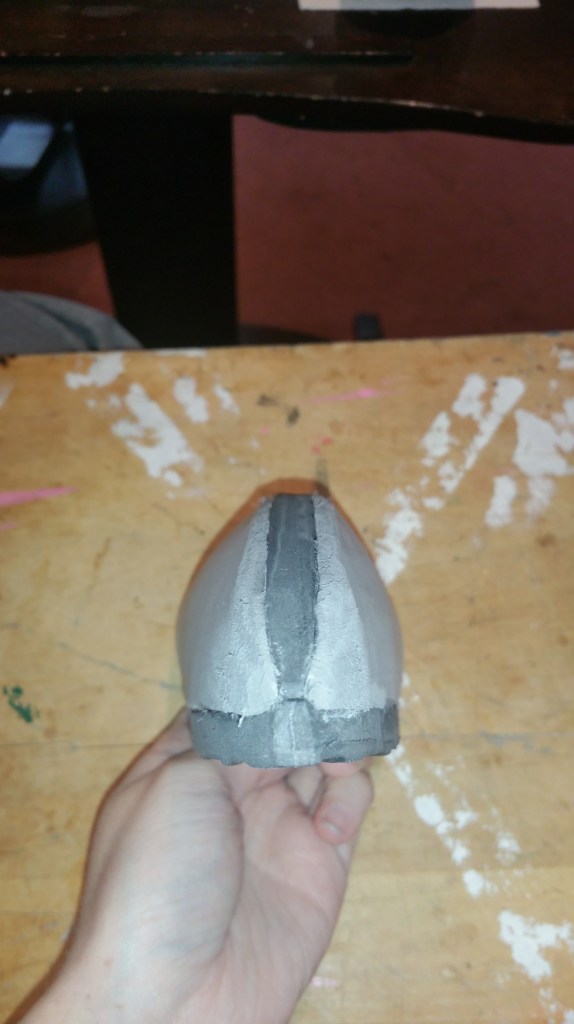
I also put down a layer of the grey foam on the chest so the neck tapers a little better into that area and isn’t as abrupt looking at the edges.
I’ll also add real quick what I did to help the cheek fluff/spiky things stand out in the right way, and make them sort of reinforced but still flexible. Instead of just being made of foam (and thin foam at that, 1/4″), I lined the back with a layer of thin EVA foam, and then added two strips of the same EVA to the back of that in a curved arrangement, so the help make the spikes stick out instead of going in toward the neck.
That also reminds me to mention, since you can see it in the above picture, I slightly modified the jaw wiring to be attached in the center of the jaw rather than on either side of the jaw. This alteration was done after I noticed that the wires being on each side of the jaw were actually impacting the movement of the head from side to side, as they would begin rubbing up against the inside of the first neck rib and impede further movement. By moving the wires into a ^ shape, similar to the rods in the head, they no longer come close to either side of the inside of the ribs.
As a small alteration note related to the above, I also added two loops of elastic that hang from the top of the neck, attached by two zip ties that slide along the plastic bar near the end of the neck (the one that also helps to reinforce the neck sides). Through those loops, the metal bars going from the sides of my head to the inside area of Vandal’s head (attached at the nose, if you recall) and help a lot with relaxation and jaw movement. While not impacting the movement itself, these elastic loops allow me to open the jaw by tilting my head down instead of needing to open my mouth. I must open my jaw, however, when his head is up, since the loops then no longer support the rods. This option though allows me to walk around with his mouth open so I can see forward without needing to have my own mouth open at all times. Obviously this is much preferable! It also helps open the mouth a little more than I can naturally open it with my own jaw, when I open the mouth all the way and tilt my head down, his jaw opens quite wide!
From here, I continued to flesh out the hair spikes one by one, smoothing them over with a layer of thin foam over the top of the chunks I was laying down from my scrap bin.
I carved some of the thin foam more as I went along, hence the ugly looking seam there in the middle, which won’t show after I add fur.
You’ll probably recall that, since the head moves, the spikes had to be very carefully constructed so that this movement wouldn’t be impacted. So, the inside of the second spike (initially I was to make it the first spike but on second consideration looking at the 3D models, its the second spikes that collapses into the third) is carved away to fit the curvature of the third spike, and only the outside edges of the second spike exist to make it appear as though its a complete hair spike. I’ll continue with this illusion when I go to fur this area, adding a strip of fur with a slit down the center of it, to the back of the second spike to cover up the carved out area and for the third spike to partially disappear into.
Around this time I also started to add foam in the gap between where the head moves around the base of the neck (you can see the thin foam behind his ear in the pictures above). This foam has a layer of styrene underneath so ensure it slides over the fur smoothly and easily.
To keep the foam and plastic piece as close to the neck as possible to help hide a seam for movement, I looped some elastic from the head base to the plastic/foam piece. This pulls the piece inward so it rests on the neck instead of sticking out, and because of the smooth styrene backing, it still moves very smoothly and hides the seam well even with just the foam (again, I have a piece of foam on the neck for movement and seam testing).
A did a similar thing to the throat area which you can also see starting behind the fluff under his ear.
Before I go to add more foam to the neck and fully encase the skeleton (also severely restricting my vision, since I don’t have the diamonds on his neck to see out of yet; that will come later), I want to install the eyes, while I still have access to inside the head. I cut out the roof of his mouth as well to help with this, and for maintenance purposes I will be making this a removable piece (via Velcro), with some of his teeth also attached to this and thus will be removable so I can safely stick my hand inside to either alter the eyes or fix anything with the metal rods inside his head.
I started working with the eyes first by making a paper mockup to find the basic size and placement for the pupil to achieve the following effect. The right-most image shows the EVA cutout of the pupil. The paper eye pattern is slightly larger than his eyesocket so I can glue the final EL panel onto the inside of head. The paper border around it is the actual eye area.
While not having this on the model in-game, I decided to add the little white eye gleam to this character; it seemed to make it pop more and just in general looked a lot better. Artistic liberty!
The first step to finally installing the eye was gluing the border in first. I lined the eye with thin EVA first and then added a layer of styrene on top of that.
After painting, I’m ready to put in the EL panel, and after that was glued in, I glued on the pupil, and voila:
(I should also mention that the white dot on his pupil is painted directly onto the EVA and sealed). The plastic around the eye is also sealed after painting and installing the panel.
After completing the eyes, its time to finish those hair spikes!
I completed these with the grey sand-able foam (slightly more flexible than my similar thickness EVA foam) and filled them with Poly-fil so they’re not totally hollow.
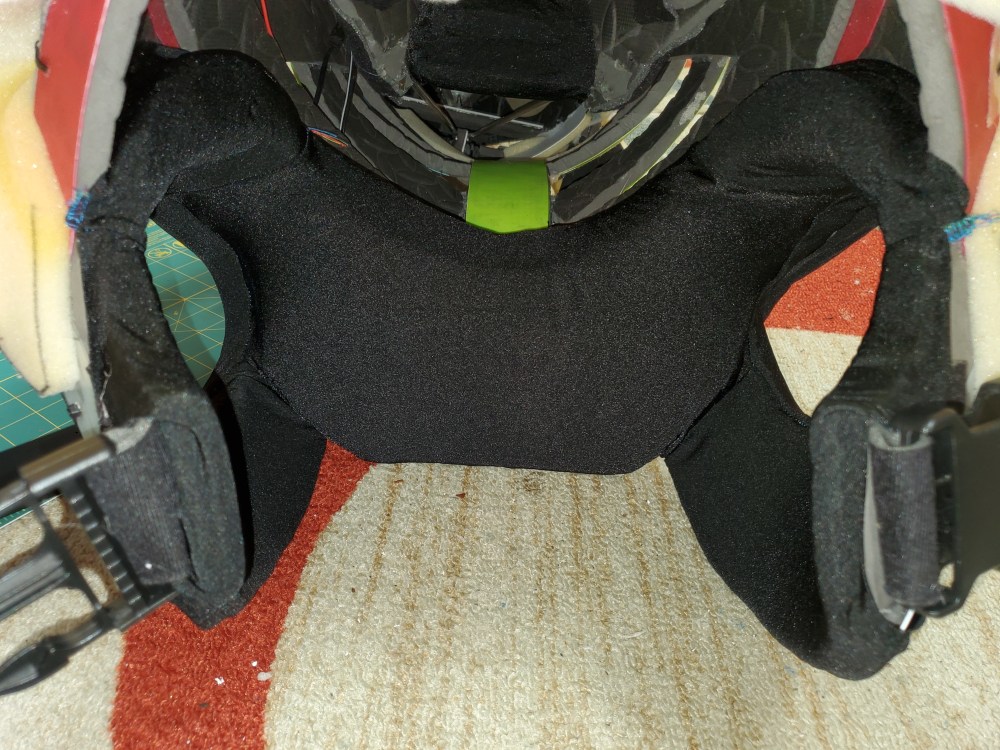
Next up was lining the inside of the chest harness and arm hole areas with foam for comfort and sweat absorbancy. For this I used more reticulated foam, which is highly porous, dries quickly, and is antimicrobial (aka it won’t rot due to yucky stuff). I removed the current padding I had and decided against (for now at least) making a new pocket for a cooling pack, instead layering a single piece of 1″ foam in here. I may revisit that pocket in the future but for now this will be fine.
After installing the foam, I broke out my hand-dandy new serging machine and lined it all, since reticulated foam isn’t the most comfy stuff in the world, and doesn’t slide over most materials very well.
I’d also like to mention here that I slightly altered the arm hole area in a couple of ways. For one, I didn’t like how cramped my head felt inside the neck, so I padded above the shoulders so the whole thing would ride higher on my shoulders. This of course made the helmet, which was attached to the spine via elastic, a little too far up, so I snipped the elastic. It is SO much more comfortable now! I had to remove some of the plastic from below the armhole though now that everything sits higher, because it was cutting into my armpit a little. To make up for that removal, I added a bit more around my chest area. This whole rig doesn’t weigh very much (around 5lbs) but if I still decide on adding the full body harness, this will give me more to attach it to.
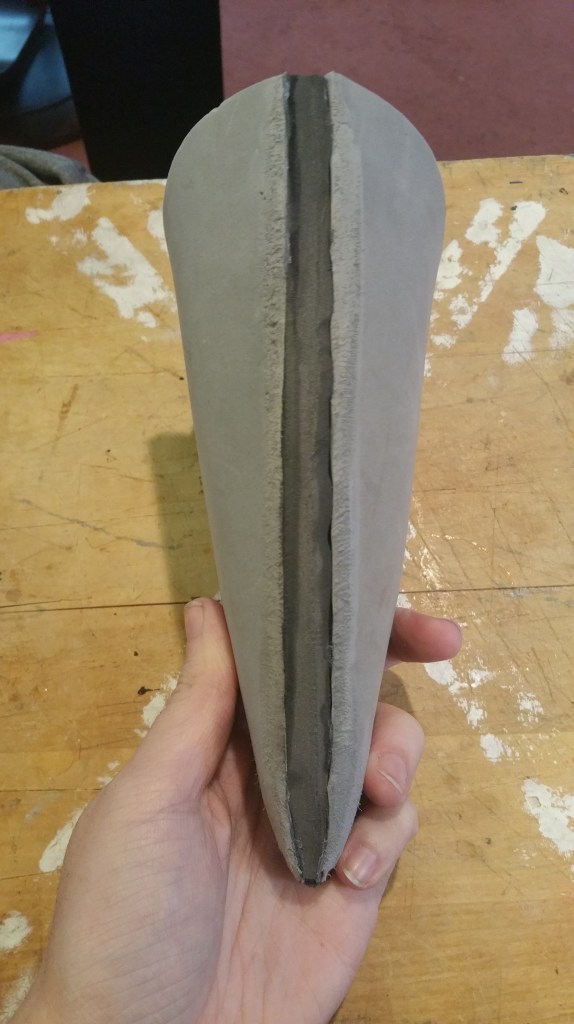
Now comes the time I must finish up and complete the neck, forfeiting my visibility for a while. It took me a lot of tinkering, adding of styrene and shaving down to get the neck in some areas to not show evidence of the ribbing, but I finally did it!
You can see the styrene through the foam 😛 but its pretty darn smooth, and I even layered a test piece of fur over it to ensure it was smooth. It very much is!
You can also see a few edits I made to the second hair spike in the second picture, a layer of headliner for smoothing and some styrene for gliding across the fur.
So at this point, his head base is completed! Yay! The next step will be patterning for fur and cutting out the diamonds for visibility. But before I go there, I wanted to add a fun thing: his tongue!
His tongue was fairly simple, but really fun in the end. I used minky fabric for this, and added some magnets to the inside so the tongue can fold up in his mouth and be out of the way. It’s also only attached with a piece of elastic to the bottom jaw, so if someone (inevitably) pulls on it, it will not break the rest of the suit, just pull on the elastic and put some stress on the lower jaw, which is fine.
And that’s just about it for this stage of the project! It sure was A LOT of work, but it was a fun process. Time to start on other things! I already have a bit of playing around done with his hands and feet so I’ll probably tackle those next.
If you have any questions or comments, feel free to leave them below!
The way I pattern costumes for adding fur or skin is quite different than most use (which is the duct tape method). I use felt to make a sort of cover for whatever piece I’m working on, cut as needed (for darts) and then trace that pattern onto the fur backing. This may make more sense with pictures:
A short log post this time just to cover a few alterations and updates I’ve made after my bit of hiatus from this project (a lot going on in my life lately…)
First things first, I reinforced a lot of areas with simple cable ties, and in one area, a plastic screwpost, because I noticed the hot glue doesn’t always hold too well to the plastic pieces. The clear rivet-looking things are the screw posts. I also added some HI styrene sheets to certain mild stress areas (around the harness where it moves slightly upon getting in and out of the suit) and both glued and cable tied them to the EVA foam. This way the glued EVA seams won’t come apart, ever. This will all be lined in the future so it won’t look as ugly!
Cable ties are something a lot of people just think of as temporary solutions, but for things like this they work very well. I will mention however, that I do not recommend them for areas that move excessively and hold weight/stretchregularly. They’re very difficult to break or stretch in general, but the more tension or weight you put on them, the easier they’ll eventually snap or stretch. The areas I’ve placed them here are infrequent (or none at all) stress areas, but with the plastic sheeting and the fact that they’re not actually supposed to stretch or move, rather to ensure the areas DON’T move, the usage will be fine. I’ve very rarely had a cable tie snap, and I use them frequently for both permanent and temporary solutions.
Near the end of the neck, I also added a piece of EVA layered with PVC board for a bit of added horizontal crush reinforcement.
I also installed a removable fan (removable via Velcro) that, because its attached to the bars along the sides of the interior helmet, moves with me as I move my head around. The battery box will be hidden inside the mohawk later on. The fan itself is far up enough to where it does not effect my vision through the mouth, and it’s very quiet.
One of the major things I altered in preparation for foaming is alteration of the area just behind where the head pivots. I removed the last ring of the neck and replaced it with a triangular piece that is curved slightly inward. This curvature allows for the head to still move smoothly and slightly overlap when turned left or right. The main reason I did this was because I started noticing how that last ring was actually being impacted by the sides of the head when it would turn, and I knew this would affect the foaming process and likely look weird when complete.
Also in prep for foaming, and now that there was a huge gap in the throat from removing that last ring and only replacing the top with the triangle, I added a single piece of EVA foam in the throat area that is curved up. This will be to attach the foam to and ensure everything stays flexible around that area, since it will need to overlap smoothly. I may or may not also add some mesh here, depending on how the visibility situation goes.
The final thing I did (besides add the start of the mohawk, which I’ll include in the foaming process) is revise the head shape some by cutting some excess foam and sanding it smooth or thinning it out in certain areas, such as behind his eyes where I thought it stuck out far too much upon revisiting this project. I also shaved down the eyebrow area, end of the muzzle, and part of the mouth to make it more straight instead of curved as much into a smile (it still looks like he’s smiling though :D)
As a side note, yes I sometimes work in my Star Wars pajamas 😛
Next journal entry will be on adding the foam, which I’ve already started on at the time of writing this. Remember to join my Discord server or follow me on Ko-fi for exclusive WIP photos even before I release the next log entry!
The conversion from the prototype to the final piece took far longer than I thought it would, and I took a lot of breaks working on it, but it’s finally done!
I had to do a lot of reworking as I went along; I realized I wasn’t happy with some of the design (such as thinking maybe the neck was a little too thick, as I still need to put a thing layer of foam over the whole thing), and some of it wasn’t quite working as well I wanted it.
The Neck
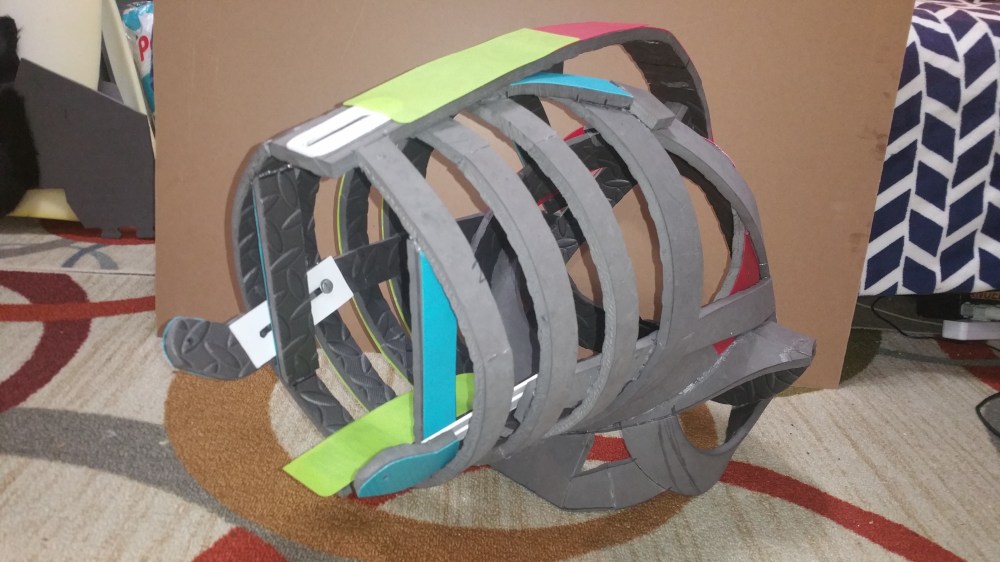
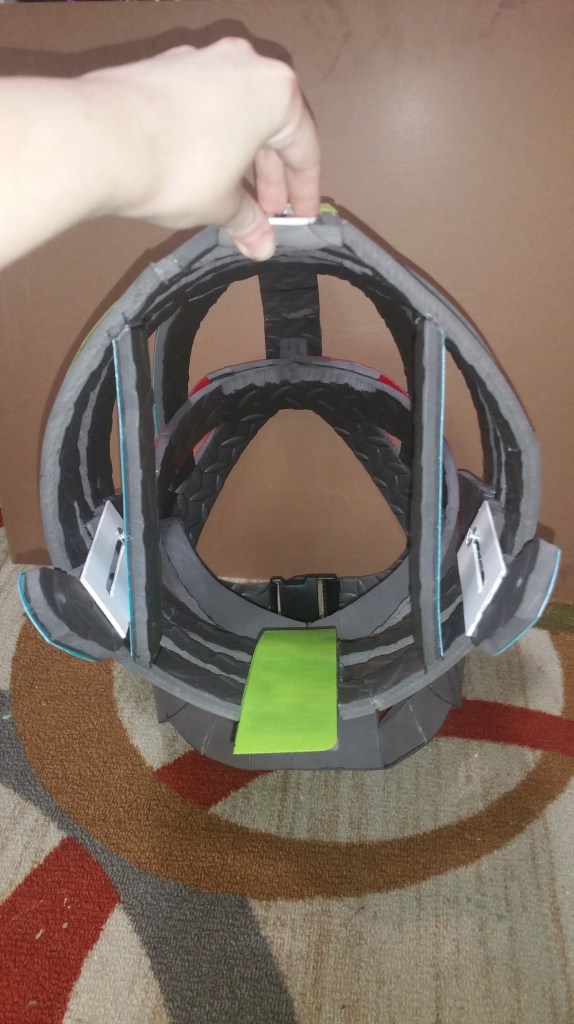
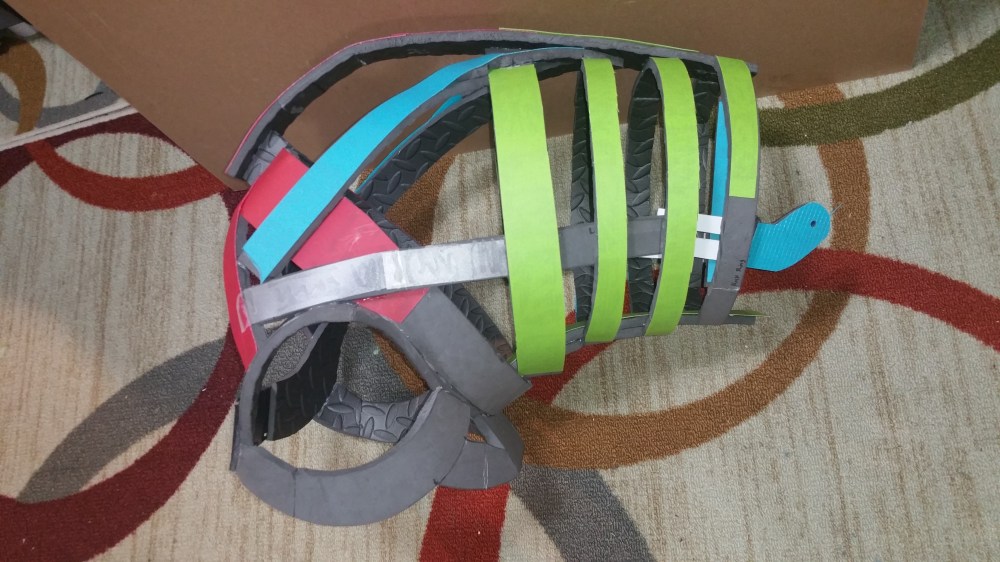
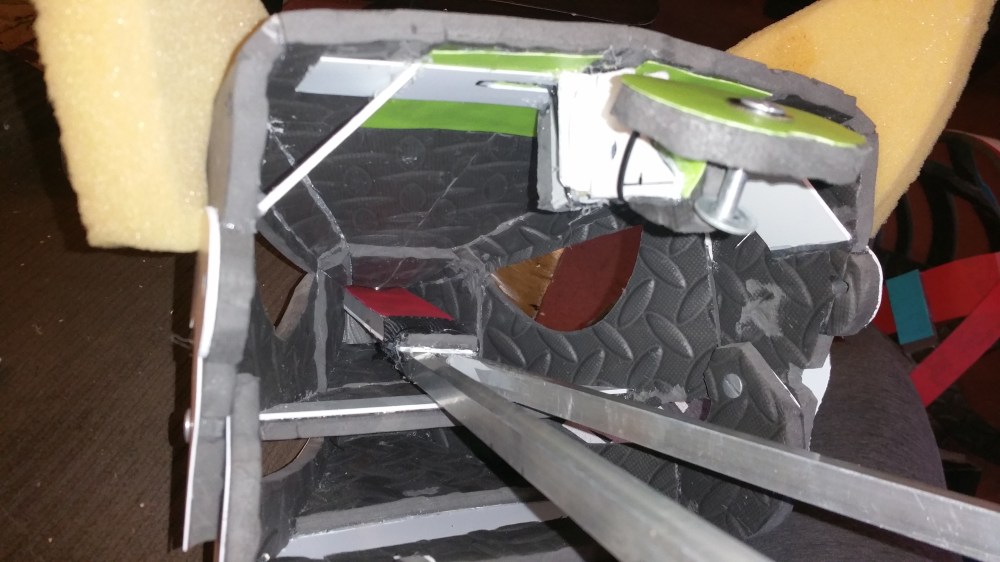
The issues I had were due to some of the design around where my head sat in the back of his neck. The arches I made, while structurally necessary to keep the whole thing sturdy, were too close to the interior helmet design I have to wear on the inside, resulting in restricted movement, so I had to redesign some of that (a few different times in some places, oof). Picture below is the original design, and then afterward is the edited (final) design.
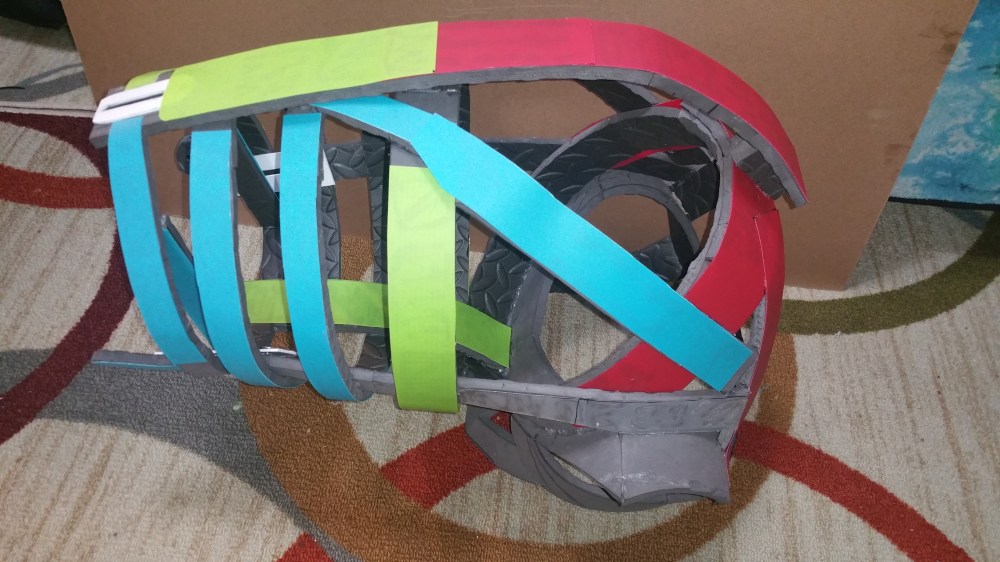
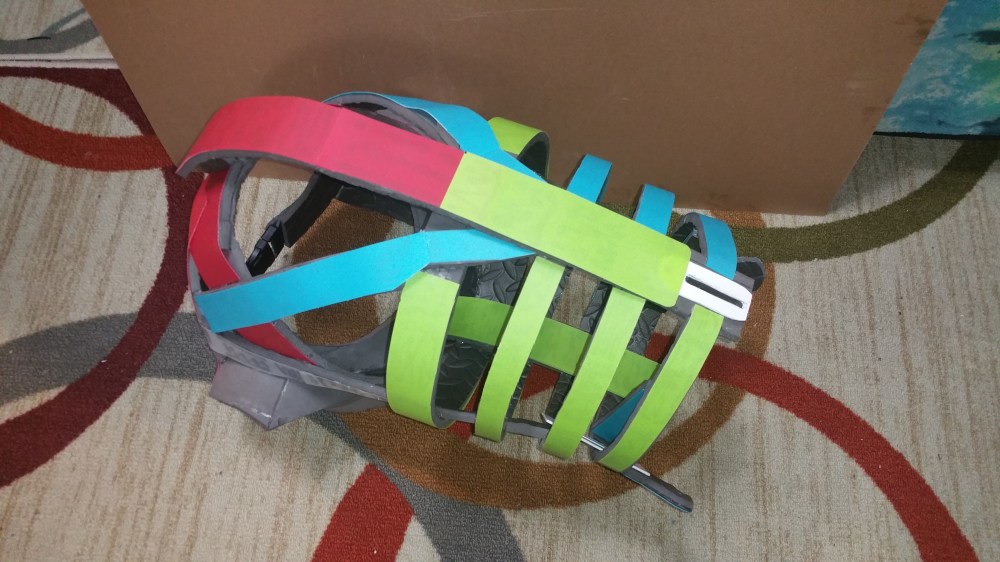
Below is a gallery of my initial design. Note: The first couple of pictures were before I placed the coloured plastic bits over the EVA, just to show the progress and that they are in fact EVA strips, just with plastic reinforcement added on top.
I’ll get to what those weird white railings are in a little bit.
The red part (his “spine”) and the blue pieces coming off of it from the back are what needed to be altered, and I also was forced to remove the two vertical braces near the head connection area. This was because the interior rods connected to the helmet bumped into them (I failed to consider just how far those rods needed to move left and right for his head to move enough to be noticeable).
While I was messing with this, I also cut the rings from the top and brought them in a little more; you won’t be able to really see this alteration, all it did was make the neck a little thinner but the seams are hidden underneath the spine.
I also took the time to play around a lot more with the movement mechanisms, which are those little white plastic pieces on the side and top of the neck. I actually removed these at one point and tried a lot more things, from elastic, to simple EVA rods, to an actual multi-hinge setup using screw posts for extra pivoting points. None of them worked the way I wanted so I returned to the PVC railing I had made first.
I went with the head-only pivot design (no neck movement) for the main reason of Obstagoon’s actual design in-game. At one point I added railings along the sides of the rings so that the rings themselves actually compressed and stretched so the entire neck moved, not just the head. This was a cool result, but Obstagoon isn’t actually shown as having this kind of movement; instead, his head pivots on the end of his neck. It may not be 100% realistic, but it’s generally how a creature like this would move (there would of course still be some neck movement on a real animal but the head movement would be much more noticeable) so I went with it.
I also slightly modified the front of the chest area to alter how it sat on my shoulders a bit. I felt the neck was a little too far forward and down, so when I hunched over even slightly it was pointed sorta toward the ground. It didn’t take much, but it seems to fit a little nicer now and the neck sits in a good position. The interior padding I will add later will help move it up and out a little bit as well.
After all of the editing and reconstruction, the final neck build looks like this (without lining and other finishing details):
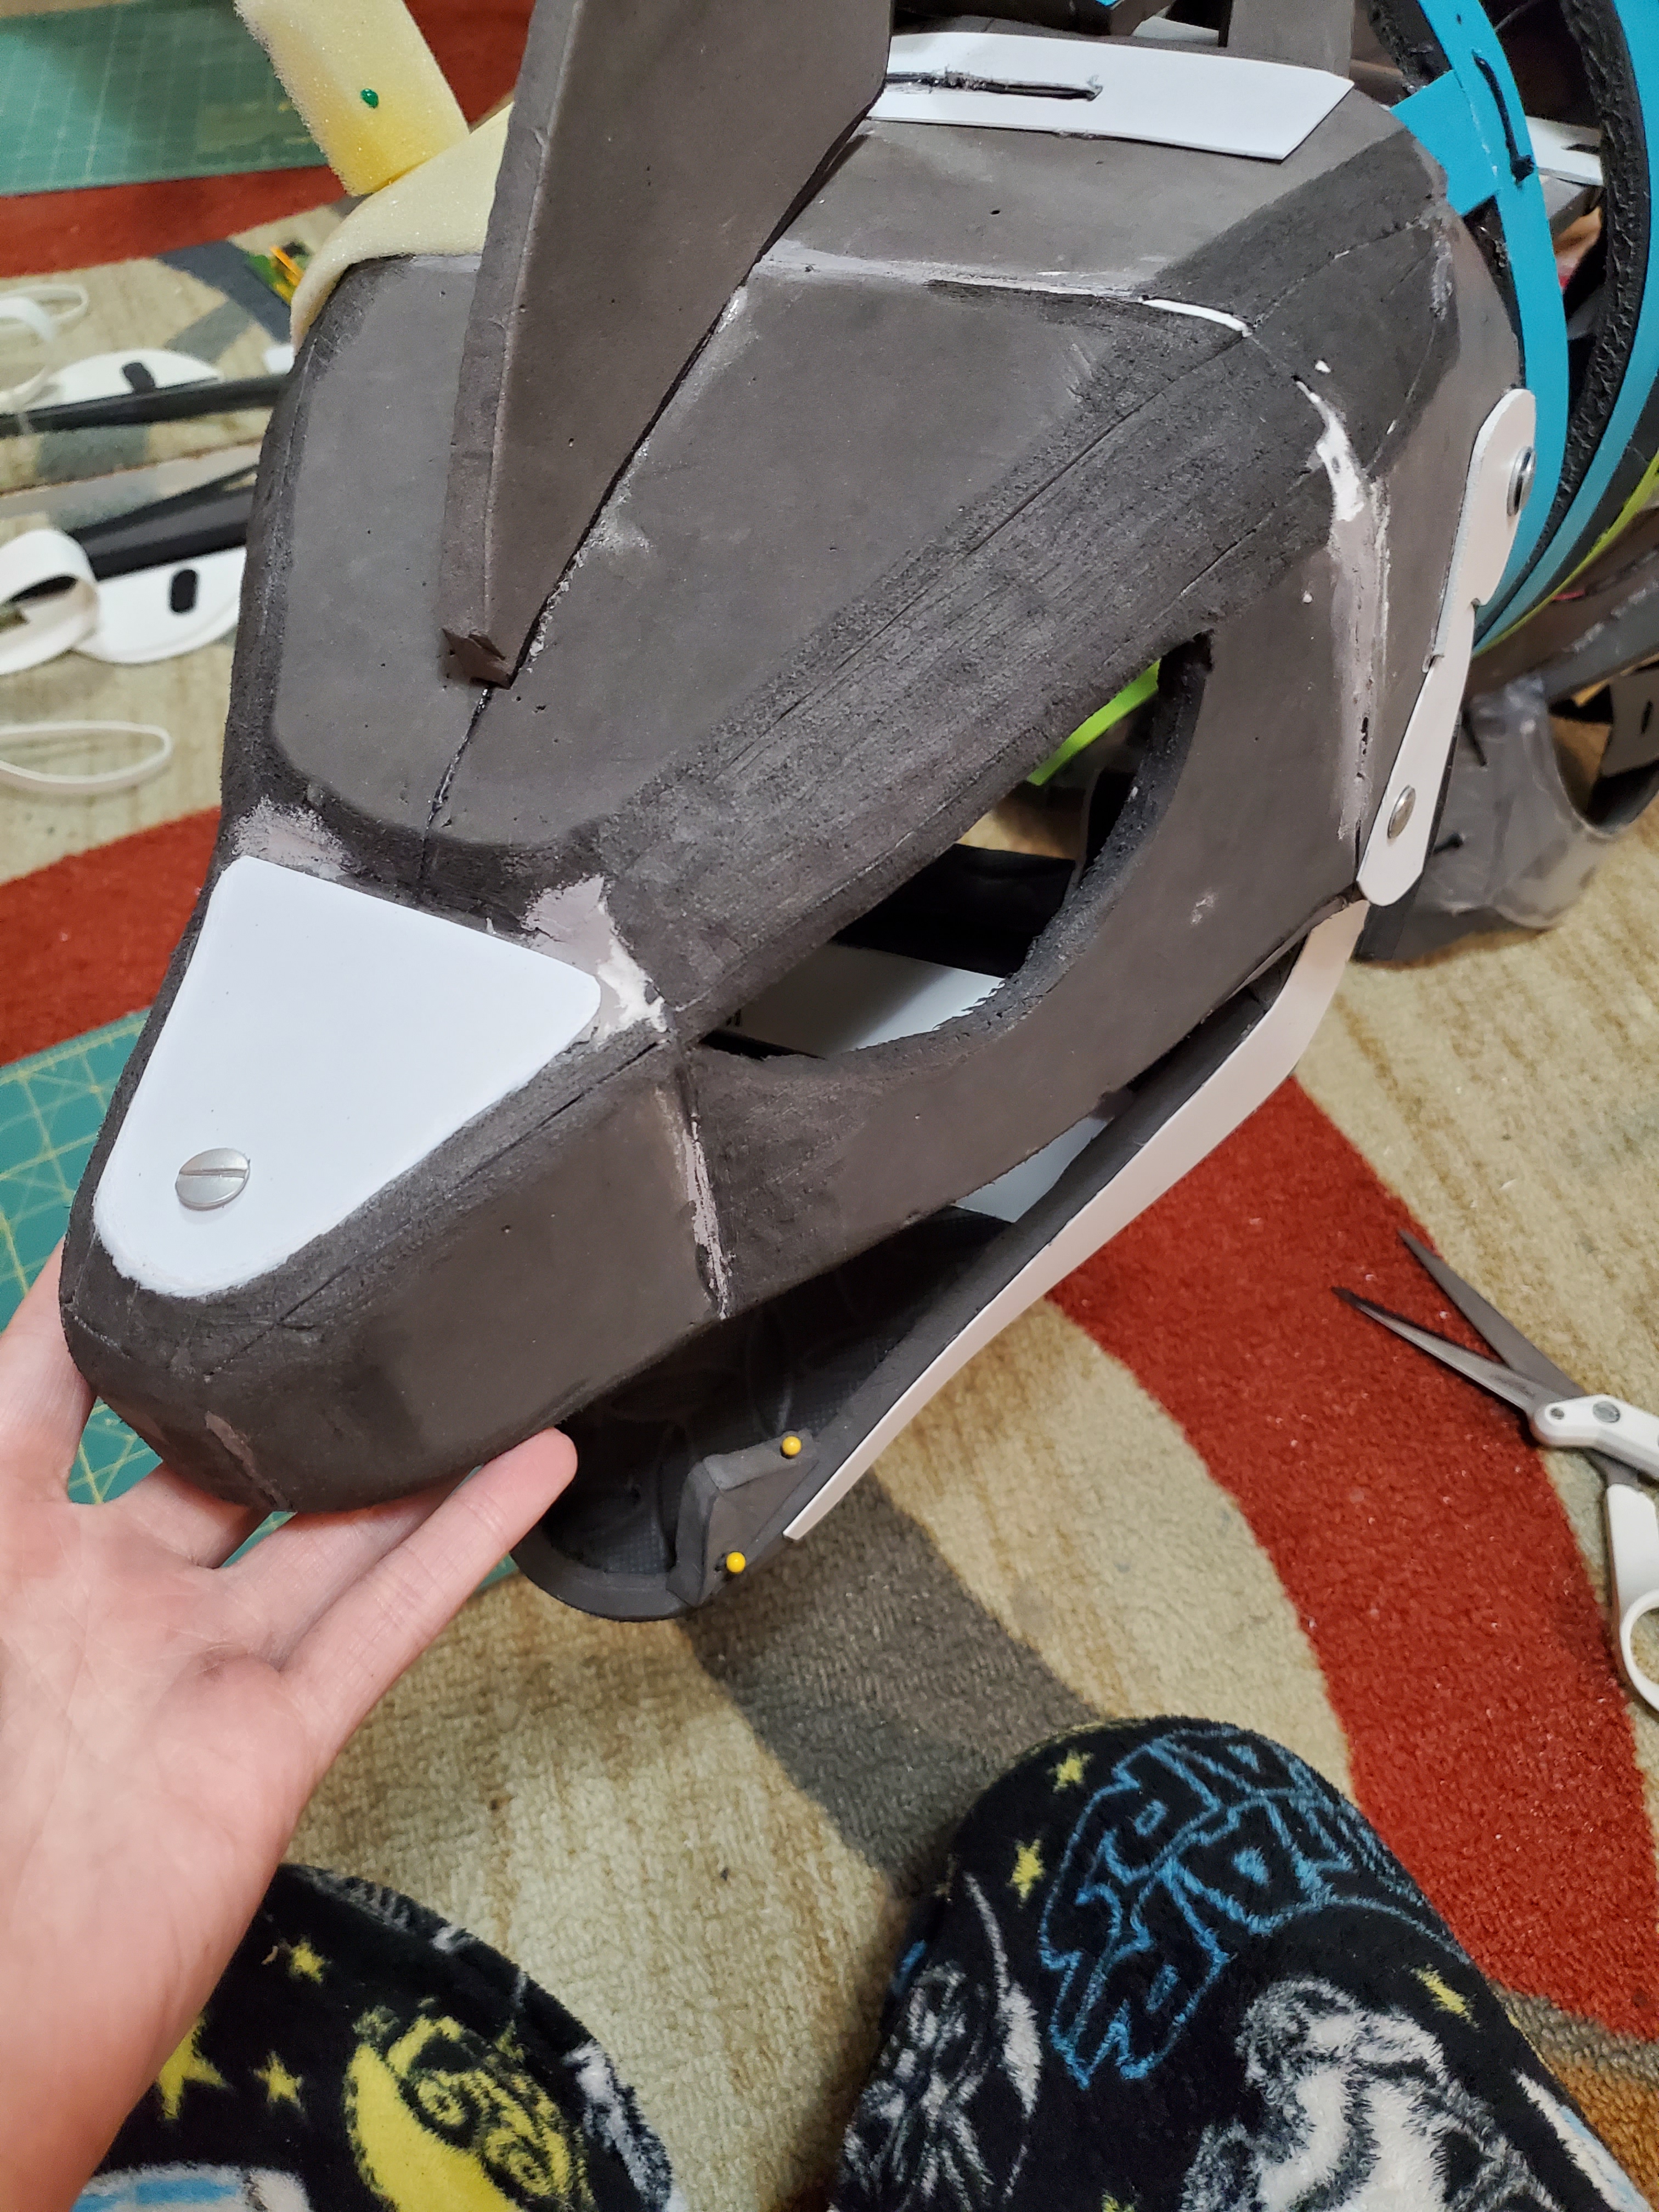
The Head
Next was his head, which started out as very basic EVA foam shapes glued together (I made a pattern based on my cardboard mockup). It fit together kinda haphazardly near the side there, my oopsies, but I filled it in with putty later so all is well!
Basic EVA headbase
This piece also went through a lot of small edits, such as the back of the head where it attaches to the neck. But once all that was worked out, I reinforced important areas with plastic (the hinge area with PVC for strength and the general foam with the styrene). I also realized after the fact that I should have cut the eyes out initially but somehow I forgot :’D I managed though. Yay box cutters! After I was done with the basic shape and reinforcing some specific parts for durability, I sanded some edges to make it smoother and filled in some cracks with foam putty. That last part doesn’t matter much but it makes me feel better not having weird gaps in-between places I needed edit. This is the final result for the headbase (no ears yet):
A single placeholder tooth is pinned in for reference when opening and closing the jaw
The wires and metal bars coming out of the back will make sense very shortly! There are also a few very minor asymmetries, but these will be fixed/unnoticeable when I go to add detail foam over this ‘skull’.
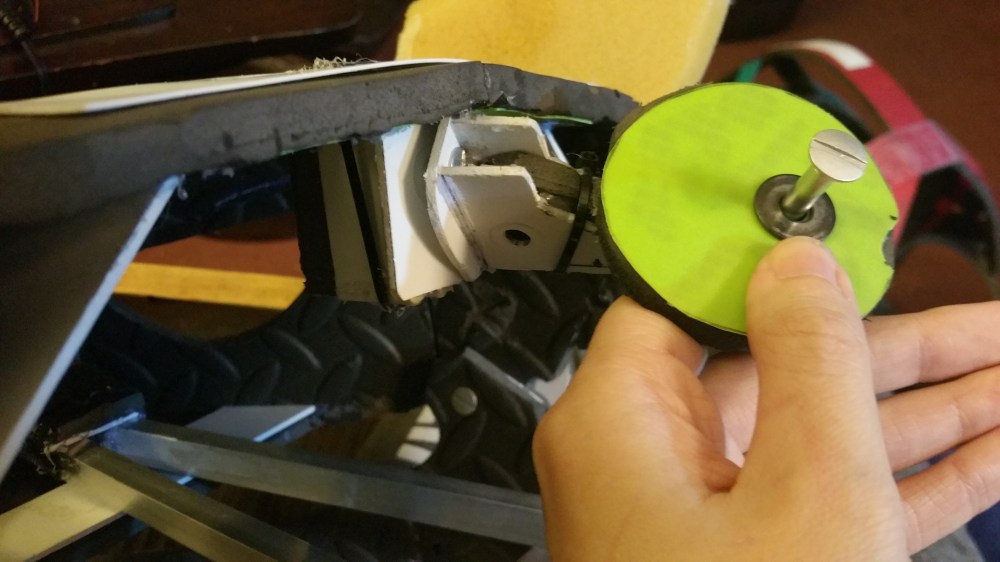
As for the other weird things you may notice, the white railing on the top of his head was leftover from my experimenting with hinges. I left it because it added some structural integrity to the back of the head. The final hinge is underneath it and is glued (with Barge and hot glue) and zip-tied to the head. The hinge itself has a hinge, too, for extra movement! This was done with a loose fitting screw post so the head can turn left and right and up and down from that point as well as the sides of the neck. Here’s a closeup picture of that area so it’s (hopefully) a little more clear.
This area is reinforced on both sides via that railing on the top and some plastic on the inside. It’s zip-tied to a piece of plastic I used to fill in part of the railing. The hinge itself is also zip-tied which is again left over from my experimentation. At an earlier point that EVA piece in the center of the sandwiched PVC pieces moved up and down but I decided to make that part static and instead went with the two-piece hinge idea for added rotation. The rest of the PVC board you’re seeing in the head is just for integrity. He is all over very sturdy!
The Interior Headpiece
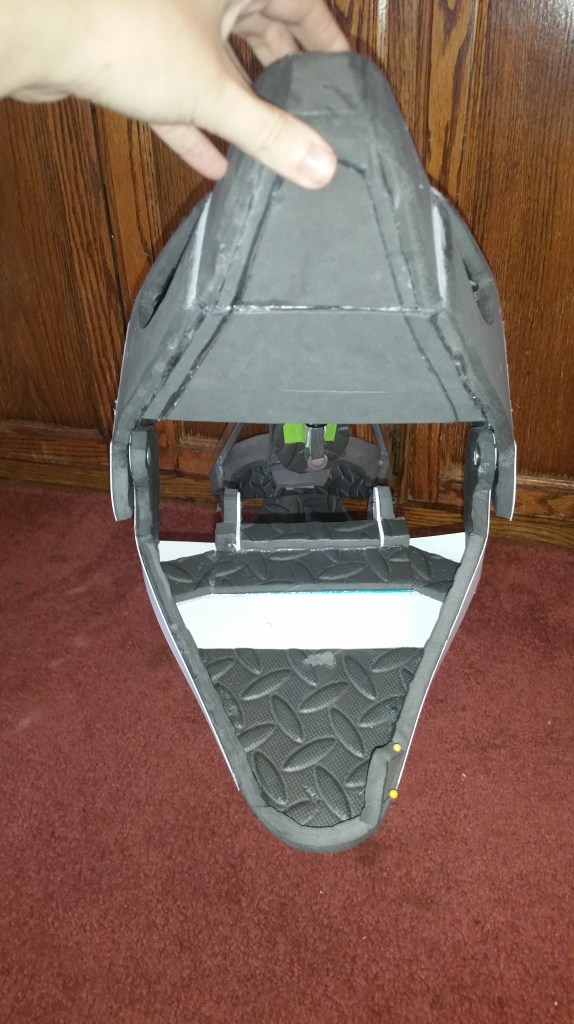
I constructed this much different from my initial design because what I had didn’t quite work the way I wanted, at least for the jaw. The jaw had a lot of unwanted movement to it and when moving my head up or down, the jaw did not respond adequately. It took me a lot of trial and error to get all of this work, but eventually I got it all up and running as I wanted it. It’s constructed as a basic helmet with a moving jawpiece that has two tiers set into it (visible in the gallery). One is for my jaw to sit on, and the other is slightly higher and presses against my chin. This is because the jaw is a push/pull mechanism; there is no elastic!
The wires and covering have been added
You’ll notice the wires coming out of the jaw. These hook directly into those weird loops at the back of Vandal’s jaw. Both ends are able to rotate where they’re connected, which was a very important piece, and that’s how the smooth jaw movement works (video at the end!). When I close my mouth, the jaw returns to being closed because that piece in front of my chin is pressed and pulls the helmet jaw back up, which in turn pushes Vandal’s jaw back into place.
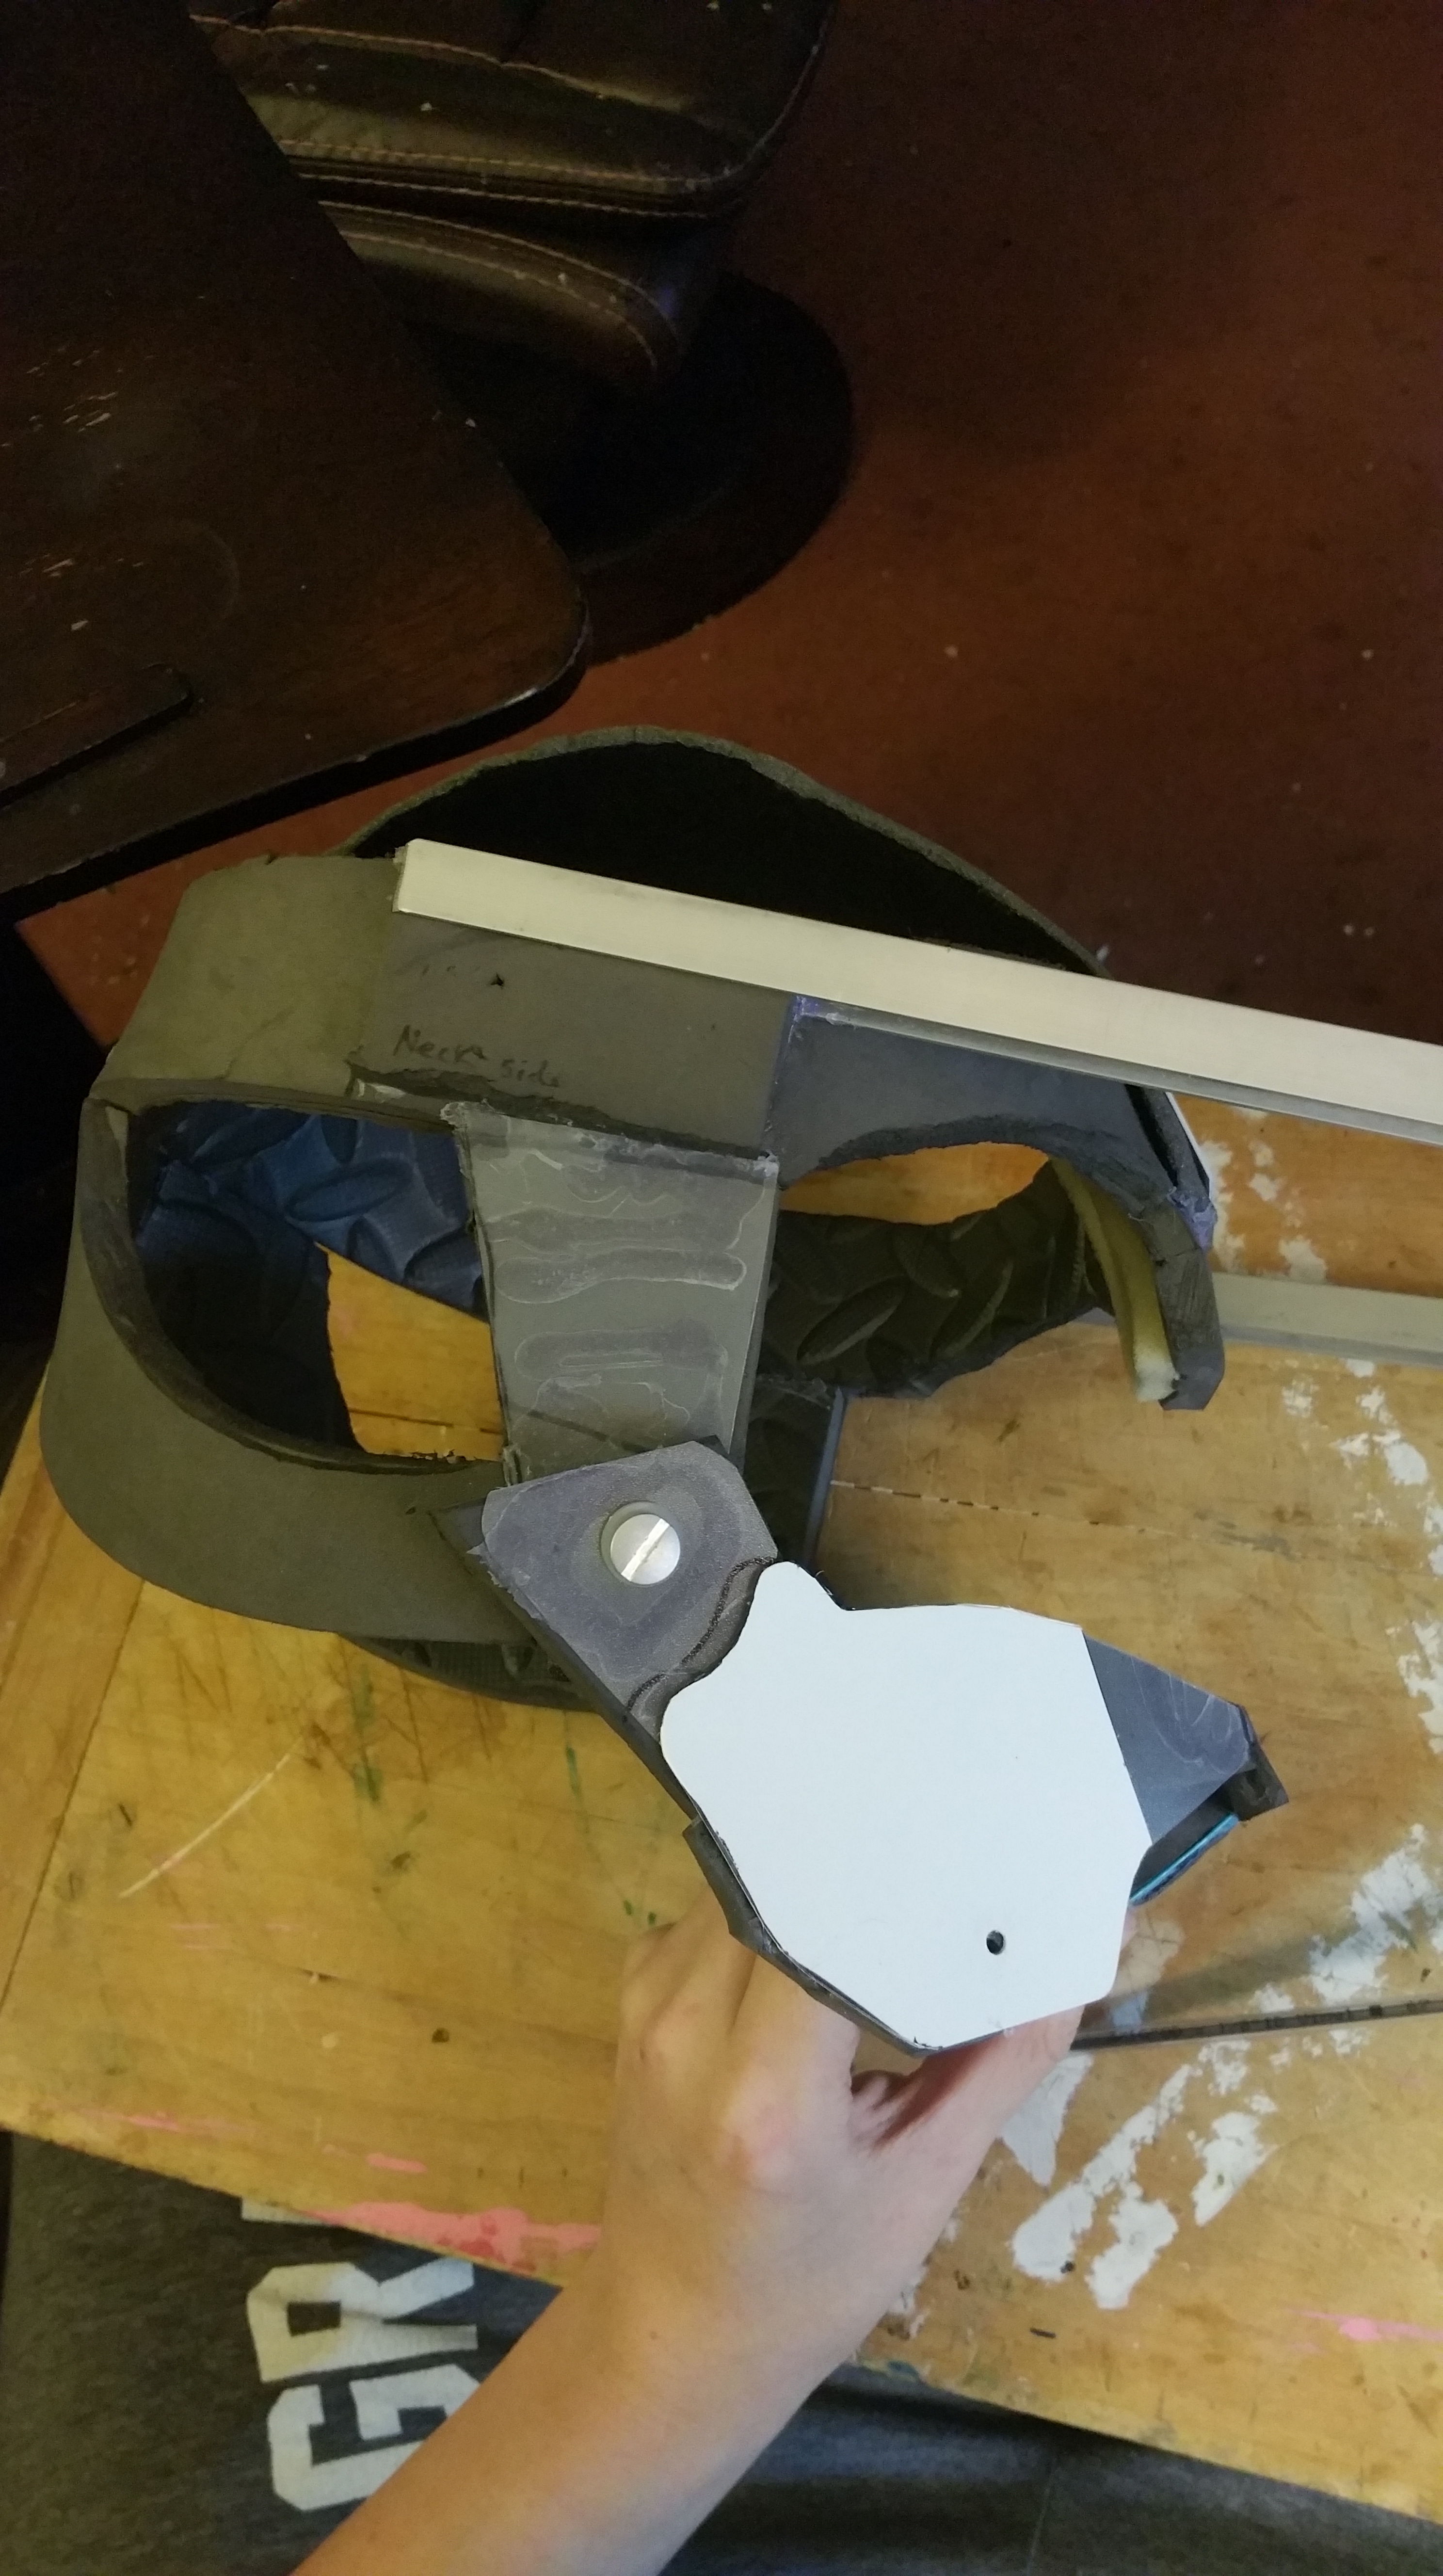
The last important piece is the metal triangle set just above my forehead. These two metal pieces meet at the end, are zip-tied together, and both glued and zip-tied to a piece of PVC board, which is bolted (with a slightly longer than necessary screw post for more free movement) at the top end of Vandal’s muzzle. It can move up and down and left and right, and because of it’s specific placement at the end of the muzzle, it helps the head actually rotate on the hinge at the back of the head. It’s a little hard to explain without going into a bunch of mechanical jargon, so I’m just going to leave it at that, but I may make a technical video in the future to better illustrate some of the stuff going on inside this suit.
And finally, here’s a video that showcases the movement of this piece in it’s completion! (I also go over a few main points of the build for newcomers to the project via YouTube). If you’re wondering about placing foam and fur over this skeleton and still having it move, I will be leaving a seam around the head and neck with sections of fur that will overlap and slide smoothly over each other to maintain the movement this has. Obviously covering this with a single piece of foam and/or fur would hinder the movement almost completely, and since I’m not using the strength of servos to move the head and am not using stretching NFT fur, I have to compromise by having this seam. I’ll do my best to make it as hidden as possible. I imagine it won’t be too difficult as his ears and cheek tufts cover up a lot of where the seam would be, but we’ll see when I get there. Until then, enjoy this video and I hope you like the results so far!
And with that, I think that just about covers all these pieces. If you have any additional questions, feel free to comment below.
When taking some of my larger and more complicated costumes to events, I’m very commonly asked “where do you even start with a costume like that?” You’re about to find out! Dare I quote The Sound of Music to begin this blog? Let’s start at the beginning, a very good place to start…
“What made you choose Obstagoon?“
After Tesla’s debut and the praise he received, I knew I wanted to make other Pokemon. Pokemon has been one of my favorite things since I was a very young child, and that hasn’t changed over the years. Despite my original disdain for Pokemon Sword and Shield (which has since changed due to their updates to the game), from the time Obstagoon was released the design resonated with me really well. Zigzagoon and Linoone were my favorite starter route Normals and I was really happy to see them get some love, and especially a fun 80’s/metalhead! It was a great design for a European badger (which some people forget are the black and white ones, vs the brown American (in this case Hoenn) ones). Some people might remember how I was able to jump on Zeraora’s design almost immediately after it was released; I didn’t have that kind of free time when Obstagoon was released, but I added it to my list of Pokemon I definitely wanted to make into a costume. So here we are!
So why did I choose Obstagoon over my other Pokemon characters that have been around longer than Vandal?
I had fun doing rather simple costumes for a while growing up, but eventually it became unchallenging for me to do so and I wasn’t learning much, which was something I wanted to do to further excel in this odd business of making creatures and characters. Obstagoon seemed like a perfect mix of complexity vs some standard build practices. Let’s take a quick look at his basic design.
We can see he’s mostly human-shaped except for his neck and head. This was perfect for a couple reasons, the main one being that I’ve wanted to construct a creature with an extended neck for quite a while now (I really wanted to practice with articulated joints beyond just tails). But with the rest of the suit being fairly standard in design sort of offset the amount of exploratory work I would have to do for the neck, which seemed like a great compromise to start, as opposed to making an entirely complicated design from head to toe. That isn’t to say I won’t be doing any complexities for Vandal’s body, of course; I will still be employing some new techniques and systems than usual, but nothing nearly as complicated as his neck construction will be.
Planning the Construction
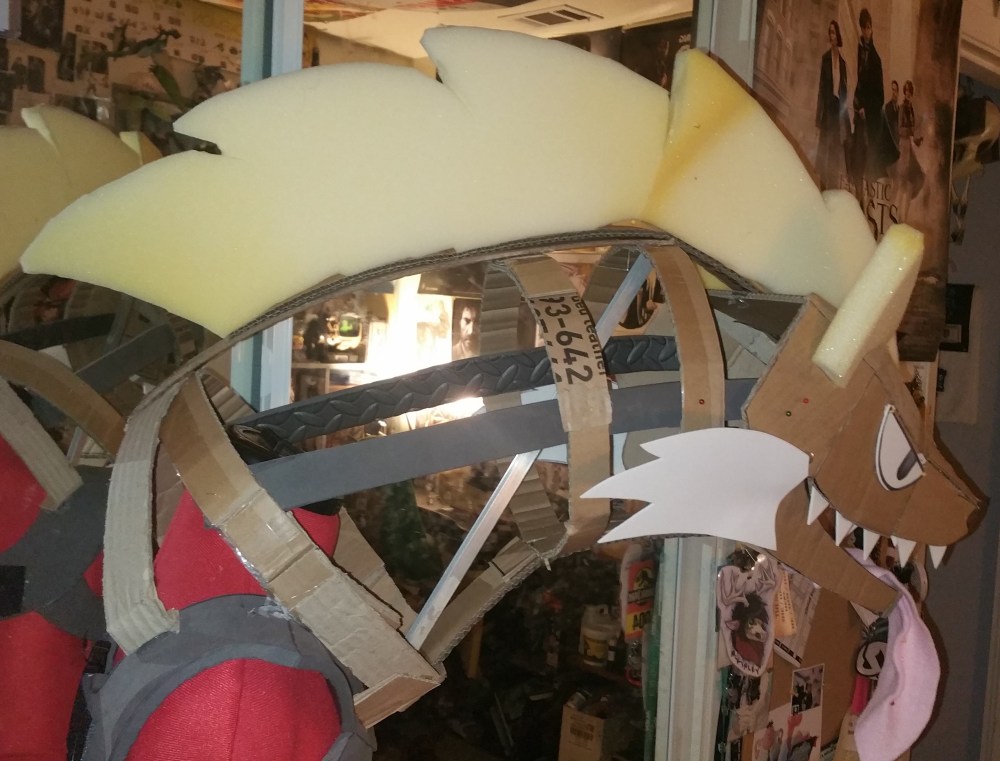
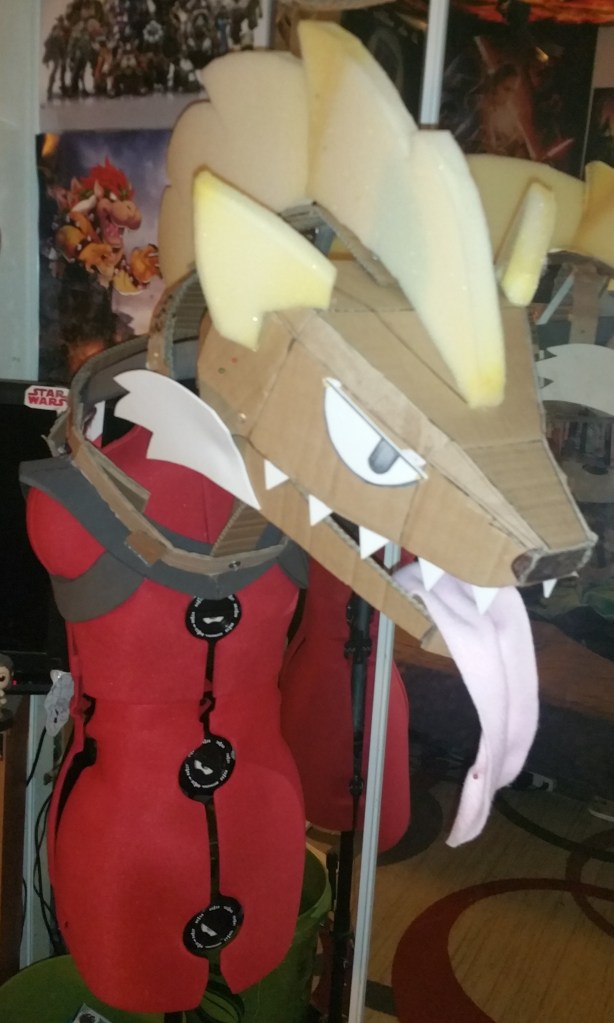
Whether I do sketches/schematics or a prototype first is a toss-up and usually comes down to how I feel about the project. Sometimes I do that at or around the same time to help with understanding as I go along. For Vandal, I did the prototype first and then based my final schematic off of that, with some added tweaks. Below you can see my cardboard prototype for his head and neck!
This build supported itself via the neck rings, that side piece of EVA foam, and the metal bar on the inside, all of which were attached to a ring around the neck and shoulders, which was in turn attached to an EVA harness which you can see on the mannequin. I felt like this was a good starting point, but I wanted to think about it a little more in terms of getting the neck a little more stable while allowing the head to move with my own and the jaw to open and close with my own.
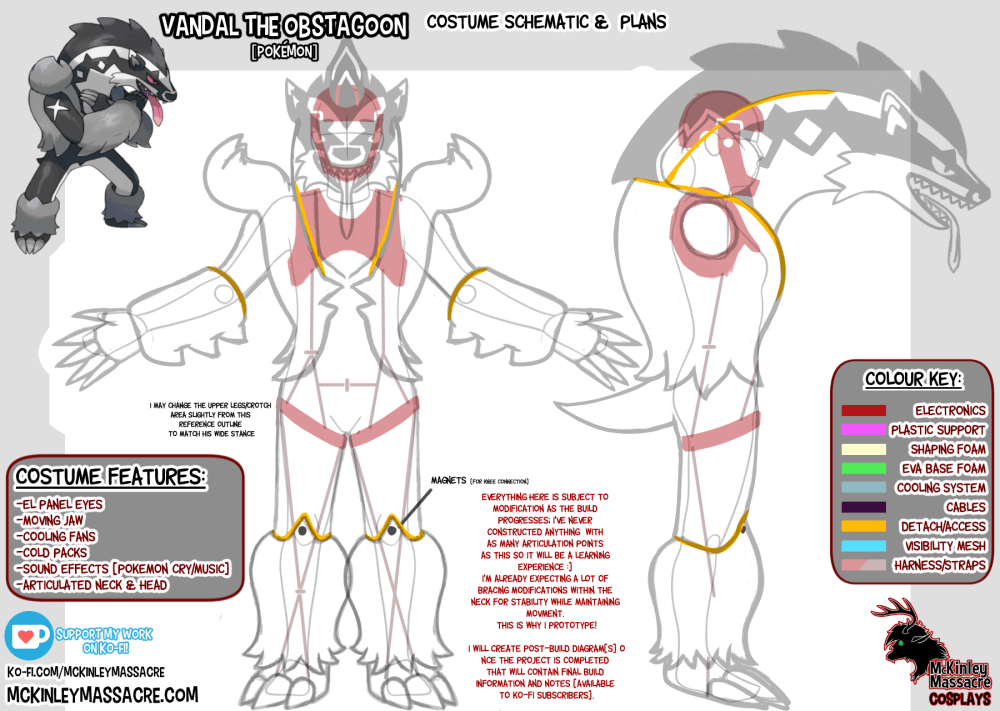
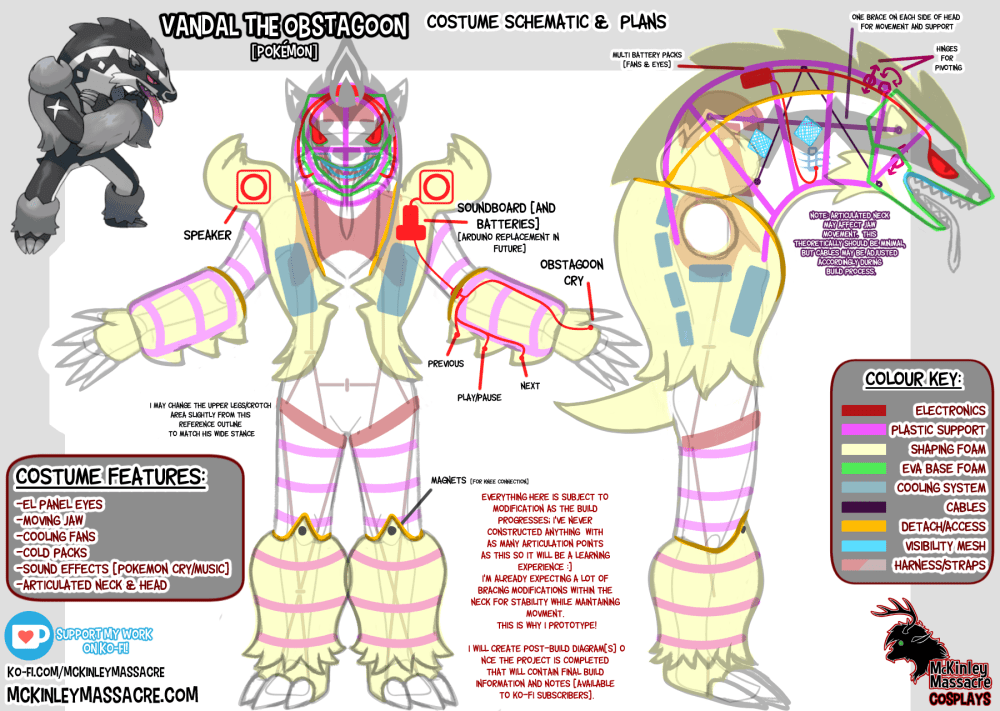
A few years ago I took the liberty to take a front and side photograph of myself (full body) wearing my diveskin (what I wear underneath suits) and traced my general shape over it. This final product allows me to make very accurate schematics for advanced costumes like this, especially when it comes to sizing something and other comparisons when building the suit out. Below are 3 images: the original outline, the basic shaping for Vandal (only foam and harness shown) and the complete schematic I’ve created for him, including planned electronics. I used the above prototype and refined some of the ideas.
Very busy design, I know! I’ll quickly go over some of the main things I’m basically showing here and why I’m deciding to make it this way.
The Harness
The harness is a necessary system for obvious reasons; the head and neck are at an awkward position and are bound to weigh a lot, and that weight needs to be held somewhere else or the whole thing would slump forward. So the base of the neck is attached to a firm harness (which I have made out of EVA foam and will in the future be layered with plastic and lined). The chest part of the harness is only one part though, as even with the under-arm support the weight and position of the neck and head can still pull it forward. To fix that the rest of the harness I’ve drawn comes into play. The design is similar to how parachute or climbing gear is designed. A strap is placed around the upper legs (in this case it will be an EVA strip) connected by nylon strapping that attaches to the upper part of the harness. This is how the harness keeps from moving too far up or forward, because the strap will obviously stop at your upper thighs/crotch area and hold it there.
How to avoid giving yourself a constant crotch wedgie, you ask? Take that idea from the 3D maneuver gear featured in Attack on Titan, which I have some experience working with in the past. The thigh rings will have nylon strap on each side, going down the leg, criss-crossing over the shin and wrapping underneath the wearers foot. This makes a full, comfortable weight distribution system (at least in my experience so far with understanding costume weight and the partial AOT costume I made) throughout the whole body, and theoretically should support the neck and head easily. I don’t know this for sure, of course, as at the time of this journal I’m still constructing it, but we will see if my theory is right moving forward! As always, tweaks are inevitable in most costume building situations; projects are fluid, nothing can truly be predicted 100% and that’s something all builders of large projects must contend with! You’ll probably realize I haven’t brought up the weird helmet part inside the neck yet. I’ll get to that a little later!
The harness is a necessary system for obvious reasons; the head and neck are at an awkward position and are bound to weigh a lot, and that weight needs to be held somewhere else or the whole thing would slump forward. So the base of the neck is attached to a firm harness (which I have made out of EVA foam and will in the future be layered with plastic and lined). The chest part of the harness is only one part though, as even with the under-arm support the weight and position of the neck and head can still pull it forward. To fix that the rest of the harness I’ve drawn comes into play. The design is similar to how parachute or climbing gear is designed. A strap is placed around the upper legs (in this case it will be an EVA strip) connected by nylon strapping that attaches to the upper part of the harness. This is how the harness keeps from moving too far up or forward, because the strap will obviously stop at your upper thighs/crotch area and hold it there. How to avoid giving yourself a constant crotch wedgie, you ask? Take that idea from the 3D maneuver gear featured in Attack on Titan, which I have some experience working with in the past. The thigh rings will have nylon strap on each side, going down the leg, criss-crossing over the shin and wrapping underneath the wearers foot. This makes a full, comfortable weight distribution system (at least in my experience so far with understanding costume weight and the partial AOT costume I made) throughout the whole body, and theoretically should support the neck and head easily. I don’t know this for sure, of course, as at the time of this journal I’m still constructing it, but we will see if my theory is right moving forward! As always, tweaks are inevitable in most costume building situations; projects are fluid, nothing can truly be predicted 100% and that’s something all builders of large projects must contend with! You’ll probably realize I haven’t brought up the weird helmet part inside the neck yet. I’ll get to that a little later!
The Foam Shaping
The pink and yellow in my schematic represent plastic support and foam, respectively (for clarity I did not add any to the neck but there will be a thin sheet over the support rings there). For the grey parts around the forearms and lower legs, I’m going to be using rings of EVA and/or plastic for basic support and for creating chunks of empty space so the pieces won’t be solid foam (this will make more sense later on). It doesn’t help all that much with venting heat but the weight is notably less, plus it’s saving materials for use in other projects. I’m not 100% sure yet how I will be constructing the “vest” part of his design in terms of foam or a skeleton. I know I will need to make pockets for the cooling packs I plan to install, so that will obviously be taken into account when I reach that part. I’m thinking that I can make the large displacement of his back with some sort of support so it’s again not solid foam, but I will need to make pockets (accessible from the inside) for the cooling packs I plan to install, which will probably be made from foam.
The tail will be segmented foam for basic movement and probably either weighted slightly or run with an inner wire/plastic or elastic piece. Since the tail never really moves much I’m not super concerned about this and will work with it more as I construct it. If it doesn’t move on its own as much as other tails I’ve made I won’t be that upset. His head base will be made out of all EVA with a sheet of thin foam over the top for any shaping details I want to add or refine. The jaw will be layered and hinged for movement using screw posts and some plastic and elastic. I didn’t fill in the upper part of the legs with foam since I don’t think they will need much. Even the supports might be unnecessary due to his legs not really being very large but it may need something, in which case I will be adding only the skeletal supports with a mesh fabric over it, and then the fur directly over that. I will be employing the same method for his upper arms, though I may need a thin layer of foam up there, or a slightly wider EVA/plastic skeleton since his upper arms are larger than normal. A major issue in terms of matching the character exactly, is the upper torso. The design is very exaggerated, and it can be looked at either as that he has a very large chest and back, or a very thin waist (or maybe a mix of both). To get the most out of what I have to work with in terms of placing this design on a human who needs to move their arms, I’ve extended the vest out as far as I think is possible underneath the arms to get that large chest area while bringing in the vest as much as possible around my waist with as little foam as possible to hopefully help to exaggerate those features. I will also be extending the fingers using the claws and some foam around my hand. The character has very long arms, and while I won’t be able to get them as long as they are in the game without sacrificing the use of my fingers, I can add as much as possible to help get there.
The Electronics
The electronics won’t be much different from what I have installed in Tesla until a little later in the project when I will be installing an Arduino for music capabilities. Since I haven’t worked much with Arduino’s or C++ code, I’m leaving this part out for a while and using one of my old unused soundboards to swap out later. I’ll still be doing all the wiring in preparation for the Arduino installation however, so I won’t have to open up the suit again to make changes. What the setup will basically be is a soundboard with the Obstagoon cry installed on it, and a button in the side of his left hand to trigger it with his thumb. The speakers will be set up in the spikey fur on his shoulders, and I will install the soundboard and battery pack on the inside of his “vest” for easy access. I will also need a few quick disconnects so I can remove the left arm from the rest of the suit and also get in and out of the suit without pulling the wires.
For the future music system I will install a button in each spike of his arm, one for play/pause, and the other two for back/next and probably leave these disconnected until I get the Arduino set up (possible I may use the play button for basic Pokemon music in the beginning but we’ll see). I’m also going to add two fans inside the neck to help cool my face. Even though my face won’t be entirely covered as closely as a regular fursuit, I will be wearing what is basically an EVA foam helmet inside so it will be nice to have some form of air movement, especially since the main vent and visibility (his mouth) is going to be fairly far from my face and I’m not sure how much I’ll get out of the buckram diamonds in the side of his neck.
The Neck and Head
Ah yes, the most complex part of the suit. This is the part I expect to change the most in terms of inner construction when compared to my schematic, as I try and discover things along the way. It’s nice to have a basically working prototype though, which I’m slowly replacing pieces of to convert it into the final piece. The rings of the neck are EVA foam at the moment (at the time of writing this I’ve been working on converting the prototype already to supply some WIP photos), but I was considering for a time making them out of plastic. I didn’t think this would give me the support I wanted though, so I’m going with EVA reinforced with plastic instead. I may do the same thing with the spine (upper segment) but not reinforced. Not sure if I want EVA for that or just a strip of plastic yet. It should be slightly flexible, hence the lack of complete reinforcement. The back part of the neck and spine/under-spine (not sure what else to call it but the line along what is his throat I guess) are attached to the harness for support, and I will slowly be applying plastic over those EVA pieces for stability.
Nothing at the base of the neck has to move much except for a possible length support I may put stretching out toward the head (the metal piece in the original prototype photos), but realistically the neck should pivot at the base of his head (somewhere just behind his ears). So I will be adding a hinge there of PVC sheet plastic and a screw post for mobility there to bring some movement to it. I may also leave a gap around his throat (underneath the fur on his cheeks) to allow for better movement. Basically an area where the fur will be separated so the movement won’t have to fight the fur or foam except around the top and sides of his head. This shouldn’t be super visible in most cases and I will slightly overlap the fur to reduce visibility in the event someone is able to see underneath his head. Along with the outer rings to help shape and support the neck, there also needs to be an inner support system. This will help with general integrity of the neck, and, for example, if someone touches or hugs his neck firmly, it shouldn’t collapse on itself or move around too much. To do this I will be adding EVA dowel cross pieces to the inside, probably 2 or 3, and probably reinforced with plastic again (the dowels are still fairly flexible which I don’t want for this). Some of you may wonder why I wouldn’t use thin PVC for this, but even thin PVC is heavier than you’d think when used in places and builds like this, so I needed something lighter for less strain on the harness and wearer.
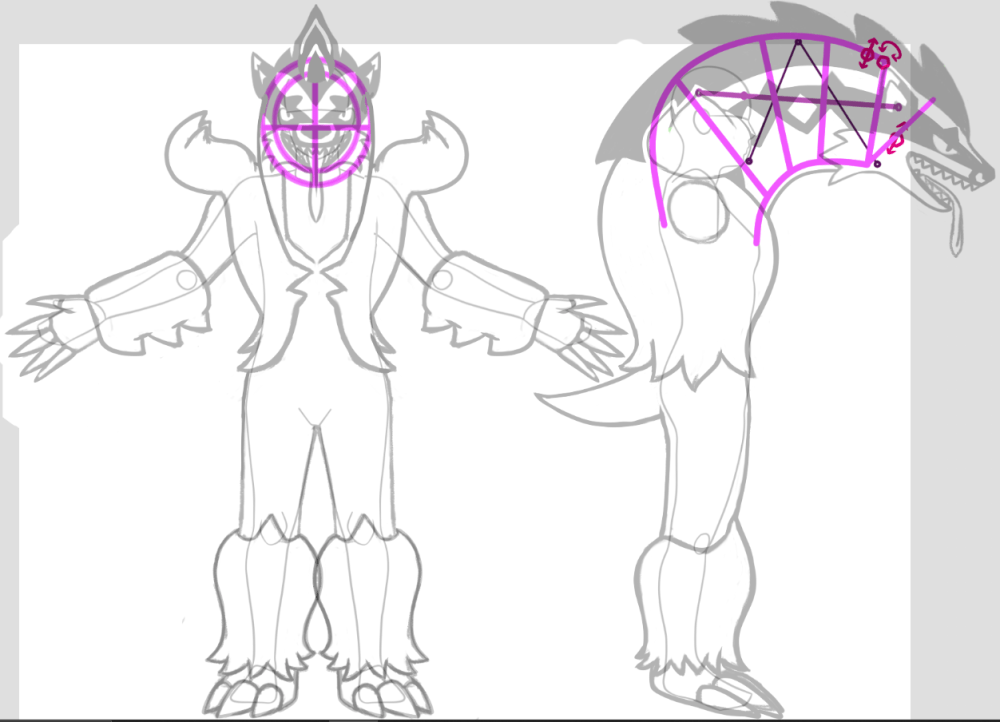
Head and Neck Movement
You’ll get your answers for the weird helmet drawn on the inside of the neck now! Besides the helmet you’ll also notice in the above image that there is a dark purple line from the helmet to Vandal’s head and an even darker line attached from the helmet jaw, up to the inside upper spine of his neck, and then to the base of his jaw. This will be my system for getting his head and jaw to move in relation to my own from inside the suit. I’ve already experimented with this system for the prototype and have a lot to say about how I got it to work but I’m going to save that for later when I actually get to posting about it specifically. Basically the jaw will work on a cable system, and the head has up/down and left/right hinges which sit behind where the head braces are attached to allow for movement. This still has some tweaks to figure out (mostly what happens when I’m not wearing the suit; it slumps and I don’t want that to break something eventually) but I’ve almost got it to a point I’m very happy with! Again this will be revisited in more detail later; stay tuned!
Claws
I’ll be trying out a new method for making claws this time around, I’m not sure how well they’ll work out in terms of durability but that’s why I’d like to try it! People that know about costumes (especially fursuits) know that rigid claws on the feet, when placed at the ends of toes, hit the ground when taking steps and thus get horrible scuffed, worn down, and can also break. A lot of fursuit makers have either resorted to making vinyl or other fabric claws that resist scuffing/breakage because they’re soft, or place claws up at an angle so that they won’t hit the ground, but this is usually unrealistic and strange looking (a method I used myself for many years and was never really happy with). As an experimental new method, I will be using a mix of materials such as EVA foam and foam clay sealed with Plasti-dip and flexible paint. I feel like making claws with this method might take longer than what is desirable (especially if it’s ever for a time constrained project), but we’ll see. If the method doesn’t work at all, I have some grey vinyl I will use for the claws instead.
Final Thoughts
I think that’s it in terms of planning and I’ve shared with you what I have of the prototype so far. I’m leaving out the simple parts such as his teeth and tongue, which will be covered more when I get to them but don’t require a detailed explanation here. Next post, I will be continuing to work with the prototype and swapping out its cardboard pieces for the final materials while also building out the harness. I expect most future entries to be far less wordy than this, and with much more interesting photos. If you’ve read my dev log for Lost Hours you probably have a basic sense of how I post updates for projects; this one should be similar. I try not to be too boring 😉
If you have any additional questions you want answered please feel free to comment!