
When taking some of my larger and more complicated costumes to events, I’m very commonly asked “where do you even start with a costume like that?” You’re about to find out! Dare I quote The Sound of Music to begin this blog? Let’s start at the beginning, a very good place to start…
“What made you choose Obstagoon?“
After Tesla’s debut and the praise he received, I knew I wanted to make other Pokemon. Pokemon has been one of my favorite things since I was a very young child, and that hasn’t changed over the years. Despite my original disdain for Pokemon Sword and Shield (which has since changed due to their updates to the game), from the time Obstagoon was released the design resonated with me really well. Zigzagoon and Linoone were my favorite starter route Normals and I was really happy to see them get some love, and especially a fun 80’s/metalhead! It was a great design for a European badger (which some people forget are the black and white ones, vs the brown American (in this case Hoenn) ones). Some people might remember how I was able to jump on Zeraora’s design almost immediately after it was released; I didn’t have that kind of free time when Obstagoon was released, but I added it to my list of Pokemon I definitely wanted to make into a costume. So here we are!
So why did I choose Obstagoon over my other Pokemon characters that have been around longer than Vandal?
I had fun doing rather simple costumes for a while growing up, but eventually it became unchallenging for me to do so and I wasn’t learning much, which was something I wanted to do to further excel in this odd business of making creatures and characters. Obstagoon seemed like a perfect mix of complexity vs some standard build practices. Let’s take a quick look at his basic design.

We can see he’s mostly human-shaped except for his neck and head. This was perfect for a couple reasons, the main one being that I’ve wanted to construct a creature with an extended neck for quite a while now (I really wanted to practice with articulated joints beyond just tails). But with the rest of the suit being fairly standard in design sort of offset the amount of exploratory work I would have to do for the neck, which seemed like a great compromise to start, as opposed to making an entirely complicated design from head to toe. That isn’t to say I won’t be doing any complexities for Vandal’s body, of course; I will still be employing some new techniques and systems than usual, but nothing nearly as complicated as his neck construction will be.
Planning the Construction
Whether I do sketches/schematics or a prototype first is a toss-up and usually comes down to how I feel about the project. Sometimes I do that at or around the same time to help with understanding as I go along. For Vandal, I did the prototype first and then based my final schematic off of that, with some added tweaks. Below you can see my cardboard prototype for his head and neck!

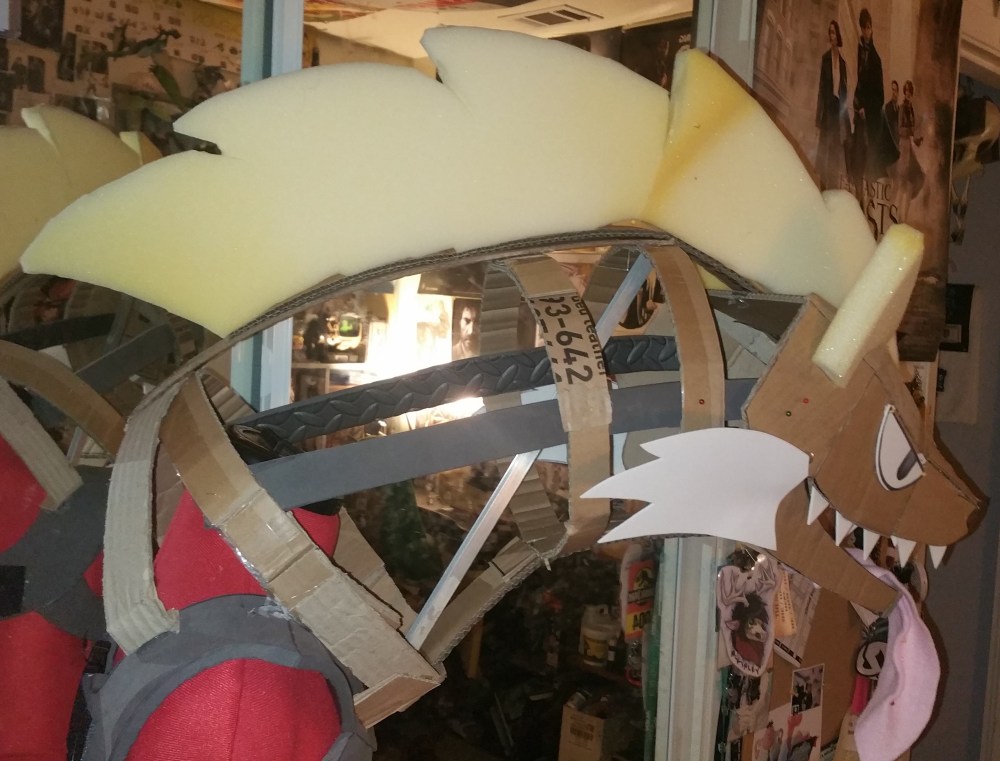

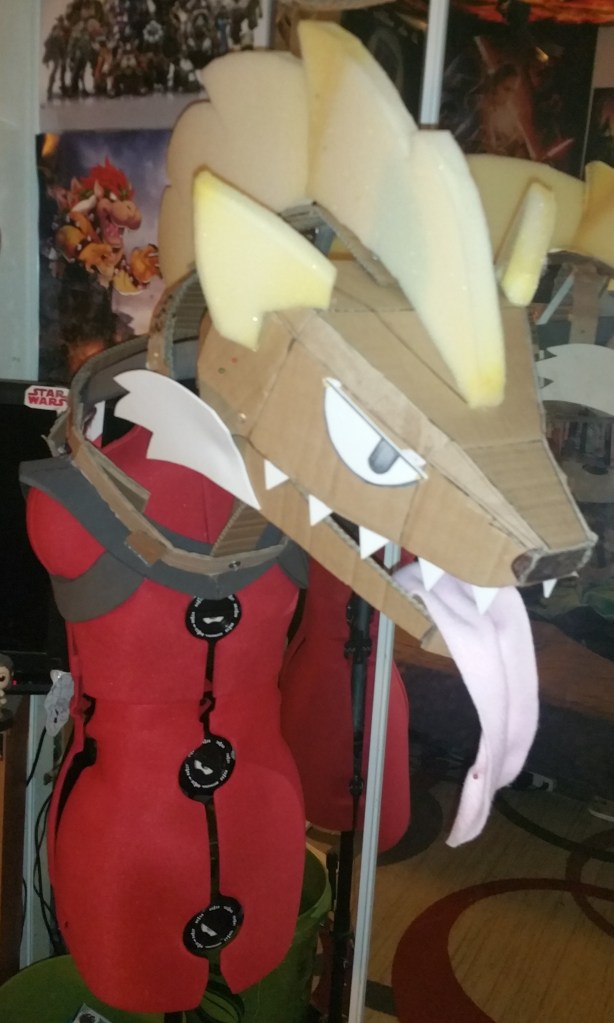
This build supported itself via the neck rings, that side piece of EVA foam, and the metal bar on the inside, all of which were attached to a ring around the neck and shoulders, which was in turn attached to an EVA harness which you can see on the mannequin. I felt like this was a good starting point, but I wanted to think about it a little more in terms of getting the neck a little more stable while allowing the head to move with my own and the jaw to open and close with my own.
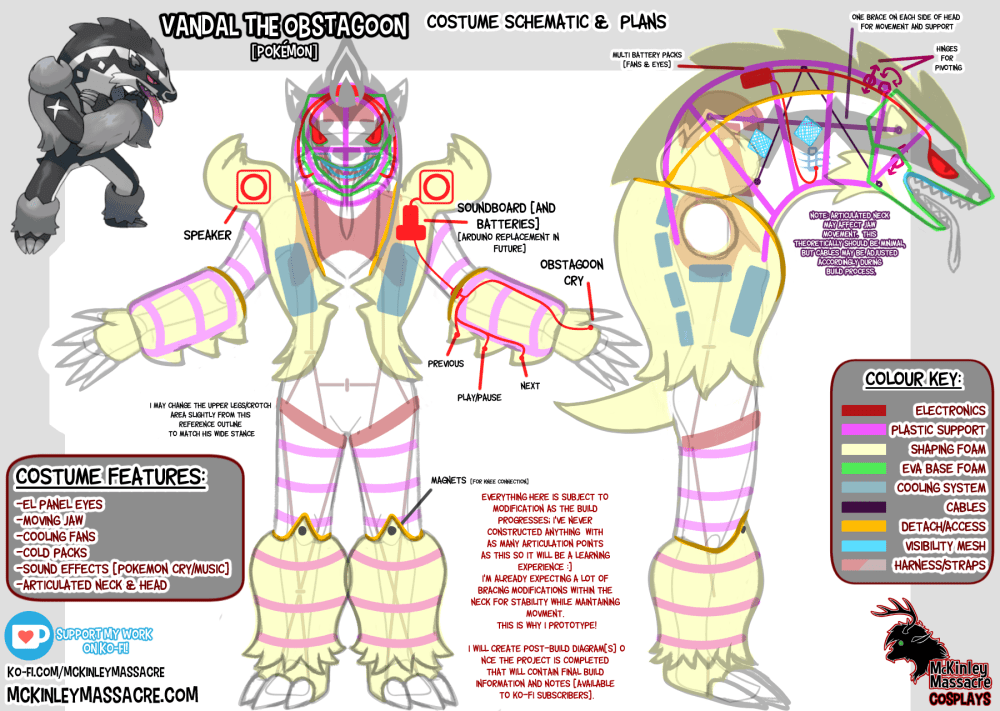
A few years ago I took the liberty to take a front and side photograph of myself (full body) wearing my diveskin (what I wear underneath suits) and traced my general shape over it. This final product allows me to make very accurate schematics for advanced costumes like this, especially when it comes to sizing something and other comparisons when building the suit out. Below are 3 images: the original outline, the basic shaping for Vandal (only foam and harness shown) and the complete schematic I’ve created for him, including planned electronics. I used the above prototype and refined some of the ideas.
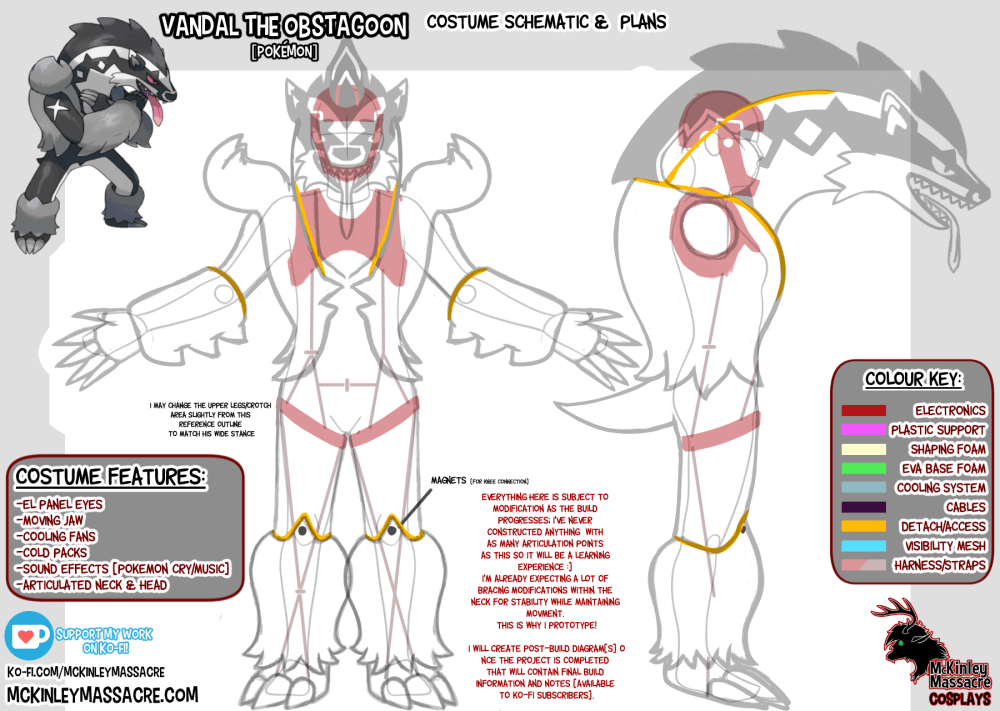
Very busy design, I know! I’ll quickly go over some of the main things I’m basically showing here and why I’m deciding to make it this way.

The Harness
The harness is a necessary system for obvious reasons; the head and neck are at an awkward position and are bound to weigh a lot, and that weight needs to be held somewhere else or the whole thing would slump forward. So the base of the neck is attached to a firm harness (which I have made out of EVA foam and will in the future be layered with plastic and lined).
The chest part of the harness is only one part though, as even with the under-arm support the weight and position of the neck and head can still pull it forward. To fix that the rest of the harness I’ve drawn comes into play. The design is similar to how parachute or climbing gear is designed. A strap is placed around the upper legs (in this case it will be an EVA strip) connected by nylon strapping that attaches to the upper part of the harness. This is how the harness keeps from moving too far up or forward, because the strap will obviously stop at your upper thighs/crotch area and hold it there.
How to avoid giving yourself a constant crotch wedgie, you ask? Take that idea from the 3D maneuver gear featured in Attack on Titan, which I have some experience working with in the past. The thigh rings will have nylon strap on each side, going down the leg, criss-crossing over the shin and wrapping underneath the wearers foot. This makes a full, comfortable weight distribution system (at least in my experience so far with understanding costume weight and the partial AOT costume I made) throughout the whole body, and theoretically should support the neck and head easily. I don’t know this for sure, of course, as at the time of this journal I’m still constructing it, but we will see if my theory is right moving forward! As always, tweaks are inevitable in most costume building situations; projects are fluid, nothing can truly be predicted 100% and that’s something all builders of large projects must contend with!
You’ll probably realize I haven’t brought up the weird helmet part inside the neck yet. I’ll get to that a little later!

The Foam Shaping
The pink and yellow in my schematic represent plastic support and foam, respectively (for clarity I did not add any to the neck but there will be a thin sheet over the support rings there). For the grey parts around the forearms and lower legs, I’m going to be using rings of EVA and/or plastic for basic support and for creating chunks of empty space so the pieces won’t be solid foam (this will make more sense later on). It doesn’t help all that much with venting heat but the weight is notably less, plus it’s saving materials for use in other projects.
I’m not 100% sure yet how I will be constructing the “vest” part of his design in terms of foam or a skeleton. I know I will need to make pockets for the cooling packs I plan to install, so that will obviously be taken into account when I reach that part. I’m thinking that I can make the large displacement of his back with some sort of support so it’s again not solid foam, but I will need to make pockets (accessible from the inside) for the cooling packs I plan to install, which will probably be made from foam.
The tail will be segmented foam for basic movement and probably either weighted slightly or run with an inner wire/plastic or elastic piece. Since the tail never really moves much I’m not super concerned about this and will work with it more as I construct it. If it doesn’t move on its own as much as other tails I’ve made I won’t be that upset.
His head base will be made out of all EVA with a sheet of thin foam over the top for any shaping details I want to add or refine. The jaw will be layered and hinged for movement using screw posts and some plastic and elastic.
I didn’t fill in the upper part of the legs with foam since I don’t think they will need much. Even the supports might be unnecessary due to his legs not really being very large but it may need something, in which case I will be adding only the skeletal supports with a mesh fabric over it, and then the fur directly over that. I will be employing the same method for his upper arms, though I may need a thin layer of foam up there, or a slightly wider EVA/plastic skeleton since his upper arms are larger than normal.
A major issue in terms of matching the character exactly, is the upper torso. The design is very exaggerated, and it can be looked at either as that he has a very large chest and back, or a very thin waist (or maybe a mix of both). To get the most out of what I have to work with in terms of placing this design on a human who needs to move their arms, I’ve extended the vest out as far as I think is possible underneath the arms to get that large chest area while bringing in the vest as much as possible around my waist with as little foam as possible to hopefully help to exaggerate those features.
I will also be extending the fingers using the claws and some foam around my hand. The character has very long arms, and while I won’t be able to get them as long as they are in the game without sacrificing the use of my fingers, I can add as much as possible to help get there.

The Electronics
The electronics won’t be much different from what I have installed in Tesla until a little later in the project when I will be installing an Arduino for music capabilities. Since I haven’t worked much with Arduino’s or C++ code, I’m leaving this part out for a while and using one of my old unused soundboards to swap out later. I’ll still be doing all the wiring in preparation for the Arduino installation however, so I won’t have to open up the suit again to make changes.
What the setup will basically be is a soundboard with the Obstagoon cry installed on it, and a button in the side of his left hand to trigger it with his thumb. The speakers will be set up in the spikey fur on his shoulders, and I will install the soundboard and battery pack on the inside of his “vest” for easy access. I will also need a few quick disconnects so I can remove the left arm from the rest of the suit and also get in and out of the suit without pulling the wires.
For the future music system I will install a button in each spike of his arm, one for play/pause, and the other two for back/next and probably leave these disconnected until I get the Arduino set up (possible I may use the play button for basic Pokemon music in the beginning but we’ll see).
I’m also going to add two fans inside the neck to help cool my face. Even though my face won’t be entirely covered as closely as a regular fursuit, I will be wearing what is basically an EVA foam helmet inside so it will be nice to have some form of air movement, especially since the main vent and visibility (his mouth) is going to be fairly far from my face and I’m not sure how much I’ll get out of the buckram diamonds in the side of his neck.
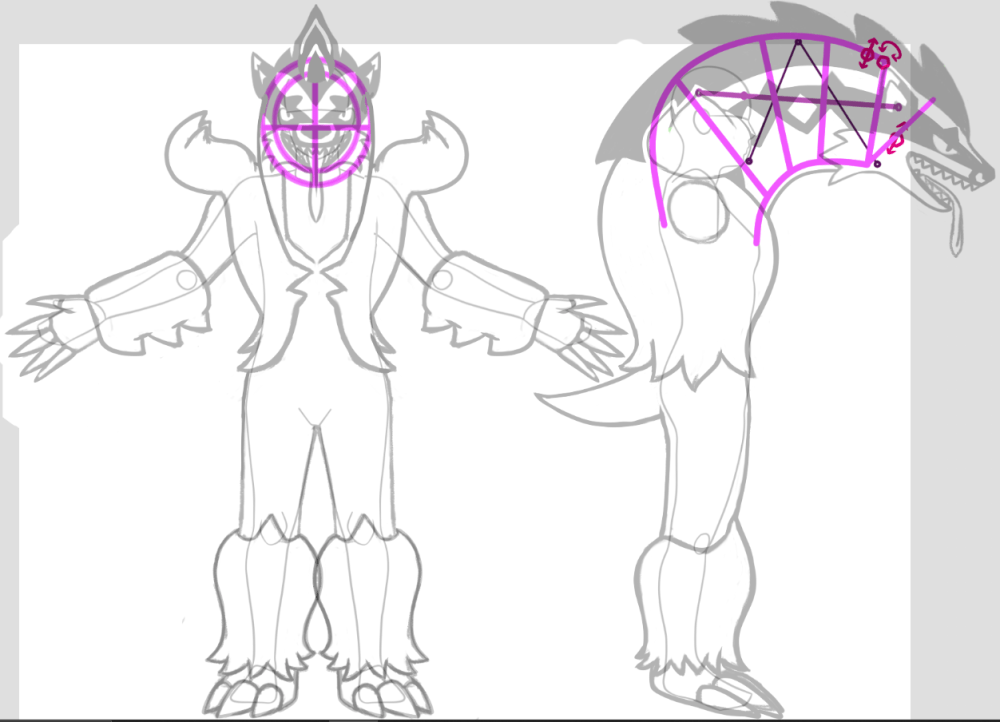
The Neck and Head
Ah yes, the most complex part of the suit. This is the part I expect to change the most in terms of inner construction when compared to my schematic, as I try and discover things along the way. It’s nice to have a basically working prototype though, which I’m slowly replacing pieces of to convert it into the final piece.
The rings of the neck are EVA foam at the moment (at the time of writing this I’ve been working on converting the prototype already to supply some WIP photos), but I was considering for a time making them out of plastic. I didn’t think this would give me the support I wanted though, so I’m going with EVA reinforced with plastic instead. I may do the same thing with the spine (upper segment) but not reinforced. Not sure if I want EVA for that or just a strip of plastic yet. It should be slightly flexible, hence the lack of complete reinforcement.
The back part of the neck and spine/under-spine (not sure what else to call it but the line along what is his throat I guess) are attached to the harness for support, and I will slowly be applying plastic over those EVA pieces for stability.
Nothing at the base of the neck has to move much except for a possible length support I may put stretching out toward the head (the metal piece in the original prototype photos), but realistically the neck should pivot at the base of his head (somewhere just behind his ears). So I will be adding a hinge there of PVC sheet plastic and a screw post for mobility there to bring some movement to it. I may also leave a gap around his throat (underneath the fur on his cheeks) to allow for better movement. Basically an area where the fur will be separated so the movement won’t have to fight the fur or foam except around the top and sides of his head. This shouldn’t be super visible in most cases and I will slightly overlap the fur to reduce visibility in the event someone is able to see underneath his head.
Along with the outer rings to help shape and support the neck, there also needs to be an inner support system. This will help with general integrity of the neck, and, for example, if someone touches or hugs his neck firmly, it shouldn’t collapse on itself or move around too much. To do this I will be adding EVA dowel cross pieces to the inside, probably 2 or 3, and probably reinforced with plastic again (the dowels are still fairly flexible which I don’t want for this). Some of you may wonder why I wouldn’t use thin PVC for this, but even thin PVC is heavier than you’d think when used in places and builds like this, so I needed something lighter for less strain on the harness and wearer.
Head and Neck Movement
You’ll get your answers for the weird helmet drawn on the inside of the neck now! Besides the helmet you’ll also notice in the above image that there is a dark purple line from the helmet to Vandal’s head and an even darker line attached from the helmet jaw, up to the inside upper spine of his neck, and then to the base of his jaw. This will be my system for getting his head and jaw to move in relation to my own from inside the suit. I’ve already experimented with this system for the prototype and have a lot to say about how I got it to work but I’m going to save that for later when I actually get to posting about it specifically. Basically the jaw will work on a cable system, and the head has up/down and left/right hinges which sit behind where the head braces are attached to allow for movement. This still has some tweaks to figure out (mostly what happens when I’m not wearing the suit; it slumps and I don’t want that to break something eventually) but I’ve almost got it to a point I’m very happy with! Again this will be revisited in more detail later; stay tuned!
Claws
I’ll be trying out a new method for making claws this time around, I’m not sure how well they’ll work out in terms of durability but that’s why I’d like to try it! People that know about costumes (especially fursuits) know that rigid claws on the feet, when placed at the ends of toes, hit the ground when taking steps and thus get horrible scuffed, worn down, and can also break. A lot of fursuit makers have either resorted to making vinyl or other fabric claws that resist scuffing/breakage because they’re soft, or place claws up at an angle so that they won’t hit the ground, but this is usually unrealistic and strange looking (a method I used myself for many years and was never really happy with).
As an experimental new method, I will be using a mix of materials such as EVA foam and foam clay sealed with Plasti-dip and flexible paint. I feel like making claws with this method might take longer than what is desirable (especially if it’s ever for a time constrained project), but we’ll see. If the method doesn’t work at all, I have some grey vinyl I will use for the claws instead.
Final Thoughts
I think that’s it in terms of planning and I’ve shared with you what I have of the prototype so far. I’m leaving out the simple parts such as his teeth and tongue, which will be covered more when I get to them but don’t require a detailed explanation here.
Next post, I will be continuing to work with the prototype and swapping out its cardboard pieces for the final materials while also building out the harness. I expect most future entries to be far less wordy than this, and with much more interesting photos. If you’ve read my dev log for Lost Hours you probably have a basic sense of how I post updates for projects; this one should be similar. I try not to be too boring 😉
If you have any additional questions you want answered please feel free to comment!
